Showing posts with label tile press. Show all posts

Thursday, September 15, 2011

Border Wars


 "Look Ma! I'm jumpin' outside the lines!" 
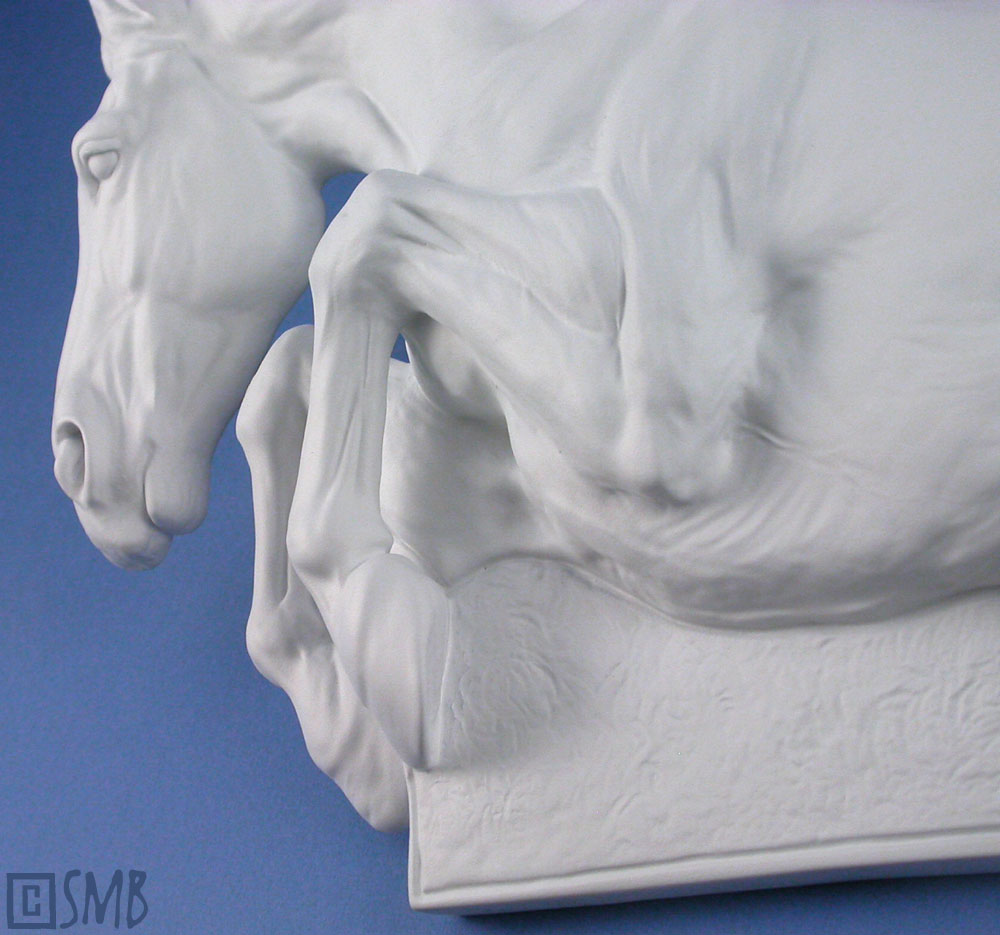
(a snippet of a Jax plaque)

It's against my nature to do what I'm told. Something deep down makes me rebel against boundaries, being told what I can and can't do. I don't know...maybe it's because I prefer to do things my own way, or it could be that I want to win my own triumphs and make my own mistakes on my own terms. Doesn't mean I can't take orders if I'm inspired to follow, but most of the time I dance to my own drum. Then again it could be that, as my husband lovingly observes, I'm just a brat. 

But being a brat isn't always compatible with art, especially when it comes to standardized formats. If you're familiar with my previous bas-relief work it's clear I don't like to sculpt "inside the lines." To me the boundaries of the edging shape are meant to be toyed with playfully, being a suggestion rather than the rule. This not only results in a better design, but it opens up design possibilities otherwise unattainable. So if a wisp of mane, twitch of an ear or a flick of a fetlock need to pop out more -- no problemo! Just do it.

But this idea cannot be applied to tile cutters. These things are designed in specific, industry-standard shapes and used to cut the clay slab into pre-sized portions for tile pressing, just like a giant, spring-loaded cookie cutter. 

Here are some of my trusty tile cutters to give you an idea of what I mean by "cookie cutter." While they're worth their weight in gold in terms of handiness, they do force a limitation on design. The trick is to interpret the limitation as a positive -- because in the long-run, it is.

Now I could sidestep this issue altogether and slip-cast everything, but the problem is time. Tile pressing is faster and less labor intensive whereas slip-casting requires quite a bit of baby-sitting and delay during the casting process, plus the cleaning up of mold seams. If I want to keep my gift ware affordable and keep the process easy enough to maintain inventory (and evidently the ease of tile pressing is a challenge even with that this year), I'm forced to rip down the time required to finish a single item. The less time my hands are on it, the more affordable I can make it and the more of them I can make, but that cannot be achieved with slip-casting when I'm the only one doing all the steps.

I think this is the #1 mistake artists make when trying to make a living at art: they don't understand that their time is everything. It's all they have. Every moment of every day is an essential building block to success, and no amount of talent, drive, or business savvy can compensate for misused time. The moment an artist doesn't treat her time like a finite resource is the moment she's out of business. Making a living at art isn't only a passion -- it's a discipline.

What this also means is that thinking beyond the boundaries of a project is beneficial more often than not. Many years back, I took a workshop with Veryl Goodnight (with my buddy Lynn, a trusty workshop-mate), an artist I greatly admire. In her gentle shrewdness Veryl conveyed to us lessons perhaps more important than those imparted about sculpting, one of them being: maximize your time use. You spent time, skill and energy creating that one piece -- so is that where it stops? No! Rethink, reuse, reapply! Whatever other application that piece can be adapted to is in your best interest. It can get your work into more hands, it can open up new opportunities and partnerships, and it can ensure greater financial gain to allow you to continue to create art for a living.

All these years later I still remember this smart sense and have begun applying it to my gift ware and collectibles in earnest. By maximizing the possibilities for a single bas-relief or stamped tile design, I'm essentially maxing out every minute and iota of energy I put into creating it in the first place. I'm literally completing multiple pieces at once. 

So...back to bas-relief and boundaries. The rub with tile cutters is their fixed shapes which don't allow for all those fun pointy-out bits outside the "parent shape." Rubbing salt into the wound, installations and all tile accoutrements are manufactured along those standard shapes so unless I want to spend a mint on commissioning custom-made tile accessories (with an accompanying lofty retail price), I'm stuck with the limited dimensions of the cutters. Like a stinging game of dodgeball, I have to stay inside the circle...or square, or rectangle. Oh snap!

 
 Here's my Feral Mare medallion in cold-painted resin (top), my Reflective plaque in glazed slip-cast earthenware (middle), and one of my new CubequinesTM in original oil clay (bottom). These pieces demonstrate what I mean by "sculpting outside the lines" with design portions that pop out beyond the oval, circle or square, respectively.

This reality makes me chomp on the bit like a snarfly pony. Poofy-haired and pudgey and oh-so irritated. It's also immensely difficult design-wise. For me to create a design that plays nice within the lines can take almost twice as long as one that doesn't simply because I don't have the cheat of busting through the boundary.

This border war may not seem like a big deal, but when it comes to bas-relief or stamp design, it's pivotal. What makes this art form so intriguing is its unique blend of sculpture and flatwork. It's basically a 3D painting. As such, it's best approached as a painting (for bas-relief) or graphic design (for a stamp) rather than as a sculpture.

So actively employing concepts about composition, positive or negative space, narrative and line so fundamental to flatwork really help. Indeed, they can make or break a piece. No amount of technical finesse, popularity of subject matter, or novelty of an idea can make up for compositional errors, just like with flatwork. In short, a horse head on a flat background with lots of empty space isn't the way to approach it. Bas-relief isn't about the subject, it's about the design.

And when it comes to the design, the outer border, or shape, determines what you can and can't do with the piece in future applications; it dictates the versatility of the piece and mandates production methods. So if I want to invest my time most efficiently, which is imperative with this kind of work, I need to create a shape that has the most potential, able to be applied to all kinds of casting and projects. In other words: I have to do what I'm told -- I gotta sculpt within the lines. Argh! Leave it to clay to put me in my place. 

The reason I bring this up now is because of two new Unicorn bas-relief tiles I'm working on, a matched pair with a moon and sun motif...

Here's the first incarnation of the moon design (very roughed out), with all the sticky-outy parts so typical of my approach. I really liked this draft. A lot. Then Veryl's words rang in my head. I realized this design would force me away from tile pressing, the very thing that was my primary intention for this set. I had to bite the bullet and redo it to fit into the 4.5" circle dictated by my circle tile cutter.

Voila. Here's the retweaked design (still very roughed out). I wanted to make the Unicorn as large as possible while avoiding "kissed" borders or gobs of empty space. The way I got around that was to add another circle, in this case a border, to let me poke parts out while still remaining inside the parent circle. So I got to lob some teaser shells at the boundary while still playing nice. "Does this bug you? I'm not touching you!" And, ultimately, this is a stronger design and far more versatile. I figure the Unicorn has universal appeal, so it would be unwise to limit its potential simply because of design.

Over the course of the next few weeks, I'll document the completion of these two designs in oil clay as well as their pressed ceramic production, plus how I adapt them to different projects. Along with stoneware and earthenware, me thinks porcelain is a definite must. But they're also destined for resin casting and perhaps metal later on. Most of all, I've got my eye keenly fixed Glasclay. Can you imagine these in glass?! Swoon! And all thanks to embracing boundaries.

Now all this doesn't mean that I'll be creating bas-reliefs only in these standards shapes from now on. Only selected ones. I have a workaround for the odd balls, and one I'm quite excited about. But I'll leave that for a future blog post when I actually implement it. The beauty of this workaround though is that it allows me to adapt any shape to any standard tile accessory, but since it requires an investment of more time, resources and energy at the back end of production, it's ideal only for specialty items. Anyway...back to the work bench!

"And this is one of the major questions of our lives: how we keep boundaries, what permission we have to cross boundaries, and how we do so." ~ A.B. Yehoshua

Share/Bookmark

Thursday, December 30, 2010

Christmas Crammed Down My Gullet

Big Al crammed full of Christmas...and I quote, "It's delicious -- thank you!" NOM NOM NOM!

It's hard to believe that Christmas 2010 has past and we're cork-screwing into New Year's Eve and 2011. One part of me is eager to start the new year, and another is hesitant to acknowledge another year has gone. My head generates so many ideas for projects and every year my calendar becomes more crammed -- and frantic -- as I try to materialize them. And 365 days never is enough time! 

However, one of these wild ideas did find fruition this year -- the new annual porcelain Christmas ornament, which was a huge success that exceeded my expectations! And as promised, this post delves into a behind-the-scene look at the total pandemonium processes behind the creation of this piece.

I had planned to use the high fire porcelain (Cone 10), but a very knowledgeable, helpful gal at my local potter's supply recommended a low fire (Cone 5) porcelain clay (one that many doll makers use) because it takes to press-molding better. So I went with her suggestion, and boy am I glad I did! Thank you Potter's Center! But before we start, there are a few things you may need to know about porcelain to understand the intimidation-factor of this project...
  • Porcelain is unlike other clays in both composition and behavior. I've never used it before, so it was like getting to know someone who's really really touchy, really well and really fast!
  • It becomes vitreous when fired to maturity, which means that water cannot penetrate it. (And neither can glaze, which is why porcelain needs to be glazed after its Cone 04 low-fire stage. But since I decided to leave the ornament bisque, I skipped that stage and went right to Cone 5.)
  • Porcelain has "memory" -- like an elephant. It means that how ever the clay is twisted, smooshed, tweaked or torked while its being de-molded or worked, it will remember that in the fire...even if you fix it before you fire it (though I have an additional theory, which I'll share later). It's definitely the antithesis to WYSIWYG! This is the primary reason why porcelain pieces are expensive -- warping and other flaws caused by this memory result in a 30%-50% loss rate. This means I had to press twice as many ornaments as I wanted to get for the edition.
  • Porcelain is "sticky" -- like soft butter, unlike earthenware or stoneware, which are more dough-like. While this feel is delightful, it does present new challenges for getting it out of a press mold! I'd pondered and cogitated and pondered some more on how I was going to lift these puppies out of the mold without distorting them...until my good friend Barb gave me a great tip -- which I'll share in a bit...
So as you can see...porcelain was a new frontier for me. But wait -- there's more! On top of this, I'd never designed a bas-relief for press molding, I've never made a press mold and I've only once pressed clay into a mold (at my buddy Lynn's studio during a fun tile pressing hands-on demo). This means I was a total newb to both porcelain and press-molding. But like most things I do in my life, I jump right in head first with literally no idea of what I'm doing. I figured I'd learn on the fly, and the good news is -- I did.

But that's not all! On top of all that, all clay has to be totally dry before it can be fired. During summer here in Idaho, that usually translates to seven days of drying time. But because it was winter and the ornament was thick, they would need at least 10 days to dry before they could go into the kiln. And ideally that would be 14 days -- two weeks! And here's the kicker: Christmas was just over three weeks away! Plus, I had to get these puppies in my Etsy store at least five days before Christmas to account for shipping! There was no time to make mistakes or dawdle -- it was full speed ahead and be-darned those torpedoes.

So either this project was going to be a happy success or an epic failure. But I think it's important to take risks every so often because sometimes contemplating a project too much can create a kind of inertia. More often than not, just flinging yourself into the fray gets the gears going out of sheer panic  -- and that's more potent than caffeine, lemme tell ya.

So now that you have a bit of background on the utter lunacy of this project, let's see the highs and lows of that learning curve...

This was my world in December.
 (1) Sir Squish, my tile press, (2) one of the eight plaster press molds I made from my oil clay original, (3) a pug of porcelain clay, (4) talc (or baby powder) to use as a mold release agent, and because the porcelain vitrifies, it doesn't absorb the talc so it dusts right off after the Cone 5 fire (if we ever meet and I smell like a baby, you know I've been pressing clay!), (5) the 2 x 4 inch clay cutter, which works like a fancy cookie cutter, (6) clay slicer, to cut slices of clay off the pug in uniform thicknesses, (7) my slab roller, Smasher, and the slab sheet (the piece cut from the pug is placed between the sheets and rolled through the slab roller, which does three important things: It squishes the clay particles into new orientations, thereby creating a kind of "blank slate," it makes that slice of equal density and it makes that slice the thickness I need), (8) the brass tubing I use to quickly punch in the hanging hole at the top, (9) the cotton batting placed over the pressed ornaments before the next dry board is placed on top of them, and (10) the plaster drying boards, or "flats," used to apply gentle pressure to the pressed clay to keep it from "potato chipping," and to suck moisture from the clay to expedite drying.

Here's the clay after it's been run through Smasher, and I'm cutting it with the clay cutter. Had I been thinking, I would have designed some stamps or molds to use up the small pieces left over (a mental note for the future), so all these scraps went into the dump bucket for later use (how I long for a pug mill -- someday!). PAM® made a handy release agent for the cutters because, remember, if the clay stuck to the cutter, it would tork when coming out and cause that "memory" to kick in. What was nice about the PAM, too, was that it smelled like I was baking cookies in the garage! Anyway, on a good sheet, I could get eight 2 x 4 rectangles, and with those numbers, I used up all five of the porcelain pugs I bought.

Then the mold is dusted with talc with a soft brush and a rectangle is placed into it carefully (so as not to bend or curve it). Unlike stamping, in which a mold is pressed into the clay, press-molding presses clay into a mold. This means that I can create sculpted 3D surfaces with press-molding, like a real sculpture with "infinite layers," whereas the stamps are just a flat surface with a second layer stamped into it, or more 2D.

 
 Then a piece of cotton cloth is placed on top and a "pressing board" is placed on top of that. The cloth prevents the board from sticking to the clay, and the board ensures that the clay is truly squished into the mold. The board needs to be just inside the rims of the mold, which makes sizing it a bit tricky. Luckily I was able to buy some wood molding at Home Depot® that was the right width, so all I had to do was cut it to the proper length.

DOH! I pressed too hard -- I broke my first mold, on my first pull! It's easy to forget that all the gears inside the press exert exponentially more pressure than what's used to pull the lever down. At first I took this as a really bad omen, and almost abandoned the project before it ever got started -- but then I realized that the mold "gods" required their sacrifice, and what better than my "first born"?

So I grabbed another mold (thank goodness I made so many) and started again with a lighter touch this time...and voila -- it worked! The very first pressed porcelain ornament!

However, I didn't like how the cloth imprinted its texture on the back of the ornament because it interfered with the clarity of the stamp I used to imprint my information onto the back. So how to create a smooth texture? I certainly couldn't smooth out all the backs of the pressed ornaments because not only would that take too long, but it risked soaking the clay too much and torking it. What to do? Bingo! A piece of stiff plastic in place of the fabric!

If you look closely at the tiles on the right, you'll see the fabric texture. On the two tiles on the left, you can see the desired result created by that plastic piece.

 
 Now I was presented with the puzzle of how to get the piece out of the mold -- you can see what a tight fit that is! And remember, I cannot bend or twist it to get it out -- it has to pop out in one perfect ejection. I'd thought about using my air compressor and airbrush to blow air into the mold to pop it out, but if the ornament caught anywhere in the mold, I'd end up with one big torked mess destined for the dump bucket. I needed more control. Lucky for me, my friend Barb visited earlier that week and we talked about my problem. Now she'd taken a porcelain tile making class and revealed The Great Solution the teacher taught her...use "buttons" from the pug to lift the piece out of the mold! Also luckily for me, I quickly realized that I designed my bas-relief perfectly so there were no undercuts or areas that would "catch" the piece as it was being lifted out...phew!

 
 I used two buttons created from the scraps left over from each cutting. I dampened their bonding surface slightly with water and gently pressed them into the surface...just hard enough to create the necessary bond. Clay loves to stick to itself when wet, so that dampness created just the right amount of suction to hold onto the ornament without being permanent. I quickly found that the fresher the buttons, the more effective they held, so I just kept using those scraps created by the fresh cuttings of each slab. The old buttons simply went into the good ol' dump bucket. It took a bit of time to learn how to squish them properly, so some of the early ornaments had stronger button imprints than later ones. Working with clay really is learning the seemingly infinite "sweet spots" it demands. Interestingly, I learned that each pug was slightly different, too, presenting a new set of sweet spots. Working with mud is about being responsive and flexible to the needs of the clay -- you really can't strong-arm it. It dictates to you, not the other way around! But this actually is refreshing, since I have full and complete control in all my other creative endeavors. It's good to be humbled and submit to the will of mystery.

 This technique allowed me to lift the ornament out of the mold with ease, quickly and without torking! But I had to concentrate in order to keep my two hands at equal orientations, so as not to bend or stretch the ornament while pulling it from the mold, and to transfer it flat onto the batting. After a few dozen times of doing this, it gets harder and harder...especially as those clock arms tick ever closer to the wee hours of the morning!

Here you can see an ornament about to be lifted out, along with those waiting to have their backsides cleaned with water. It takes just my finger and some water to smooth out where the buttons were. Inadvertently, I learned that if I let the ornament sit in the mold for about two minutes, it lifts easier, often just popping out. So while ornaments waited to be untombed, I cleaned up those previously de-molded.
 
 So right when I was all puffed up over my brilliant design savvy, I realized my ornament had a big design flaw -- it had beveled edges. I was accustomed to designing bas-relief for slip-casting, and a design with beveled edges pulled better from a slip-casting mold than one with straight edges. However the reverse is true for press-molding! Getting that clay to squish evenly to those wide-spread edges became a real headache, and I decided that the press board just wasn't enough by itself -- it needed help. So I began all sorts of configurations with bits of cardboard, as you can see above. I finally ended up with #4. What was particularly troublesome was that not only did each pug behave differently during the press, but also each mold behaved differently! I can't explain why, but each definitely had a way it wanted to work best. To complicate matters, each mold can only be used for about 15 pressings at a time, otherwise it gets too wet and begins to tear the clay, so I'd have to switch to another mold to keep the pace going. All this meant my brain's memory chip was working over time between the seven molds to remember which mold wanted things which way! I suspect if anyone had been watching, they'd have seen steam flow out out of my ears. Now had I been smart, I would have labeled the molds and written down notes -- but when it's 2am and it's your third night of sleep deprivation, you just careen forward...flailing.

 The reward: A flat full of beautiful pressings! I figured I needed at least 200 to achieve my goal of 100 sellable ornaments. I ended up with about 280, or about 10 flats. I expected to lose about 50% during the fire, but I also had to figure in another 20% loss during the drying and cleaning process. The thing is you don't know what you can and can't rescue until you've actually cleaned a few -- so during the pressing process, you save whatever you can. And sure enough, I lost a whole lot as I cleaned them -- good thing I pressed so many! But yes -- all 280 of those ornaments had to be cleaned by hand...removing all the little imperfections in the mold, smoothing the edges and tidying up the holes. That took a couple more days and nights of sleep deprivation -- blorg! One day, I'll have a series of wheeled racks to hold all my flats in stacks, but until then I have to stack them on the garage floor. Now the problem was that during this week, we had freezing temperatures and this porcelain clay cannot freeze since that would hose up the water particles in the clay. The solution? Stack all the flats in the house! So for nearly two weeks, the house was inundated by both Christmas and ten cumbersome flats stacked randomly around the house -- wherever I could find room! Poor Hubby's man cave was overtaken by six of them! But at this point, he's used to personal sacrifice in the name of art.

 Brass tubing, which you can find in many male-oriented hobby stores, make excellent punches for hanging holes. They come in many shapes, and I like to use the circle, rectangle and teardrop shapes the most. Be sure to get the next size down, or some suitable instrument to push through it to pop out the clay, otherwise you'll never it out of there. And part of the fun is hearing the "pop" as the little clay pellet shoots out! I also recommend cutting them to about 2" and use a diamond bit with a Dremel® to create a cutting edge on one end.

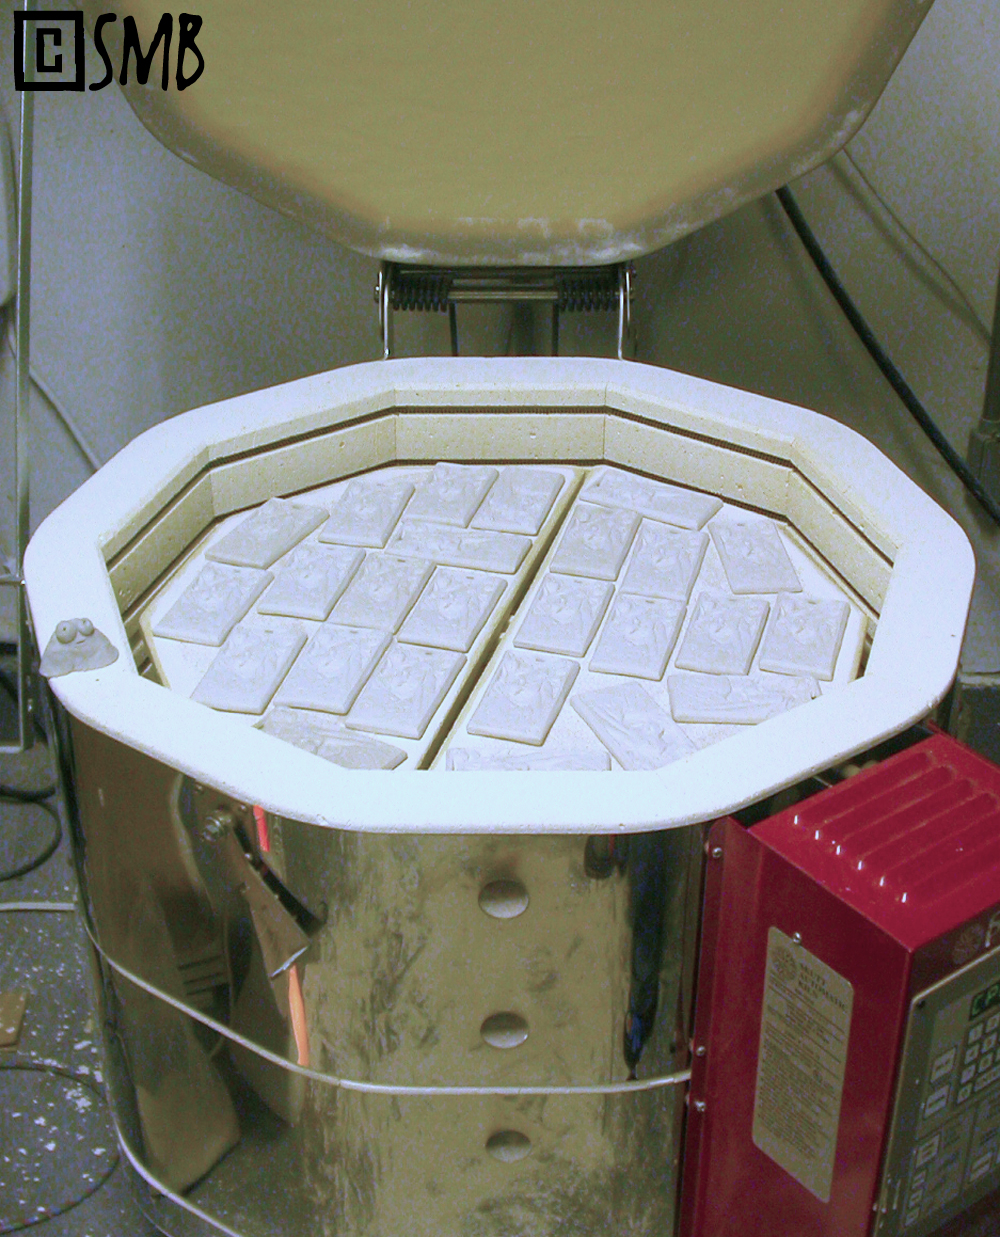
Happily, the ornaments dried a lot faster than I expected, probably because they were kept in a heated house. Now another thing about porcelain is that it shrinks as it fires -- a lot. It shrinks so much, in fact, that unless it has some sort of "slippery" surface on the kiln shelf, it can catch on something as it shrinks and destroy the piece. The solution is "doll sand," or fine sand spread on the kiln shelf that acts as little ball-bearings for the piece's surface to roll on as it shrinks (above). The sand doesn't melt, or get stuck in the ornament, either. So while I had Big Al packed tight with all 280 ornaments, with only 1/16th inch of space between them, when the fire was done the spaces between them looked like yawning corridors! It's like grown-up Shrinkydinks!

Between the bad pressings and those thrown out between drying and cleaning, my porcelain dump bucket was almost full! There's easily 100 rejected ornaments that met a soggy end in that ol' bucket.

 
 The first initial slabs were too thick, so I just stored them in a baggie separated by plastic to use later for my stamps. What I love about mud is that so much of the materials can be recycled or repurposed. To use up even more from the onset, I'm going to create new stamp designs that can be applied to the little scraps from the cutting process. They can be turned into neat magnets, zipper pulls or even jewelry.

 
 Suffice to say, the wait to open Big Al was torturous -- was this going to work, or was it a big waste of time?! Perhaps it was beginners luck, but WOOT -- I opened up Big Al to a kiln-full of beautiful ornaments! I cannot describe the sense of elation at seeing that big gaping maw full of all my hard work, glistening and lovely! Now I had to sort through them to pick out the best ones, and throw the rejects away. But to my astonishment, I lost only about 30% to warping! This allowed me to be really picky choosing the edition's denizens, and left some seconds for me to paint later, which was an unexpected bonus. It also told me that my methods worked and porcelain wasn't to be feared!

 
 Now came the fun part -- packaging! It was a treat to pick out just-the-right ribbon, and whip together something that looked nice. It took one long day to tie on the ribbons and get everyone packaged in their bags -- then the next day I uploaded them to my Etsy shop!

Now regarding that additional theory about porcelain's memory -- I wish I'd taken photos as proof, but I'm not convinced that all warping is due to handling, at least in my case. In order to get Big Al stuffed with all the ornaments in one fire, I resorted to using  many of my broken shelves and half shelves, jigsawing them together to maximize space. To my surprise, I found that along the seams, where the heat's convection rose and churned like volcano vents, was where most of the warped edges happened! In fact, I'd say about 80% of all the warping I had was along those convention vents. In contrast, all of the ornaments in the middle of the full shelves -- without exception -- were perfect. This leads me to believe that a new strategy may be instructive next year, implementing these changes:
  • Using only full kiln shelves
  • Keeping the ornaments centered and away from the edges
  • Running two firings instead of one big one
So we'll see. All in all, this project wasn't only challenging and fun, it was instructional on many levels...some of them personal. And while it often was hair-raising, and sometimes maddening, it was a true labor of love.  Though I was exhausted and zombified from a lack of sleep, I relished every minute. It also started a passionate love-affair with porcelain -- I am in love with the stuff! I cannot wait for next year's ornament! And I'm eager to apply what I've learned and see where I can refine and innovate.

As for the series, I decided to stick to the 2 x 4" shape not just to create a coherent collection, but the design challenge of using that fixed space in new ways is just too irresistible. Again -- why make things easy? The fun stuff happens in the daunting, unlikely chaos! Though I have to admit, looking back, I can't believe I got it all done...what was I thinking?!

Next time, I'll show you my new stamps and how I made them! So until then...from all of us here at Minkiewicz Studios...HAPPY NEW YEAR! MAY IT ROCK!

Now...for some sleep.

"You need chaos in your soul to give birth to a dancing star." ~ Friedrich Neitzsche

Share/Bookmark

Friday, December 17, 2010

Jumpin' for JOY!


My radio silence the last couple of weeks was due largely to this yuletide tidbit (above). So ta-da! -- I'd like to introduce my first annual Minkiewicz Studios Christmas ornament, "Joy"! It depicts an exuberant Arabian mare cavorting about to the ring of jingle bells. They're a limited edition of only 100, and  are available now in my Etsy store.

This piece represents many "firsts" for me: First use of porcelain, first pressed clay piece, first finished edition from the studio, first use of my 2 x 4 inch tile cutter and first in a new annual series. Every year I hope to issue a new addition, featuring different breeds and themes. Like this one, they'll all be cast in beautiful porcelain and this same shape, and left bisque because I think that really showcases the bas-relief and the clay so beautifully. That makes the collection coherent, too, and more fun for me since it presents design challenges for that 2 x 4 inch space.

I'll be documenting the creation of this edition later in the week...but until then, I have to get tangled in wrapping paper!

"Don't shirk away from challenges...keep reaching for that star, that sky." ~ Rick Moore 

Share/Bookmark

Friday, October 29, 2010

Setting New Sights

My new studio glasses -- bold and colorful. 

This past year as has been...interesting. If it could be distilled into one word, it would perhaps be "transformation." 

First of all, I sat down and took stock in the studio and decided what needed to be pared away, jettisoning such stand-bys as my sculpture critiquing service, several art forums, and my repair service. I simplified my selling methods, dumping those that entailed high transaction costs and excessive office work. I  also decided to put my books on hold -- the pile of articles I've written over the years fills that gap. I even resigned as editor of The Boat. 

I need to refocus on my own career. There are several goals I've been putting off for far too long, such as bronzes, my ideas for teapots and developing my giftware lines. I've also adopted new goals, such as designing a jewelry line in PMC, construction-grade tiles and cast-concrete garden animals. And I have my ever-present line-up of half-finished sculptures and paintwork that have been demanding completion. It's time to finally buckle down and get crackin'!

But perhaps the biggest metamorphosis has been my husband's employment. He recently graduated from two years of training in a brand new field, and after a rather challenging time finding a job in today's economy, he landed one here in town...a good one. All this is still sinking in. The thing is, this whole matter has been quite stressful because it included the prospect of shutting down the studio for a move, or perhaps permanently shutting it down if I needed to find a job that offered a more regular paycheck. So to say I'm relieved would be quite an understatement! But this is definitely a new chapter in our lives, both exciting and a bit intimidating, but what's life without a bit of adventure?

As a metaphor for all this, my eye sight has changed. I've been nearsighted all my life, but as age sifts down upon me they're starting to reverse. I'm also having to take my glasses off to see up-close work! So I got a new pair of "everyday" glasses with the  new prescription (above). Now I usually pick frames that are quite discreet, like tiny wire rims so the glasses become more inconspicuous. But in keeping with all these transformations, I decided to pick something completely outside my comfort zone. Something a bit brazen and unapologetic. Something that made a statement. So I did -- and I love them. I guess when you live for two years in deep anxiety of what your future would  hold, when you come out the end of that dark tunnel and into the light, you want to kick up your heels. You're a bit more audacious. A tad more cheeky. And that's good.

In keeping with that, I've launched a new project I hope to turn into an annual Christmas tradition for the studio: A limited edition Christmas ornament. To be bolder still, I've decided to make it my first pressed-tile venture, and pressed in porcelain, no less. Three brand new things that (hopefully) will go better together! Each year will feature a new horse design and I plan to limit them to 200 (optimistic) or 100 (conservative) casts to be sold exclusively through my new Etsy store. I intend to keep the ornaments as bisque (unglazed) white porcelain because I like that look, but I'm considering adding gold or silver accents in overglaze. We'll see. Each will be about 2" x 4", or a snidge smaller because of porcelain's 13% shrink rate. Let's see if I can pull this off in time for Christmas! Keep yer fingers n' toes crossed!

So here's a peek of the inaugural first design, a beautiful Arabian mare showing us her spunk:

Joy, 2.27" x 4.57", original in oil clay. A slit will be cut at the top, between the border and the sculpted ribbon, while in the greenware stage so that a ribbon can be run through it for hanging after firing. I'm thinking about accenting the star in gold overglaze.

So with all these changes, I hope to finally start moving forward with all that's been brewing in my brain to transform the studio into more productive creative kitchen. Time to stir the pot!

"A wish changes nothing. A decision changes everything." ~ Anonymous

Share/Bookmark

Tuesday, December 15, 2009

Stampin' to Siouxsie


Just when you think you're totally rad, something occurs to you and you realize you weren't rad at all. Not even in the vicinity of radness. Your Rad-O-Meter reads zero. Heck, it's not even turned on. Instead, you see you've been an utter and complete dork. A dufus of the highest order.

I had one of the worst nights Sunday night -- my neck, shoulders and back were locked tight and the pain kept me up, well, pretty much all night. All of this due to hand-stamping. With this unignorable result, I knew there was no way I was going to survive my own idea. The quote came to mind from The Mincing Mockingbird, "My Personal Quest Would Have Been Much More Successful Had I Not Gotten Involved." And I have this piece hanging in my studio for obviously very important reasons. Anyway, I got to thinking...

Hey, I have a perfectly good tile press, why can't I use that? LO! YES. Cut the handle off the stamp with a hacksaw! Why not? Rather than pressing clay into a mold, why couldn't I press a mold into the clay? Out came the hacksaw and off came the handle. I zipped down to Potter's Center, got more clay and immediately dove in.

It worked. Beautifully! And with such ease. Nary a smidgen of pressure did the job! And what's more -- in a quarter of the time! In the time it took me to hand-press ten tiles -- about thirty minutes -- Sir Squish (my tile press) did in ten. BUCK A WAH.

Only a finger's touch does the job! I can sleep again! I got my tile press from J & J Mold Company and it's da bomb. Each one is hand made and works like a dream. It's geared, so the task of pressing is a breeze.


I've also gotten more proficient at rolling, so I'm getting more cut-outs from a single slab -- yay!


So I cranked up Siouxsie's Mantaray album and pressed away! I have all my Christmas tiles pressed in the blink of an eye, and now I can dive into sale pieces. But what irony! Though I now have plenty of clay and have the system down, I've run out of drywall boards! DOH! So I'm off to procure more. I suspect the next thing I'll run out of is space in the garage for drying. Oy.

"New ideas pass through three periods: 1) It can't be done. 2) It probably can be done, but it's not worth doing. 3) I knew it was a good idea all along!" ~ Arthur C. Clarke

Share/Bookmark

Monday, June 30, 2008

"I am living amongst BARBARIANS...."

Meet "Sir Squish," my new tile press, freshly mounted to my new custom built work table! He's named after one of my little Charmkins who was so large, gooey and mooshable he was hard to put down, and who was also grey, so it seemed a fitting name. Now I've long used those folding plastic jobbers for work tables in my ceramics area, but when this puppy arrived, he had to be bolted down to something more substantial, which meant enlisting my handyman to build this new hefty table for me. I'm so excited about the prospect of pressing tiles, I can barely stop thinking about it! Like I just needed a new swath of projects in my schedule, but when something resonates as clearly as tiles do to me, I have to act on it. I love combining the design challenges of graphic work and sculpture into narratives, plus adding "non-horsey" elements and art glazes....I get rather dreamy-eyed just thinking about it all. So many possibilities! So many new ideas to explore! So now I must experiment and tackle the learning curve that comes with stoneware clay and high fire glazes. Life is never static with ceramics! Amen. But if you see a mushroom cloud in the general Northwest vicinity, you know I got a little too ambitious for a newbie. Though I may end up looking like Wily E. Coyote after his Acme dynamite goes off, I'll have a big grin on my face.

Speaking of big grins, the title to this post, "I am living amongst BARBARIANS," is a quote Lesli Kathman quipped during the recent Mayhem. She had taught me to make genuine Southern Sweet Tea, with the proper brand of tea and cane sugar. The whole nine yards. My husband loves it, but I'm just too impatient to wait for water to boil (yes, I can be ridiculous when it comes to patience!). So what did I do for my own tea when she was here?---I whipped out the Lipton Instant tea and Splenda. She took one look at the Lipton and out popped that comment. Now it's stuck in my head, and I can't help but giggle every time my neurons replay it. I also imagine she's armed to defend herself against the Barbarians with her husband's trebuchet, which cracks me up just as much. I now have images in my head of an alternate universe Mayhem, with Lesli hurtling jars of Lipton Instant tea into swarming rabid hordes of rampaging Barbarians, with her dog, Emma, barking enthusiastically beside her, with Joanie quietly popping chocolate in her mouth, while her fluffy white dogs stare intently at her, and Lynn grinning ear to ear, with her cat, Aji, perched on her shoulder and her other cat, Chimayo, peering from behind her legs....and me covered in my bruxing rats and laughing hysterically.

Anyway....speaking of Barbarians, my German-heritage hubby is in Cheesehead Heaven, thanks to Stephanie Michaud. He's a Wisconsin native, being weaned on beer, brats and cheese, and even having worked as a lumberjack in his younger days (and yes, he has a Cheesehead hat to root for his beloved Green Bay Packers). However, he longs for the culinary goodness of that forested land, treats which Idaho apparently lacks. Such things as homemade sauerkraut, SunDrop pop, various handmade bratwursts and knutwursts and sundry sausages, and, of course, squeaky cheese kurds are all spoken of in hushed tones in this house. He and Stephanie waxed philosophical about the gastronomic delights of the Minnesota and Wisconsin area, something that went clean over my head at the time, never having indulged in the genuine article myself. However, I now fully understand the endearment to squeaky kurds since Stephanie overnighted three bags worth! Delish! Hubby has consumed enough cheese to plug up a mule deer, but lovin' every minute. Thank you Stephanie! And thank you Sonya for your fabulous cooking during your stay! Hubby still talks of your fajitas and chili with a wistful look in his eye, and if I even hint at some of your antics, he busts up in hysterical laugher. Antics you ask? Well, such things like THIS:
But you may be wondering why Sonya is in my kitchen! In June I was lucky enough to host Sonya Johnson (who was one of my bridesmaides in my wedding back in 2000) and Stephanie Michaud for a week of arty, horsey, foodie fun! It had been eight long years since I'd visited with Sonya last and it was fabulous to carouse with her again. It was very much like we just picked up where we left off, as though eight years simply never happened. It also was the first time I'd met Stephanie, though we had previously chatted through email, and I gotta say....it was like we'd known each other for years! What a riot! Then when Lynn was able to join us, I could hear the happy hummings of the cosmos again:
Ed Gonzales was supposed to join us, but alas, the scheduling was off so we'll have to wait for him next year (we hope!). We ate a swath through Boise, and Sonya even cooked several wonderful meals for all of us, including homemade pizza! In the arty department, it was a whirlwind of ideas and raiding the local art stores! During her stay, Sonya and I had tried twice to make a plaster mold for her Bjorn relief sculpture, and both times we failed, honestly due to my inexperience. Much to Joan's amusement (and I think I can hear Lesli giggling, too, through the telepathic ether), I first entombed the rigid resin copy of Bjorn in a plaster mold...something I'll never do again, trust me. Then after breaking him out of the mold, we decided to pour a rubber flexible positive ("flexible" being the key word, here) and try again. It was my first time pouring rubber, and thank goodness for Joanie's guidance over the phone, Barry Moore's pouring demos, and Sonya's experience with such things, because we got a nice rubber positive of her lovely piece. Everything worked fine cocooning this green guy in plaster, until the last mold piece...the little ear piece (isn't that how it always happens?)! It cemented in there as sure as it was glued (yes--we did soap it!), and I had to chisel it off---dooooooh! After a consult with Joanie, she provided the probable cause for the sticking, which I'll be sure to remedy in the next pours. So while we failed to create a plaster mold for Bjorn, we learned a lot in the process and had fun, and now I'm confident not only to pour rubber, but to make my own three-piece relief molds, too. So Bjorns should soon be popping out of a new mold like spiders out of an egg sac. Here he is in his green glory, with his two "beat me with a clue bat" molds (Yes, Joanie, I can hear you snickering!), and sitting on top of his silicon mold Sonya previously poured:
Bjorn was a good "teether" for my next project, which is to make a rubber master positive, and rubber master mold, of my Feral Mare bas-relief sculpture, so wish me luck! Can you hear the circus music? Here she is "clayed up" and waiting for her green reincarnation:
Both Sonya and Stephanie also got to do a bit of glazing and greenware cleaning, and we three exchanged methods and ideas on cold-painting and sculpting, and anything else that tripped our triggers. Stephanie also showed the three of us some handy tricks in PhotoShop, a program that's better taught in person, than through a book. We even introduced Stephanie to Mystery Science Theater with special screenings of "Manos, The Hands of Fate," and the movie, "This Island Earth,". Manos, by the way, is easily regarded as the worst movie ever made, but made into a cinematic gem by the crew of MST! "Relax...it's a natural exfoliant!" The information stream and laughter was a happy resonance throughout the week, and we all look forward to next year! Playing in ceramics again also got me inspired to do more claybody customs, so I'm busily at work on more of those little guys for Joanie, Lesli and now this time, Addi Velasquez, too!

I've taken to these artist retreats far more than traveling to shows or expos because they allow us artists to relate as colleagues rather than competitors.
I believe it's important for us artists to remember who we are as people, and to nurture and maintain our friendly bonds more than anything else. In a career so often characterized by sequestered solitude in the studio, it's these visits that help me remember some important reasons why I do what I do in ways no other avenue can provide. I also believe that staying open to other creative points of view and staying in "learner mode" is essential for artistic growth and staying centered as an artist....and who better to learn from than dear friends who have something wonderful to share? The energy generated by this kind of dynamic isn't only potently inspiring and informative, but consummately satisfying, as well! I can't wait for Mayhem and JuneJuju 2009, that's for sure!

The competitive angle isn't always the best path towards improvement, and winning isn't necessarily the healthiest way to find fulfillment. I've discovered that the most satisfying experiences and achievements have been found in the company of good friends, sharing in their enjoyment and triumphs, and absorbing the good vibes and insights they shed in their joy. In this safe and relaxed environment, we can stretch our perceptions and become bolder in our paradigms, more eager to venture into unknown territory with a friend by our side. Our ideas become more flexible and varied, and our brains become eager for information and experience, in ways hard to come by in other avenues. I'm a firm believer in our own friendly classrooms, where camaraderie and laughter are the only grades, and discovery is the final test! And boy...those school lunches!

"Real learning comes about when the competitive spirit has ceased." --Jiddu Krishnamurti

Share/Bookmark
Related Posts with Thumbnails