

Brownie—big, medium and petite, or rather resin, earthenware, and porcelain. Besides the shrinkage, also note the different color tones each has…interesting!
And when I mean "awesome" I don't mean the kind of awesome associated with finding a $100 bill on the ground. Or finally getting that box chock full of brand new art supplies that just showed up on your doorstep. Or even when your husband buys you a pile of mongo–monolith Rice Krispie Treats "just cuz."
No.
I'm talking about the kind of AWESOME that warrants capital letters in italics and bold print. THAT kind of AWESOME.
As you may have surmised from some of my previous posts about my excursions into porc–e–land, my big goal has been working towards a full spectrum of slipcast works along with hand–built busts, bas–reliefs and full sculptures in this stuff…and last month I hit a major milestone. And not only hit, but hit spot on. I'm still giddy with delight. Can you tell? Is it that obvious? GOOD. Because it's AWESOME.
I kicked up the stakes this year by attempting the first full–body castings and claybody customs in slipcast porcelain. I actually poured the initial bodies—a Brownie, a Collier and a couple of Limericks—at Mudhenge 2012. I chose these pieces because they had thicker legs in relation to their mass, and that's important for reasons we'll get to in a moment. That said, I have to admit they languished for some time in the wet box before I could get to them. Fortunately, this didn't prove to be a problem thanks in large part to vitrification.
I started first with the Brownie. I assembled and cleaned him as usual, but left him unchanged since I wanted a baseline with this porcelain. As for the three minis, I tweaked them starting first with the Collier which got just a bit of alteration then finishing with the two Limericks who got the most extreme changes. I wanted a progression to make clearer deductions later. I used all the same techniques one would use with stoneware or earthenware, trusting that vitrification would melt everything together as I learned from the claybodied Reflectives.


This is the brand of porcelain slip I use. Other colors are made, which would be fun to explore.
But I did employ one extra step: burnishing. Slipcast porcelain dries very quickly. Honestly, it's not unusual for me to pour, clean, and bisque fire such a piece within 12 hrs during a hot, dry Idaho summer. That means by the time I get to the final stages of blending and refinement, the clay may be rather dry despite regular spritzing with a water spray bottle—and that spells cracks and lifting during the mature fire. It seems that vitrification can only do its magic if it has something to grab onto at that critical moment, and burnishing seems to give the parent clay "fingers" by truly mashing it together with the additions.
Because—yes—sometimes this step is needed despite wetting, scoring and slip, especially with large additions. To burnish, I used circular motions with just enough pressure and just a dash of water to mush and squish the two together without destroying things. It's essentially grinding in the edges of the larger added sections, those usually entailing the torso, hindquarter, and neck. You'll also want to do this with the edges of sections that were added to make portions longer, such as lengthening a neck, torso or leg. Any tool with a curved, domed smooth surface will do—I used the back of my favorite sculpting tool.
Because—yes—sometimes this step is needed despite wetting, scoring and slip, especially with large additions. To burnish, I used circular motions with just enough pressure and just a dash of water to mush and squish the two together without destroying things. It's essentially grinding in the edges of the larger added sections, those usually entailing the torso, hindquarter, and neck. You'll also want to do this with the edges of sections that were added to make portions longer, such as lengthening a neck, torso or leg. Any tool with a curved, domed smooth surface will do—I used the back of my favorite sculpting tool.

This is the spoon–like shape I mean—the back of this shape is really handy for all sorts of sculpting tasks. That's green vet wrap around the tool on the left to help my grip.
I also tend to burnish the area before I start sculpting in earnest because I want a good bond before I really get to work. Afterwards, I roughly block in the area followed by generalized smoothing (with water and a soft brush) to create a blank slate of sorts. Then I allow it to rest for a bit, just to toughen up and dry out enough to avoid becoming a mushy mess, and then I start my actual sculpting. Nevertheless, a lift or crack can erupt despite it all—it's rare but happens sometimes—but it's an easy fix: just add more slip, reburnish, resmooth and proceed as usual. As for delicate bits like legs, ears, tendrils and such, I've been able to burnish them as well, albeit not so aggressively.

Assembling the Brownie, who has a separate mold for his head and front legs, and the start of the long, sad, tedious series of breaks on the Dutch Draft Limerick.

The Collier suffered his share of breaks, too. It got to be ridiculous.
The Brownie went easy as pie. The Collier was easy, too, as was one of the Limericks. The other Limerick, however, was a real trick pony simply because I decided to input some really ambitious changes after he was dry. It was my own fault—I'd sculpted myself into a corner with him. See, I initially beefed him up to make him more like a Dutch Draft (as a study for Himmy). Fine—all great and dandy. But after I came back to him, I was completely convinced that he needed a longer back and forearms to synch better with his new proportions. Okay, that was tricky enough, but as it so happens I accidentally destroyed his already completed head while doing just that, forcing me to sculpt an entirely new one. From scratch.
And when we're talking 1:32 scale in dry greenware porcelain, piecing together a tiny pile of body parts, let alone making new ones, is a really dicey proposition. Not to be daunted though, I made his new head from a puddle of porcelain slip transformed into a consistency more like pug clay. To do this, pour the same slip onto a plaster mold to suck out just enough water to make it malleable like pug clay. Pull it up (be careful to pick out any plaster bits or debris) knead it, and sculpt accordingly. When leather–hard just hollow out those portions that are too thick to dry or fire safely. This is a handy trick for creating bases, new body parts or manes and tails, and I use it often.
And when we're talking 1:32 scale in dry greenware porcelain, piecing together a tiny pile of body parts, let alone making new ones, is a really dicey proposition. Not to be daunted though, I made his new head from a puddle of porcelain slip transformed into a consistency more like pug clay. To do this, pour the same slip onto a plaster mold to suck out just enough water to make it malleable like pug clay. Pull it up (be careful to pick out any plaster bits or debris) knead it, and sculpt accordingly. When leather–hard just hollow out those portions that are too thick to dry or fire safely. This is a handy trick for creating bases, new body parts or manes and tails, and I use it often.
But dry clay, and dry porcelain in particular, is really delicate. Being unfired, it's basically just dried dirt held together by the adhesion of its own particles, what we call greenware. Now because any ability to flex is gone, pressures, harmonics, or vibrations beyond its ability to withstand will then result in breaks. And since I'm so darned clumsy, the legs on this particular Limerick were flying off like shrimp at a Benihana. SNEEZE. Boink! HAND SLIP. Bink! KNOCK TABLE. Twink! HICCUP. Doink!

An in–progress shot of the Dutch Draft Limerick. You can see the repair on that one forearm, too. As you can tell, he got entirely new ears along with his new head. When I wipe something out, apparently I really wipe something out.
All that's fixable, of course, but fixes usher in their own problems all the same. For one, a break usually remains even more delicate an area, and so really precarious repairs should be done last just to hedge your bets that an intact piece will make it into the bisque fire. Or for another, you can do such a good job repairing a break that it actually becomes stronger than its surrounding areas, forcing them to break around the repair. I've found this to be a peculiarity with porcelain, which is exactly how I ended up with a conga–line of breaks up each leg on this Limerick, all of which then added weight to that structural column to exacerbate the likelihood of yet another break. It got to a point where I could actually hear circus music in my head.
Now if he'd been a larger piece, I would have sculpted and cleaned each broken piece perfectly and then reattached it (again, leaving the repair "for last"). But at 1:32 scale, this isn't only a logistical problem, it's a creative problem; the smaller the piece, the more necessary it becomes to sculpt in situ to maintain coherent anatomy and proportion. So after the circus music had played through its many loops, the final toll was at least three separate breaks on each of his tiny legs! It was like operating on butterfly wings. I didn't even dare breathe! Thank goodness Dutch Drafts have thick feathering, that's all I can say. But I was determined—one could even say obsessive—and this wasn't going to stop me. Being bullheaded does have its perks in art though, as it tends to add new troubleshooting skills to one's repertoire. You know what they say about necessity and invention…
For example, there's definitely a trick to working through a conga–line of breaks. Wet and score your surfaces as usual, but use the least amount of slip necessary to reduce the amount of scraping, i.e. pressure. Then let that leg "rest" after reattachment, to allow the clay to solidify and toughen. Don't let it get too dry though, just "hard damp." Then use a soft brush (I like to use a pointed round or angled flat) to dampen only the immediate area you're working on to clean, sculpt, and refine. This minimizes pressures and helps to mediate weakening the area with over–saturation. Also, don't work on the whole thing or even on sequential portions all at once. Give the leg time to rest between each repaired portion, then when you do come back to it, work on the area opposite where you just finished. This creates self–reinforcing weld points that seem to hold up better.
When you're done, use a soft damp brush to smooth the entire leg, starting with the hoof and moving up to the body—that is to say you don't want to first soak those areas that will have to withstand the pressures of smoothing. Be painfully light in the touch and take extra care not to saturate. Allow the leg to rest when needed, and remember that any additional smoothing can be done later in the bisque with sandpaper. Now granted, it took some time to fix all the legs in this painstaking way, but it worked! I learned a greater feel for this stuff in the process, too.
Here's another tip: when sculpting in slipcasting porcelain, do your sculpting, especially your details, a little sharper than usual. During vitrification your sculpting will soften a little bit. Think of butter in a warm oven. So those features you want really precise—like eyelids, wrinkles, chestnuts, hoof chips, or hair—you want to make very defined and crisp, so don't blend them too much with your water and brush. Let vitrification do that for you. But any hollows you sculpt, like for muscle groups, the underside of the hooves, or nostril and ear cavities, will remain as they are—they don't "fill" from seepage. You'll get a feel for how this medium behaves the more pieces you create with it, which is where bas–relief and medallion work really comes in handy!
Anyway, so here they are in greenware going into their bisque Cone 04 fire…

The Brownie.

The Collier.

One of the Limericks, made into a Cob.

The Dutch Draft Limerick.
All four were bisque fired on their sides because I felt I'd already tempted Fate plenty by this point. Bare clay won't stick to anything in the bisque fire because glaze isn't involved and the temperature doesn't get high enough to cause fusion. I often stack my tiles and ornaments in the bisque fire to really pack Big Al, for instance. The next morning then, I popped open Big Al to find they'd all bisque fired just fine and dandy. And that was great. Really great.
But there was a problem. One big problem actually. And if you know anything about firing full body porcelain sculptures like this, you may have already deduced that one big problem by now. Again it was my seemingly instinctive propensity for distraction and subsequent gross negligence at the root of this big problem to boot. I swear, sometimes I think I'm too incompetent to work in ceramics!
See, here's the thing: had I not been so fixated on sculpting, as per usual, and actually been thinking about what I was really doing, I would have remembered a vital component to these pieces—the stilts. The blessed stilts! But I hadn't. Of course I hadn't. That would have required thinking ahead and we can't have that now, can we?
To understand why this is a problem, let's backtrack a bit. At vitrification, the porcelain momentarily turns into a jelly–like substance as it chemically changes into its glass–like final form. That means any sticky–outy parts (like tendrils, ears, legs, etc.), or slender portions that support weight (like legs or tails) are vulnerable to warping and slumping as gravity pushes downward on the mass of the piece. Clearly then, equine sculptures are a smorgasbord of every conceivable pitfall one could encounter with porcelain in this regard, aren't they? And this problem is more a function of mass than of size, too, which gets back to the reason why I chose sculptures with thicker legs in relation to their bodies. It also explains why there's a threshold mass where porcelain just isn't feasible anymore and a metal like bronze is the better choice.
But getting back to the issue: ceramists have managed this problem through the process of "stilting," of creating a series of supports, like flying buttresses, to shore up vulnerable portions and to support the mass of the piece. For a production piece, stilts would be designed specifically for and alongside the original, and have their own molds that would be poured at the same time in the same slip as the sculpture itself, and they'd be dried at the same rate, too. For this reason there's a comparable amount of clay used in the casting of the piece that's discarded at the backend of the process in the form of fired stilts. Add in the approximate 30% loss rate on top of this, and you may now understand some of the reasons why porcelain (and fine bone china) is so expensive and exclusive.
But for one–of–a–kind pieces like these claybodied guys, I have to make one–of–a–kind stilts for each of them, made from the same pour and allowed to dry right alongside them at the same rate. Or rather I should have. So I was in a real pickle—not only did I already have fired bisque sculptures, but I was also left with a jar of slip from another batch of porcelain. There I was with everything wrong.
But why the same clay? Made the same way? Dried at the same rate? Good questions! Here's why. Due to its chemical composition and its lack of grog, porcelain shrinks quite a bit—about 13%–15%. That's a lot. In fact, it's the highest shrink rate of all ceramic clays. This is why porcelain casts fired to maturity are so much smaller than the original sculpture, or casts poured in other clays. Such casts also tend to be much heavier because porcelain is quite dense.

With this in mind, you now have a big clue as to why the stilt problem was a big one. How so? Well, while each batch of porcelain may be mixed according to a recipe, slight differences in chemistry always exist induced by supply, bacterial flora, and circumstances that can slightly change the properties of each batch—or more specifically, slightly change the shrink rate of each batch. How the clay was stored and used by the artist can also add further peculiarities that affect its nature, i.e. its shrink rate. Put all this together and we can think of each pour session of porcelain as unique. And we want those stilts to shrink exactly the same as the sculpture itself; otherwise support will be compromised to either mar or even destroy the piece.
Which is why my woeful oversight concerned me so much. All my hard work, painstaking care, and dogged determination may have all been for naught simply because I'd spaced this one critical component. Trust me—my neurons and basal ganglion were in a frenzy assigning blame because I couldn't really leave these pieces as bisque porcelain either. I've found bisque porcelain to be surprisingly fragile. It just doesn't seem to have the gumption of bisque earthenware or even bisque stoneware. It needs to be vitrified. As with all things in life, the only way around it is through it then. I had nothing to lose, right? So I decided to mush on, to see what happened.
Nevermind that I'm totally ignorant in the whole stilting gig, a fact that neither impeded these experiments nor deterred my resolve. As you've probably guessed by now, my modus operandi is to just dive in and learn to swim later—it's reckless, I know, but new ground isn't found by playing it safe. I also must admit that the Universe has been unquestionably generous with my adventures in clay, something I choose to interpret as an open invitation to get crazier. Can do.
But there was a problem. One big problem actually. And if you know anything about firing full body porcelain sculptures like this, you may have already deduced that one big problem by now. Again it was my seemingly instinctive propensity for distraction and subsequent gross negligence at the root of this big problem to boot. I swear, sometimes I think I'm too incompetent to work in ceramics!
See, here's the thing: had I not been so fixated on sculpting, as per usual, and actually been thinking about what I was really doing, I would have remembered a vital component to these pieces—the stilts. The blessed stilts! But I hadn't. Of course I hadn't. That would have required thinking ahead and we can't have that now, can we?
To understand why this is a problem, let's backtrack a bit. At vitrification, the porcelain momentarily turns into a jelly–like substance as it chemically changes into its glass–like final form. That means any sticky–outy parts (like tendrils, ears, legs, etc.), or slender portions that support weight (like legs or tails) are vulnerable to warping and slumping as gravity pushes downward on the mass of the piece. Clearly then, equine sculptures are a smorgasbord of every conceivable pitfall one could encounter with porcelain in this regard, aren't they? And this problem is more a function of mass than of size, too, which gets back to the reason why I chose sculptures with thicker legs in relation to their bodies. It also explains why there's a threshold mass where porcelain just isn't feasible anymore and a metal like bronze is the better choice.
But getting back to the issue: ceramists have managed this problem through the process of "stilting," of creating a series of supports, like flying buttresses, to shore up vulnerable portions and to support the mass of the piece. For a production piece, stilts would be designed specifically for and alongside the original, and have their own molds that would be poured at the same time in the same slip as the sculpture itself, and they'd be dried at the same rate, too. For this reason there's a comparable amount of clay used in the casting of the piece that's discarded at the backend of the process in the form of fired stilts. Add in the approximate 30% loss rate on top of this, and you may now understand some of the reasons why porcelain (and fine bone china) is so expensive and exclusive.
But for one–of–a–kind pieces like these claybodied guys, I have to make one–of–a–kind stilts for each of them, made from the same pour and allowed to dry right alongside them at the same rate. Or rather I should have. So I was in a real pickle—not only did I already have fired bisque sculptures, but I was also left with a jar of slip from another batch of porcelain. There I was with everything wrong.
But why the same clay? Made the same way? Dried at the same rate? Good questions! Here's why. Due to its chemical composition and its lack of grog, porcelain shrinks quite a bit—about 13%–15%. That's a lot. In fact, it's the highest shrink rate of all ceramic clays. This is why porcelain casts fired to maturity are so much smaller than the original sculpture, or casts poured in other clays. Such casts also tend to be much heavier because porcelain is quite dense.

Look at the shrinkage! A resin Brownie (left), an earthenware Brownie (middle) and the porcelain Brownie (right).
With this in mind, you now have a big clue as to why the stilt problem was a big one. How so? Well, while each batch of porcelain may be mixed according to a recipe, slight differences in chemistry always exist induced by supply, bacterial flora, and circumstances that can slightly change the properties of each batch—or more specifically, slightly change the shrink rate of each batch. How the clay was stored and used by the artist can also add further peculiarities that affect its nature, i.e. its shrink rate. Put all this together and we can think of each pour session of porcelain as unique. And we want those stilts to shrink exactly the same as the sculpture itself; otherwise support will be compromised to either mar or even destroy the piece.
Which is why my woeful oversight concerned me so much. All my hard work, painstaking care, and dogged determination may have all been for naught simply because I'd spaced this one critical component. Trust me—my neurons and basal ganglion were in a frenzy assigning blame because I couldn't really leave these pieces as bisque porcelain either. I've found bisque porcelain to be surprisingly fragile. It just doesn't seem to have the gumption of bisque earthenware or even bisque stoneware. It needs to be vitrified. As with all things in life, the only way around it is through it then. I had nothing to lose, right? So I decided to mush on, to see what happened.
Nevermind that I'm totally ignorant in the whole stilting gig, a fact that neither impeded these experiments nor deterred my resolve. As you've probably guessed by now, my modus operandi is to just dive in and learn to swim later—it's reckless, I know, but new ground isn't found by playing it safe. I also must admit that the Universe has been unquestionably generous with my adventures in clay, something I choose to interpret as an open invitation to get crazier. Can do.
Nonetheless, even though I knew what had to be done, I still had no idea how to do it. Having sculpted myself into a proverbial corner, traditional stilting wasn't going to be feasible—I deduced that much. I had to cheat construct a strategic engineering remedy. Gawd, I'm pretty sure Fate is going to catch up with my shenanigans at some point, whip around and chomp me in the hinder…until that happens though, onto cheating strategizing…
After consulting with fellow mudhens, Joanie suggested belly supports rather than actual stilts. They'd bridge my howling deficiency in the logistics of stilt–making while simultaneously creating a workaround for the compositional disparity between the supports and the sculptures. A basic scoop that supports a belly is far more forgiving than flying buttresses of exact measurements. Brilliant!


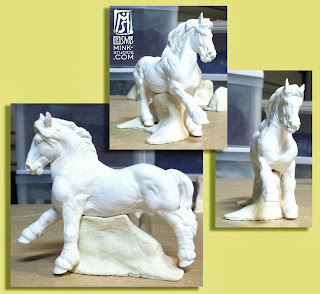
Here's the Brownie on his belly support. Note the "prongs" projecting outward from his belly and back between his hindlegs, designed to keep him balanced and upright.
To make these belly supports, I turned porcelain slip into malleable clay in the same way I did for sculpting that Limerick's new head and then went about custom–shaping little contraptions for each piece. This wasn't a haphazard endeavor, however. Each support had to achieve five nonnegotiable goals:



Needless to say it was a delicate balancing act to get those belly supports just right. Trickier than I expected, and they certainly took on odd forms, but function was the only name of their game. And thinking about it more, I expect all these issues, especially that of base stability, to become increasingly important as scale increases. Mass is a big issue with porcelain. To be quite honest, I think I skittered by despite my mistakes thanks to the small scale of these pieces as I'm not sure bigger pieces would've been so forgiving. I must pay better attention to the process the bigger I work!


"Far away there in the sunshine are my highest aspirations. I may not reach them, but I can look up and see their beauty, believe in them, and try to follow where they lead." ~ Louisa May Alcott
- Lift the sculpture off its feet to remove gravity's effect as downward pressure of the body's mass during the critical moment of vitrification to protect the legs from warping. Equine legs should adhere to a very specific set of anatomical and conformational angles to remain viable, so protecting my sculpted legs from warping or misalignments is a priority.
- Not interfere with the sculpture as both shrink. The support had to steer clear of the hooves, feathers, legs and tail so it couldn't influence the "shrinkage pathways" and potentially cause distortion. It also couldn't interlock with the sculpture. It's amazing just how quickly those legs and body features can create a kind of Chinese Finger Puzzle effect with the support if the ease of removal isn't given equal attention as support. Lastly, the supports also couldn't hook onto or cause drag on any feature sculpted into the torso which could damage the piece. Support wasn't necessarily served by a mirror image. In theory, too, I could make two or three base supports for a particularly complicated piece if these problems warranted that, but I haven't gotten to that point yet.

The Limerick turned into a Cob on his base. Note the sharp right turn on that one buttress. Functionality is the motto here!
- Maintain support while shrinking. As both the sculpture and support shrink, it's possible that the sculpture's center of gravity will shift to alter its balance. If that happens without accommodation, the sculpture could tip, rollover, or fall right off the support…and even a tip is unwelcome by changing gravity's angle of influence. In line with that idea, each support had to keep the sculpture at a perpendicular angle to maintain the desired angle for the legs. I want those foot bones, cannons, and long bones straight! So while I made the supports snug, they weren't too snug. They had just enough wiggle room, like a comfortable T–shirt. I also made them with the idea of a cupped hand rather than as a flat tabletop, with the rims a snidge higher. As a test, I slightly jiggled a sculpture atop its support to determine how it all balanced—carefully, of course! If the sculpture stayed where it was, I figured it was a suitable base. If it shifted, adjustments were necessary. (Remember, too, that I was making greenware bases for bisque sculptures—ideally they'd have been made together. I imagine in the future I'd allow the sculpture to dry so I could lightly make a good belly impression into a fresh clay base. A gentle wiggle and squirm would then help generate the accommodating room necessary.)

The Dutch Draft on his belly support. You can see what I mean regarding all those goals in these images.
- Be stable. The base had to be big enough, splayed enough, and have enough weight so if the sculpture shifted or rocked, it would stay put. It had to be the rock. The supports were first formed solid for straightforward shaping, but were later hollowed to minimize the possibility of exploding air bubbles. Not too much though—they had to keep some weight and durability to do their job.

Here are the belly supports on their sides so you can see how they were hollowed out, and their odd shapes.
- Not stick to the sculpture. Because vitrification causes the porcelain to essentially melt, any bits that touch will actually fuse together, just like glaze. So if the sculptures were simply plopped onto their supports for the mature fire, they'd melt together into a big wad of NOPE. So I coated the entirely of each support with three coats of kiln wash (except the bottom of each support since I wanted an unfettered surface on the underside, plus my kiln shelves were already kiln washed). The wash was about the consistency of pancake batter and applied with a brush. Nothing fancy, just purely functional. And only the belly support was kiln washed. The bisque sculpture was left bare and pristine. In bated breath I hoped that the kiln wash would act as a barrier, allowing me to simply pop the sculpture off the base when the mature fire was completed.

Getting kiln washed.
Needless to say it was a delicate balancing act to get those belly supports just right. Trickier than I expected, and they certainly took on odd forms, but function was the only name of their game. And thinking about it more, I expect all these issues, especially that of base stability, to become increasingly important as scale increases. Mass is a big issue with porcelain. To be quite honest, I think I skittered by despite my mistakes thanks to the small scale of these pieces as I'm not sure bigger pieces would've been so forgiving. I must pay better attention to the process the bigger I work!

All done and ready to do their jobs! They kinda look like tree stumps, don't they? The one in the upper left has a hole in it where my hollowing cut through, but it proved to be no big deal. Those bare spots are there so I could see the identifying abbreviations for each sculpture, so I knew which bases went with what sculpture.
Another fortunate happenstance was this: I poured the sculptures rather thickly in anticipation of claybodying, and even the Brownie was a thick pour. So not only did these pieces have thicker legs in relation to their mass, but they had thicker body walls, too. I believe this was a boon when it came to the belly supports since these thicker walls could better support the piece's mass without distorting. Plus, an arch is a sturdy architectural structure—so hooray for hollow torsos! I must keep all this in mind for future work!

The Collier on his belly support. This one was especially tricky, since it posed the most risk of interlocking with the legs. Thankfully I avoided that with a more "puddled" design.
One complication I couldn't escape, however, was porcelain's memory. I had to make the bases as close to my intention as possible right from the get–go because its memory could reform them back during the final fire, and that could be a problem with balance and stability. So I had to have a pretty good idea of what I had to do before I did it. It's helpful that the brain quickly develops a knack for anticipating how a sculpture might behave in shifting conditions. It catches on pretty quick.

As a workaround, too, I found that first making a block, then getting a belly impression, then forming the avoiding cavities and stability features, and then making adjustments seemed to be the best approach. After hollowing them, removing sharp edges and being allowed to dry, they were then bisque fired to Cone 04 to bring them to the same stage as the sculptures. It was after their bisque fire that they were then coated in kiln wash. That is to say I didn't fire the greenware supports, already covered in kiln wash, straight up to Cone 5 with the sculptures.
Still and all, none of these supports are reusable for future pieces. Being specifically custom–made is one thing, but being specifically pre–shrunk is another. So they're essentially nothing more than curiosities now. I'm half–tempted to stick them in my garden as fun novelties, or even include them with the piece as a relic of the process. Still cogitating.

Here they all are on their bases.
As a workaround, too, I found that first making a block, then getting a belly impression, then forming the avoiding cavities and stability features, and then making adjustments seemed to be the best approach. After hollowing them, removing sharp edges and being allowed to dry, they were then bisque fired to Cone 04 to bring them to the same stage as the sculptures. It was after their bisque fire that they were then coated in kiln wash. That is to say I didn't fire the greenware supports, already covered in kiln wash, straight up to Cone 5 with the sculptures.
Still and all, none of these supports are reusable for future pieces. Being specifically custom–made is one thing, but being specifically pre–shrunk is another. So they're essentially nothing more than curiosities now. I'm half–tempted to stick them in my garden as fun novelties, or even include them with the piece as a relic of the process. Still cogitating.

In Big Al, ready for the mature Cone 5 fire. Rather than placing the belly supports into Big Al first, then popping each sculpture onto them, instead I secured each piece on their belly support first on a tabletop so I could be sure of their exact balancing, then gently clamped my fingers around the whole kit–n–kaboodle to pop each onto the kiln shelf. That worked much better to get them just right.
Another element I had to cogitate was how to fire them. Up until this point I'd used this slip to make bigger bas–relief pieces or sturdy boxes, but never before with such tiny pieces, let alone in full–body compositions. And that was a concern. If this midfire porcelain gets too hot, it turns into a puddle of lava, with bubbling, puckering and general catastrophe all 'round. So I definitely couldn't let that happen, but which could so easily be the case with the delicacy of their tiny bits.
Now the way a clay gets too hot during a fire happens in two ways. First, the actual temperature can be set too hot, which is easily amended by simply firing at a lower temperature. But the other, and more overlooked, way a clay can become too hot is to be fired at its correct Cone for too long. At least I've found that to be the case with midfire porcelain. Indeed, firing this clay isn't just a matter of temperature—it's equally about time. The longer this clay is allowed to "soak," the more intense the result. (This is the basis for "ramping" a fire, but we won't get into that since it doesn't apply here.)
So I definitely didn't want these guys to soak for too long. I knew that Big Al's Cone 5 on Fast was perfect for the larger, thicker porcelain works I previously fed him. But that's a problem, see—I'd already maxed out the time with the Fast setting. So my only other option was to fire at a lower temperature, at Cone 4. I knew that Big Al fired on the hot side, so I anticipated that Cone 4 would suffice with such small pieces. (There's a way to program Big Al to fire at Cone 4.5, but I haven't figured it out yet.) I knew I could always refire hotter or longer if Cone 4 on Fast was too cool for vitrification to take place, but there's no way to fix boiled, bubbled blobs. So through the night, Big Al cooked them at Cone 4 on Fast, and I waited anxiously for the morning.

As you might have surmised already then—it all worked, and it all worked beautifully! Big Al popped out four perfect little porcelain pieces with zero slump, warpage, or distortion, all vitrified and with a lovely, glassy sheen. And heavy—wow! More still, each popped off his belly support with absolutely no fusion, marring, or interlocking. Success! I'm also happy to report that the customizing and even all those leg breaks melted together so flawlessly, it's as though they never happened, confirming my predictions on what vitrification would and could do for such circumstances. And when it comes to clay—and especially to porcelain—being able to predict anything involving such extremes is a real boon. It tells me that all those claybody Reflectives were impeccable teachers, and also that this slip porcelain was indeed a viable medium for this type of work.
Now the way a clay gets too hot during a fire happens in two ways. First, the actual temperature can be set too hot, which is easily amended by simply firing at a lower temperature. But the other, and more overlooked, way a clay can become too hot is to be fired at its correct Cone for too long. At least I've found that to be the case with midfire porcelain. Indeed, firing this clay isn't just a matter of temperature—it's equally about time. The longer this clay is allowed to "soak," the more intense the result. (This is the basis for "ramping" a fire, but we won't get into that since it doesn't apply here.)
So I definitely didn't want these guys to soak for too long. I knew that Big Al's Cone 5 on Fast was perfect for the larger, thicker porcelain works I previously fed him. But that's a problem, see—I'd already maxed out the time with the Fast setting. So my only other option was to fire at a lower temperature, at Cone 4. I knew that Big Al fired on the hot side, so I anticipated that Cone 4 would suffice with such small pieces. (There's a way to program Big Al to fire at Cone 4.5, but I haven't figured it out yet.) I knew I could always refire hotter or longer if Cone 4 on Fast was too cool for vitrification to take place, but there's no way to fix boiled, bubbled blobs. So through the night, Big Al cooked them at Cone 4 on Fast, and I waited anxiously for the morning.

Here's the Dutch Draft Limerick all spiffy after the mature fire. You can see the amount of shrinkage in the composite image in the upper left. Hooray! Cone 4 on FAST was sufficient to vitrify these tiny fellows!
As you might have surmised already then—it all worked, and it all worked beautifully! Big Al popped out four perfect little porcelain pieces with zero slump, warpage, or distortion, all vitrified and with a lovely, glassy sheen. And heavy—wow! More still, each popped off his belly support with absolutely no fusion, marring, or interlocking. Success! I'm also happy to report that the customizing and even all those leg breaks melted together so flawlessly, it's as though they never happened, confirming my predictions on what vitrification would and could do for such circumstances. And when it comes to clay—and especially to porcelain—being able to predict anything involving such extremes is a real boon. It tells me that all those claybody Reflectives were impeccable teachers, and also that this slip porcelain was indeed a viable medium for this type of work.
But one thing that did prove to be inescapable was the matter of the glaze. Earthenware and fine bone china are brought up to maturity first for the clay. Earthenware clays generally fire to maturity at Cone 04 while fine bone china mature fires much hotter, anywhere from Cone 2–10 depending on the recipe. Once they've been mature fired, however, they're "in the clear" so to speak, and then the glazes are fired on afterwards and at lower temperatures. This means they're available for more glazing options such as underglazing, overglazing, and even art glazes.
Not so for porcelain. Porcelain and its glaze must come up to maturity together or the glaze will flake off. This means that underglazing isn't available for porcelain because the final "sealing" clear glaze cannot happen. It also means that applying a midfire or highfire clear glaze to the bisque porcelain for chinapainting, or even art glaze, isn't an option because how could that happen with stilts, let alone belly supports? Not only would that risk fusing the support to the body, but a lip or ridge would remain where the glaze met the bare porcelain, giving the impression of a massive ringworm infestation.
It's conceivable that belly supports with little prongs could be made to minimize the surface area that touched the sculpture, with glaze applied everywhere except those areas that contacted the touch–points. But not only wasn't I that motivated (or even that skilled), but I believed that was asking for way too much to go wrong. For one, what if the sculpture shifted during the shrinking, moving the prongs out of the bare areas? What if the prongs couldn't dissipate the weight of the sculpture well enough and slumped or collapsed? What if the belly wall puckered or blew inward under the weight focused on those touch–points?
Ultimately, I decided that I'd rather have a pristine unglazed sculpture than a marred glazed one. And that decision was the right one for me as preserving the integrity of the sculpture will always be my first priority. And regardless, I figured I could at least cold–paint the pieces if push came to shove. But even so, it's obvious how much I adore the look of bare bisque porcelain anyway, based on my claybodied Reflective work. To tell the truth, I plan to leave much of my future handbuilt porcelain work plain bisque precisely for that reason. I fundamentally consider myself a sculptor more than anything else and, in my opinion, bisque porcelain is an ideal medium for showcasing a sculpture entirely on its own terms.
In spite of all that though, I later learned that I could still apply fired pigment directly onto the bare porcelain if it contained enough flux, and if it wasn't applied too thickly. Swooping into my rescue then was a fellow mudhen who just happened to find a source for exactly that kind of pigment! Thank you a million bajillion times Jen! And thank you Karen for bringing this sacred stuff to Mudhenge 2013 so we could see it in action! I cannot wait to go shopping. I'll be like a kid in a candy store!
Along with all the high–fives, hoopla, and highlights, however, there's always a price to be paid, isn't there? A tribute to the ceramic powers that be for such good graces. And remember that Fate thing coming back to bite me in the hinder? Well, it took a goodly bite. CHOMP. For the unprecedented generosity such powers saw fit to bestow on me for these experiments, they demanded a sacrifice of equal measure…and they got it. They took the Cob. As I was staging his photograph, I clumsily bumped the table and he leapt onto the concrete floor, shattering into seven perfect pieces at seven perfectly clean breaks.

But, hey—seven is one of my favorite numbers! And perhaps this was the Universe's way of forcing me to keep him for myself. I'd originally decided to do just that as he seriously grew on me during his creation, but life happens from time to time, forcing me to sell individuals from my own personal collection who are hard to let go. He's stayin' with me though! After some glue (and eventually a new ear because I haven't found it yet) I've pieced him back together, and he's my new studio mascot, christened "Eggar" in reference to Humpty Dumpty. Admittedly, too, I inadvertently sculpted his head a teensy bit too thin in my enthusiasm (as seen from the front). I decided against amending that odd aspect, however, because I already liked his head exactly as it was from the sides so darned much anyway. So either which way, it's a happy ending.
It's been a couple of weeks since I pulled this lot out of Big Al—this post being delayed by Mudhenge 2013 (another post coming on that, stay tuned)—and yet I'm still tickled pink! The potential for my sculptures to also be offered in porcelain as castings, claybodies, and handbuilt works is like Christmas, New Years, my Anniversary, my birthday and winning the lottery all wrapped up into one ecstatic, blissful package.

Add into that the new Ferro Sunshine options for pigment, and lemme tell ya—I've been pinching myself a lot lately! See, I told you—a whole lotta AWESOME! In the meantime, this calls for kicking the madness up another notch, don't you? Onto bigger sculptures…as my orbs meander on over to those Pixie, Dafydd and Stormwatch molds…

The Cob, after he was sacrificed.
But, hey—seven is one of my favorite numbers! And perhaps this was the Universe's way of forcing me to keep him for myself. I'd originally decided to do just that as he seriously grew on me during his creation, but life happens from time to time, forcing me to sell individuals from my own personal collection who are hard to let go. He's stayin' with me though! After some glue (and eventually a new ear because I haven't found it yet) I've pieced him back together, and he's my new studio mascot, christened "Eggar" in reference to Humpty Dumpty. Admittedly, too, I inadvertently sculpted his head a teensy bit too thin in my enthusiasm (as seen from the front). I decided against amending that odd aspect, however, because I already liked his head exactly as it was from the sides so darned much anyway. So either which way, it's a happy ending.
It's been a couple of weeks since I pulled this lot out of Big Al—this post being delayed by Mudhenge 2013 (another post coming on that, stay tuned)—and yet I'm still tickled pink! The potential for my sculptures to also be offered in porcelain as castings, claybodies, and handbuilt works is like Christmas, New Years, my Anniversary, my birthday and winning the lottery all wrapped up into one ecstatic, blissful package.

The Collier after the mature fire.
Add into that the new Ferro Sunshine options for pigment, and lemme tell ya—I've been pinching myself a lot lately! See, I told you—a whole lotta AWESOME! In the meantime, this calls for kicking the madness up another notch, don't you? Onto bigger sculptures…as my orbs meander on over to those Pixie, Dafydd and Stormwatch molds…
"Far away there in the sunshine are my highest aspirations. I may not reach them, but I can look up and see their beauty, believe in them, and try to follow where they lead." ~ Louisa May Alcott


