Thursday, December 30, 2010

Christmas Crammed Down My Gullet

Big Al crammed full of Christmas...and I quote, "It's delicious -- thank you!" NOM NOM NOM!

It's hard to believe that Christmas 2010 has past and we're cork-screwing into New Year's Eve and 2011. One part of me is eager to start the new year, and another is hesitant to acknowledge another year has gone. My head generates so many ideas for projects and every year my calendar becomes more crammed -- and frantic -- as I try to materialize them. And 365 days never is enough time! 

However, one of these wild ideas did find fruition this year -- the new annual porcelain Christmas ornament, which was a huge success that exceeded my expectations! And as promised, this post delves into a behind-the-scene look at the total pandemonium processes behind the creation of this piece.

I had planned to use the high fire porcelain (Cone 10), but a very knowledgeable, helpful gal at my local potter's supply recommended a low fire (Cone 5) porcelain clay (one that many doll makers use) because it takes to press-molding better. So I went with her suggestion, and boy am I glad I did! Thank you Potter's Center! But before we start, there are a few things you may need to know about porcelain to understand the intimidation-factor of this project...
  • Porcelain is unlike other clays in both composition and behavior. I've never used it before, so it was like getting to know someone who's really really touchy, really well and really fast!
  • It becomes vitreous when fired to maturity, which means that water cannot penetrate it. (And neither can glaze, which is why porcelain needs to be glazed after its Cone 04 low-fire stage. But since I decided to leave the ornament bisque, I skipped that stage and went right to Cone 5.)
  • Porcelain has "memory" -- like an elephant. It means that how ever the clay is twisted, smooshed, tweaked or torked while its being de-molded or worked, it will remember that in the fire...even if you fix it before you fire it (though I have an additional theory, which I'll share later). It's definitely the antithesis to WYSIWYG! This is the primary reason why porcelain pieces are expensive -- warping and other flaws caused by this memory result in a 30%-50% loss rate. This means I had to press twice as many ornaments as I wanted to get for the edition.
  • Porcelain is "sticky" -- like soft butter, unlike earthenware or stoneware, which are more dough-like. While this feel is delightful, it does present new challenges for getting it out of a press mold! I'd pondered and cogitated and pondered some more on how I was going to lift these puppies out of the mold without distorting them...until my good friend Barb gave me a great tip -- which I'll share in a bit...
So as you can see...porcelain was a new frontier for me. But wait -- there's more! On top of this, I'd never designed a bas-relief for press molding, I've never made a press mold and I've only once pressed clay into a mold (at my buddy Lynn's studio during a fun tile pressing hands-on demo). This means I was a total newb to both porcelain and press-molding. But like most things I do in my life, I jump right in head first with literally no idea of what I'm doing. I figured I'd learn on the fly, and the good news is -- I did.

But that's not all! On top of all that, all clay has to be totally dry before it can be fired. During summer here in Idaho, that usually translates to seven days of drying time. But because it was winter and the ornament was thick, they would need at least 10 days to dry before they could go into the kiln. And ideally that would be 14 days -- two weeks! And here's the kicker: Christmas was just over three weeks away! Plus, I had to get these puppies in my Etsy store at least five days before Christmas to account for shipping! There was no time to make mistakes or dawdle -- it was full speed ahead and be-darned those torpedoes.

So either this project was going to be a happy success or an epic failure. But I think it's important to take risks every so often because sometimes contemplating a project too much can create a kind of inertia. More often than not, just flinging yourself into the fray gets the gears going out of sheer panic  -- and that's more potent than caffeine, lemme tell ya.

So now that you have a bit of background on the utter lunacy of this project, let's see the highs and lows of that learning curve...

This was my world in December.
 (1) Sir Squish, my tile press, (2) one of the eight plaster press molds I made from my oil clay original, (3) a pug of porcelain clay, (4) talc (or baby powder) to use as a mold release agent, and because the porcelain vitrifies, it doesn't absorb the talc so it dusts right off after the Cone 5 fire (if we ever meet and I smell like a baby, you know I've been pressing clay!), (5) the 2 x 4 inch clay cutter, which works like a fancy cookie cutter, (6) clay slicer, to cut slices of clay off the pug in uniform thicknesses, (7) my slab roller, Smasher, and the slab sheet (the piece cut from the pug is placed between the sheets and rolled through the slab roller, which does three important things: It squishes the clay particles into new orientations, thereby creating a kind of "blank slate," it makes that slice of equal density and it makes that slice the thickness I need), (8) the brass tubing I use to quickly punch in the hanging hole at the top, (9) the cotton batting placed over the pressed ornaments before the next dry board is placed on top of them, and (10) the plaster drying boards, or "flats," used to apply gentle pressure to the pressed clay to keep it from "potato chipping," and to suck moisture from the clay to expedite drying.

Here's the clay after it's been run through Smasher, and I'm cutting it with the clay cutter. Had I been thinking, I would have designed some stamps or molds to use up the small pieces left over (a mental note for the future), so all these scraps went into the dump bucket for later use (how I long for a pug mill -- someday!). PAM® made a handy release agent for the cutters because, remember, if the clay stuck to the cutter, it would tork when coming out and cause that "memory" to kick in. What was nice about the PAM, too, was that it smelled like I was baking cookies in the garage! Anyway, on a good sheet, I could get eight 2 x 4 rectangles, and with those numbers, I used up all five of the porcelain pugs I bought.

Then the mold is dusted with talc with a soft brush and a rectangle is placed into it carefully (so as not to bend or curve it). Unlike stamping, in which a mold is pressed into the clay, press-molding presses clay into a mold. This means that I can create sculpted 3D surfaces with press-molding, like a real sculpture with "infinite layers," whereas the stamps are just a flat surface with a second layer stamped into it, or more 2D.

 
 Then a piece of cotton cloth is placed on top and a "pressing board" is placed on top of that. The cloth prevents the board from sticking to the clay, and the board ensures that the clay is truly squished into the mold. The board needs to be just inside the rims of the mold, which makes sizing it a bit tricky. Luckily I was able to buy some wood molding at Home Depot® that was the right width, so all I had to do was cut it to the proper length.

DOH! I pressed too hard -- I broke my first mold, on my first pull! It's easy to forget that all the gears inside the press exert exponentially more pressure than what's used to pull the lever down. At first I took this as a really bad omen, and almost abandoned the project before it ever got started -- but then I realized that the mold "gods" required their sacrifice, and what better than my "first born"?

So I grabbed another mold (thank goodness I made so many) and started again with a lighter touch this time...and voila -- it worked! The very first pressed porcelain ornament!

However, I didn't like how the cloth imprinted its texture on the back of the ornament because it interfered with the clarity of the stamp I used to imprint my information onto the back. So how to create a smooth texture? I certainly couldn't smooth out all the backs of the pressed ornaments because not only would that take too long, but it risked soaking the clay too much and torking it. What to do? Bingo! A piece of stiff plastic in place of the fabric!

If you look closely at the tiles on the right, you'll see the fabric texture. On the two tiles on the left, you can see the desired result created by that plastic piece.

 
 Now I was presented with the puzzle of how to get the piece out of the mold -- you can see what a tight fit that is! And remember, I cannot bend or twist it to get it out -- it has to pop out in one perfect ejection. I'd thought about using my air compressor and airbrush to blow air into the mold to pop it out, but if the ornament caught anywhere in the mold, I'd end up with one big torked mess destined for the dump bucket. I needed more control. Lucky for me, my friend Barb visited earlier that week and we talked about my problem. Now she'd taken a porcelain tile making class and revealed The Great Solution the teacher taught her...use "buttons" from the pug to lift the piece out of the mold! Also luckily for me, I quickly realized that I designed my bas-relief perfectly so there were no undercuts or areas that would "catch" the piece as it was being lifted out...phew!

 
 I used two buttons created from the scraps left over from each cutting. I dampened their bonding surface slightly with water and gently pressed them into the surface...just hard enough to create the necessary bond. Clay loves to stick to itself when wet, so that dampness created just the right amount of suction to hold onto the ornament without being permanent. I quickly found that the fresher the buttons, the more effective they held, so I just kept using those scraps created by the fresh cuttings of each slab. The old buttons simply went into the good ol' dump bucket. It took a bit of time to learn how to squish them properly, so some of the early ornaments had stronger button imprints than later ones. Working with clay really is learning the seemingly infinite "sweet spots" it demands. Interestingly, I learned that each pug was slightly different, too, presenting a new set of sweet spots. Working with mud is about being responsive and flexible to the needs of the clay -- you really can't strong-arm it. It dictates to you, not the other way around! But this actually is refreshing, since I have full and complete control in all my other creative endeavors. It's good to be humbled and submit to the will of mystery.

 This technique allowed me to lift the ornament out of the mold with ease, quickly and without torking! But I had to concentrate in order to keep my two hands at equal orientations, so as not to bend or stretch the ornament while pulling it from the mold, and to transfer it flat onto the batting. After a few dozen times of doing this, it gets harder and harder...especially as those clock arms tick ever closer to the wee hours of the morning!

Here you can see an ornament about to be lifted out, along with those waiting to have their backsides cleaned with water. It takes just my finger and some water to smooth out where the buttons were. Inadvertently, I learned that if I let the ornament sit in the mold for about two minutes, it lifts easier, often just popping out. So while ornaments waited to be untombed, I cleaned up those previously de-molded.
 
 So right when I was all puffed up over my brilliant design savvy, I realized my ornament had a big design flaw -- it had beveled edges. I was accustomed to designing bas-relief for slip-casting, and a design with beveled edges pulled better from a slip-casting mold than one with straight edges. However the reverse is true for press-molding! Getting that clay to squish evenly to those wide-spread edges became a real headache, and I decided that the press board just wasn't enough by itself -- it needed help. So I began all sorts of configurations with bits of cardboard, as you can see above. I finally ended up with #4. What was particularly troublesome was that not only did each pug behave differently during the press, but also each mold behaved differently! I can't explain why, but each definitely had a way it wanted to work best. To complicate matters, each mold can only be used for about 15 pressings at a time, otherwise it gets too wet and begins to tear the clay, so I'd have to switch to another mold to keep the pace going. All this meant my brain's memory chip was working over time between the seven molds to remember which mold wanted things which way! I suspect if anyone had been watching, they'd have seen steam flow out out of my ears. Now had I been smart, I would have labeled the molds and written down notes -- but when it's 2am and it's your third night of sleep deprivation, you just careen forward...flailing.

 The reward: A flat full of beautiful pressings! I figured I needed at least 200 to achieve my goal of 100 sellable ornaments. I ended up with about 280, or about 10 flats. I expected to lose about 50% during the fire, but I also had to figure in another 20% loss during the drying and cleaning process. The thing is you don't know what you can and can't rescue until you've actually cleaned a few -- so during the pressing process, you save whatever you can. And sure enough, I lost a whole lot as I cleaned them -- good thing I pressed so many! But yes -- all 280 of those ornaments had to be cleaned by hand...removing all the little imperfections in the mold, smoothing the edges and tidying up the holes. That took a couple more days and nights of sleep deprivation -- blorg! One day, I'll have a series of wheeled racks to hold all my flats in stacks, but until then I have to stack them on the garage floor. Now the problem was that during this week, we had freezing temperatures and this porcelain clay cannot freeze since that would hose up the water particles in the clay. The solution? Stack all the flats in the house! So for nearly two weeks, the house was inundated by both Christmas and ten cumbersome flats stacked randomly around the house -- wherever I could find room! Poor Hubby's man cave was overtaken by six of them! But at this point, he's used to personal sacrifice in the name of art.

 Brass tubing, which you can find in many male-oriented hobby stores, make excellent punches for hanging holes. They come in many shapes, and I like to use the circle, rectangle and teardrop shapes the most. Be sure to get the next size down, or some suitable instrument to push through it to pop out the clay, otherwise you'll never it out of there. And part of the fun is hearing the "pop" as the little clay pellet shoots out! I also recommend cutting them to about 2" and use a diamond bit with a Dremel® to create a cutting edge on one end.

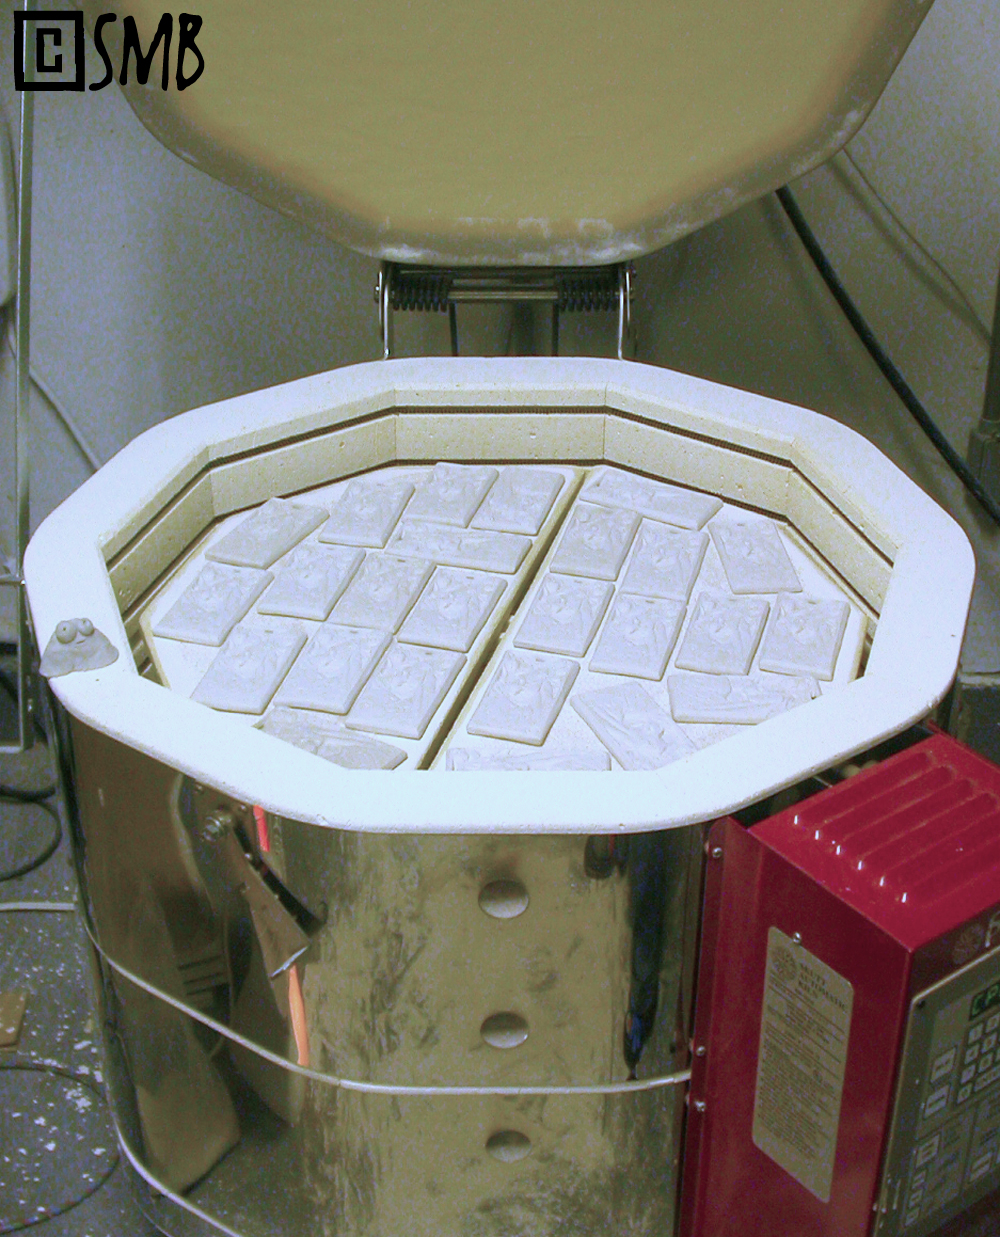
Happily, the ornaments dried a lot faster than I expected, probably because they were kept in a heated house. Now another thing about porcelain is that it shrinks as it fires -- a lot. It shrinks so much, in fact, that unless it has some sort of "slippery" surface on the kiln shelf, it can catch on something as it shrinks and destroy the piece. The solution is "doll sand," or fine sand spread on the kiln shelf that acts as little ball-bearings for the piece's surface to roll on as it shrinks (above). The sand doesn't melt, or get stuck in the ornament, either. So while I had Big Al packed tight with all 280 ornaments, with only 1/16th inch of space between them, when the fire was done the spaces between them looked like yawning corridors! It's like grown-up Shrinkydinks!

Between the bad pressings and those thrown out between drying and cleaning, my porcelain dump bucket was almost full! There's easily 100 rejected ornaments that met a soggy end in that ol' bucket.

 
 The first initial slabs were too thick, so I just stored them in a baggie separated by plastic to use later for my stamps. What I love about mud is that so much of the materials can be recycled or repurposed. To use up even more from the onset, I'm going to create new stamp designs that can be applied to the little scraps from the cutting process. They can be turned into neat magnets, zipper pulls or even jewelry.

 
 Suffice to say, the wait to open Big Al was torturous -- was this going to work, or was it a big waste of time?! Perhaps it was beginners luck, but WOOT -- I opened up Big Al to a kiln-full of beautiful ornaments! I cannot describe the sense of elation at seeing that big gaping maw full of all my hard work, glistening and lovely! Now I had to sort through them to pick out the best ones, and throw the rejects away. But to my astonishment, I lost only about 30% to warping! This allowed me to be really picky choosing the edition's denizens, and left some seconds for me to paint later, which was an unexpected bonus. It also told me that my methods worked and porcelain wasn't to be feared!

 
 Now came the fun part -- packaging! It was a treat to pick out just-the-right ribbon, and whip together something that looked nice. It took one long day to tie on the ribbons and get everyone packaged in their bags -- then the next day I uploaded them to my Etsy shop!

Now regarding that additional theory about porcelain's memory -- I wish I'd taken photos as proof, but I'm not convinced that all warping is due to handling, at least in my case. In order to get Big Al stuffed with all the ornaments in one fire, I resorted to using  many of my broken shelves and half shelves, jigsawing them together to maximize space. To my surprise, I found that along the seams, where the heat's convection rose and churned like volcano vents, was where most of the warped edges happened! In fact, I'd say about 80% of all the warping I had was along those convention vents. In contrast, all of the ornaments in the middle of the full shelves -- without exception -- were perfect. This leads me to believe that a new strategy may be instructive next year, implementing these changes:
  • Using only full kiln shelves
  • Keeping the ornaments centered and away from the edges
  • Running two firings instead of one big one
So we'll see. All in all, this project wasn't only challenging and fun, it was instructional on many levels...some of them personal. And while it often was hair-raising, and sometimes maddening, it was a true labor of love.  Though I was exhausted and zombified from a lack of sleep, I relished every minute. It also started a passionate love-affair with porcelain -- I am in love with the stuff! I cannot wait for next year's ornament! And I'm eager to apply what I've learned and see where I can refine and innovate.

As for the series, I decided to stick to the 2 x 4" shape not just to create a coherent collection, but the design challenge of using that fixed space in new ways is just too irresistible. Again -- why make things easy? The fun stuff happens in the daunting, unlikely chaos! Though I have to admit, looking back, I can't believe I got it all done...what was I thinking?!

Next time, I'll show you my new stamps and how I made them! So until then...from all of us here at Minkiewicz Studios...HAPPY NEW YEAR! MAY IT ROCK!

Now...for some sleep.

"You need chaos in your soul to give birth to a dancing star." ~ Friedrich Neitzsche

Share/Bookmark

Friday, December 17, 2010

Jumpin' for JOY!


My radio silence the last couple of weeks was due largely to this yuletide tidbit (above). So ta-da! -- I'd like to introduce my first annual Minkiewicz Studios Christmas ornament, "Joy"! It depicts an exuberant Arabian mare cavorting about to the ring of jingle bells. They're a limited edition of only 100, and  are available now in my Etsy store.

This piece represents many "firsts" for me: First use of porcelain, first pressed clay piece, first finished edition from the studio, first use of my 2 x 4 inch tile cutter and first in a new annual series. Every year I hope to issue a new addition, featuring different breeds and themes. Like this one, they'll all be cast in beautiful porcelain and this same shape, and left bisque because I think that really showcases the bas-relief and the clay so beautifully. That makes the collection coherent, too, and more fun for me since it presents design challenges for that 2 x 4 inch space.

I'll be documenting the creation of this edition later in the week...but until then, I have to get tangled in wrapping paper!

"Don't shirk away from challenges...keep reaching for that star, that sky." ~ Rick Moore 

Share/Bookmark

Thursday, November 11, 2010

Full Circle...and Beyond

One of the many Unicorns from my old sketchbooks.

Things have been busy here at the studio, preparing for Christmas, getting projects completed and started, and dealing with little setbacks that inevitably pop up from time to time. The thing is...creativity doesn't always apply to the design of a new piece. Just as much, it applies to problem-solving the technical aspects of our work because each one presents us with a whole lorry of engineering challenges that we often have to tackle on the fly. And some of them work and some of them implode in a rather spectacular manner.

One such disaster befell VToo. Despite being packed in foam, bubblewrap and being double-boxed, she arrived to my caster, Resins by Randy, with a busted supporting leg. ARGH. The problem was that the leg attached to the base had many weak areas caused by all the cuts and reattached adjustments made to the leg's proportions as the sculpture developed. I thought I had packed her suitably well to protect that leg...but physics and the post office had other ideas. Such is life. The good news is that the repair to her leg was quite simple, but the bad news is the issue of her base has been the tricky part.
 
For the past week I've been "tinkering" with ways to make her detachable from that darned paper-weight. Oh heck -- let's use a more accurate term....struggling. I've been struggling with ways to make her detachable from her base. Despite the frustration, doing so will allow me to ship her separated from it so she arrives intact, and in theory, make her casting easier. However, the complication is that this engineering also must allow the buyer to affix her to the base both easily and at the correct angles. This means that her foot must fit into the base much like a key in a lock so she seats onto the base in the way I intend her to sit -- and that's not easy. Not even by a little bit. In fact, two methods I've tried this week haven't worked, so now I'm on the third. But I guess it's three times the charm because -- by jove -- I think I got it this time!
 
Really the primary issue is having one element to that lock-and-key mechanism fixed; I needed a rigid, uniform shape to reduce the equation down to one variable. That way all I have to do is make an impression of it in the base, do a little finessing and voilĂ . So I realize now that the reason the two other attempts failed was because I was dealing with two variables -- her foot and the base -- which amounted to one big headache.

To achieve this simplified equation, I needed a peg for her foot. Not one that I made, but one made from a wood dowel or acrylic rod...both of which I didn't have. And I definitely didn't want to jump into the car and drive all the way to a craft store to buy one. I dislike running errands like that because I find them so annoyingly disruptive...and I was already pretty annoyed. So what to do? What to do? Hmmmm.....AH! Yes, of course! Why not? The handle end of a paintbrush!

Up by her hock, you can see the area of the break. But look at her hoof -- I had to rebuild it entirely, and with that "key" projecting out of the bottom. That's the butt-end of a paintbrush, with a "spine" made out of Superglue and baking soda, which was then shaped with a drill bit.

The "keyhole" in the base made by the peg. The peg's "spine" will keep her from twirling on the base, while the peg will hold her in the right position from all other angles. Once this epoxy cures, I'll finesse it more and blend it into the sculpting on the base.

So hopefully by Monday, I can hit the "do-over" button with Randy and we can get VToo into production! BAH! But on a good note...lots of new projects are underway for Christmas and 2011! Now while I promised sneak peeks of Dante and Alfred, they'll have to wait for next week. Instead, here's a sneak peek of a spur-of-the-moment sculpture I started yesterday -- a Unicorn!

Here's the fresh armature, with a Photoshopped tail and horn in the way I envision them now. He was supposed to be 1:24 scale, but he ended up being closer to 1:12 scale.

Unicorns have paraded through my mind for ages, and so I've been meaning to sculpt a series of them for years -- and now that I've streamlined the studio, the opportunity has presented itself. However, I don't cotton to the idea that a Unicorn is just a horse with a horn. No. To me, a Unicorn is other-worldly.  Something familiar -- horse-like -- but not horse...unfamiliar. Something both ethereal, beautiful, elemental...and perhaps a little bit unsettling. In that light, I don't see Unicorns romping under rainbows with butterflies and faeries. Nope. I see solitary Unicorns silently prancing through dark, old growth forests, misty lonely mountains, yawning wastelands, raging coasts, and tangled jungles...anywhere not tamed by humanity. Fierce and free, they cavort in the wild and primeval places in our hearts, embodiments of both mystery and magic, and wisdom that stretches into eternity.

As such, they've taken up quite a few pages in my sketchbooks throughout the years as I explored different ways to approach them. Here are various selections out of my 1985 (!!!) sketchbooks, so you can get an idea of what my vision of a Unicorn embodies...

Here you can see I experimented with lots of different "head types." In my series, I plan to build upon this variety since, being a fantasy animal, I have lots of wiggle room to play with ideas.


These last two drawings depict my more "old world" vision of the Unicorn, incorporating more deer-like or antelope-like qualities.

 Here's another variant, blending "old world" with some new interpretations.

Here's a more conventional interpretation, but definitely still not a horse with a horn.

On the same page, I'm playing with totally opposite interpretations. Had I been more clever, I would have made the Unicorn on the left poking his horn through the loop of his tail. As for the one on the right, I've long associated Unicorns with ivy, for reasons I can't explain. But you'll see this motif come up often in my tile work depicting Unicorns. And ivy makes such a lovely border!

So I think it's safe to say that I'm not sure how the sculpture will turn out, though I'm leaning more towards the "old world" interpretation for now. But like I said -- he's first in a series, and I intend to meander through lots of different interpretations of this mystical creature.

Speaking of which, I thought you'd get a kick out of some other selected sketches from those 25 year old sketchbooks....

Before I started sculpting, I was dabbling in oil painting. This piece was an initial sketch for a painting that never happened. It's big, which is why it's been pieced together in Photoshop. I don't know why I pitted a Unicorn against a Dragon. I guess because I thought a Unicorn would whoop a lion's hinder!

I've also had a fascination for dragons. While frightening to some, I've never perceived them as evil. I just don't "get" that idea. To me, they're like Unicorns, only in another form. In fact, when I saw the movies "Alien" and "Aliens," I was so frightened by those creatures that I filled up pages of my sketchbooks with "Protector Dragons." Once I did that, the nightmares ended.

Here's another dragon, with the fledgling beginnings of color pencil (done badly). I'd like to get back to dragons someday, because I think they'd make for some marvy sculpture work and tile designs.

I've also been enthralled with "seahorses," in the fantasy sense. So I'd like to start a series of them, too, because I think the biological variety that could be explored with them is exciting!

It's hard to believe that all those drawings were done 25 years ago -- where does the time go? In a deep sense, the age of these drawings seems to urge me to finally make good on my childhood promises, and bring these creatures to sculptural life! As I child I drew immortal creatures, yet now as I'm aging and facing my own mortality, I'm called back to them. Interesting. 

And in those same books, I was delighted to find even more carousel horses...a whole boatload of them!...

 A dramatic armored horse.

 A charming prancy fellow.

As you know, I'm nuts about carousel animals, especially the horses. And I've started the first steps towards creating a series of carousel medallions, for both white resin and ceramic. Each design will explore a different theme, and I'm really looking forward to decking out each horse in the accoutrements of each idea. Right now, I have 116 themes, so this project will keep me busy for some time! 

What a fun intermixing of the old made new again lately, but in the meantime, I have my 2010 ornament to contend with! I've finished making the pressmolds, all eight of them, and tomorrow I'll be jetting down to The Potter's Center to buy the porcelain clay. Then hopefully this weekend, The Grand Experiment will begin!

Eight innocent-looking pressmolds drying in the garage. I say "innocent" because I'm not going to let their doe-eyed, pristine optimism dupe me into thinking that this Grand Experiment won't be fraught with disaster, frustration and lots -- and LOTS -- of learning. Take a deeeeeep breath and....JUMP!

"Cut not the wings of your dreams, for they are the heartbeat and the freedom of your soul." ~ Flavia

Share/Bookmark

Monday, November 1, 2010

A Rainbow of Possibilities


In keeping with the theme of "transformation" are my ventures into new avenues with my work. Specifically, I'd like to expand into the giftware market, as well as develop more inroads into the fine art venue not only to diversify the studio, but to explore new possibilities with my two hands. I don't like limitations, so I figure I can apply my skills and ideas to all sorts of creative projects! But this is no easy task because I'll essentially be starting from scratch again as I build new client bases...something that's both exciting and intimidating at the same time. Being so, I'm both optimistic and somber about the prospects.

The thing is that in the equine collectible industry, an artist creating good work tends to have it easy. Simply create reliable and consistent pieces and collectors will come to your door. Consequently, such an artist doesn't necessarily have to sweat so hard to market her work, and presentation often takes a backseat to simply creating in-demand pieces. However, this equation is flipped  outside of that market, which means I'll have to hustle to learn and deploy marketing tactics, and work on that almighty component to success -- presentation. The fact is that how work is presented can have more to do with its success than its quality, within the full spectrum of "buzz" to what actually ends up in the customer's hands. 

So I've had a busy time researching various tactics and deciding what would work for my purposes, though I fully expect to learn mostly by trial and error. I've also been researching where to take out print and banner ads once I get my inventory built up, and I'm eager to start that stage of the process. In the meantime, I've been able to apply a few of these strategies to the collectible facet of my studio, and have found that paying more attention to packaging and presentation really does impact the perception of my work. And, ultimately, I want my collectors to have a positive experience when they open that box because so much love and care has gone into everything it contains! Indeed, things only begin once that sculpture is finished!

"I believe that what it is I have been called to do will make itself known when I have made myself ready." ~ Jan Phillips

Share/Bookmark

Friday, October 29, 2010

Setting New Sights

My new studio glasses -- bold and colorful. 

This past year as has been...interesting. If it could be distilled into one word, it would perhaps be "transformation." 

First of all, I sat down and took stock in the studio and decided what needed to be pared away, jettisoning such stand-bys as my sculpture critiquing service, several art forums, and my repair service. I simplified my selling methods, dumping those that entailed high transaction costs and excessive office work. I  also decided to put my books on hold -- the pile of articles I've written over the years fills that gap. I even resigned as editor of The Boat

I need to refocus on my own career. There are several goals I've been putting off for far too long, such as bronzes, my ideas for teapots and developing my giftware lines. I've also adopted new goals, such as designing a jewelry line in PMC, construction-grade tiles and cast-concrete garden animals. And I have my ever-present line-up of half-finished sculptures and paintwork that have been demanding completion. It's time to finally buckle down and get crackin'!

But perhaps the biggest metamorphosis has been my husband's employment. He recently graduated from two years of training in a brand new field, and after a rather challenging time finding a job in today's economy, he landed one here in town...a good one. All this is still sinking in. The thing is, this whole matter has been quite stressful because it included the prospect of shutting down the studio for a move, or perhaps permanently shutting it down if I needed to find a job that offered a more regular paycheck. So to say I'm relieved would be quite an understatement! But this is definitely a new chapter in our lives, both exciting and a bit intimidating, but what's life without a bit of adventure?

As a metaphor for all this, my eye sight has changed. I've been nearsighted all my life, but as age sifts down upon me they're starting to reverse. I'm also having to take my glasses off to see up-close work! So I got a new pair of "everyday" glasses with the  new prescription (above). Now I usually pick frames that are quite discreet, like tiny wire rims so the glasses become more inconspicuous. But in keeping with all these transformations, I decided to pick something completely outside my comfort zone. Something a bit brazen and unapologetic. Something that made a statement. So I did -- and I love them. I guess when you live for two years in deep anxiety of what your future would  hold, when you come out the end of that dark tunnel and into the light, you want to kick up your heels. You're a bit more audacious. A tad more cheeky. And that's good.

In keeping with that, I've launched a new project I hope to turn into an annual Christmas tradition for the studio: A limited edition Christmas ornament. To be bolder still, I've decided to make it my first pressed-tile venture, and pressed in porcelain, no less. Three brand new things that (hopefully) will go better together! Each year will feature a new horse design and I plan to limit them to 200 (optimistic) or 100 (conservative) casts to be sold exclusively through my new Etsy store. I intend to keep the ornaments as bisque (unglazed) white porcelain because I like that look, but I'm considering adding gold or silver accents in overglaze. We'll see. Each will be about 2" x 4", or a snidge smaller because of porcelain's 13% shrink rate. Let's see if I can pull this off in time for Christmas! Keep yer fingers n' toes crossed!

So here's a peek of the inaugural first design, a beautiful Arabian mare showing us her spunk:

Joy, 2.27" x 4.57", original in oil clay. A slit will be cut at the top, between the border and the sculpted ribbon, while in the greenware stage so that a ribbon can be run through it for hanging after firing. I'm thinking about accenting the star in gold overglaze.

So with all these changes, I hope to finally start moving forward with all that's been brewing in my brain to transform the studio into more productive creative kitchen. Time to stir the pot!

"A wish changes nothing. A decision changes everything." ~ Anonymous

Share/Bookmark

Monday, October 18, 2010

Here Comes the Party Girl!


Just finished and delivered to Barry Moore of Bear Cast LLC last week, Sheza Carnival will soon be stampeding out of the studio and into new homes! She's an altered version of my original Spinnaker, now made into a feisty little mare. Here are these two, side-by-side:


Her name was inspired by one of my favorite songs by one of my favorite bands, Siouxsie and the Banshees. The exuberant flamboyance of the song "She's a Carnival" fits Sheza well. She measures about 5.25" x 4", making her about 1:32 scale. To peruse more shots of her, dance on over to her album, and to see more of her with Spinny, go here.

Still working like mad on more minis, plus a whole pile of new tile designs. I hope to have them done just in time for Christmas! I'm on a roll!

"If I can't dance I don't want to be part of your revolution." ~ Emma Goldman 

Share/Bookmark

Wednesday, October 13, 2010

A Milestone at Mink Studios


The door is open, the shelves are stocked and the ratties are ready to ring up your orders! Sales have been brisk so far and it's such a delight to share my love of making these tiles with everyone! Mud is a magical marvel!


I'll be offering my giftware and future jewelry selections in my store, and I can't wait to get to work stuffing the shelves with goodies for you!

Yoicks and away!

"To love what you do and feel that it matters – how could anything be more fun?" ~ Katherine Graham

Share/Bookmark

Wednesday, September 15, 2010

Pondering my Future in PMC

My two favorite pieces from the class. I forgot to show the backside of that Rune Horse pendant, so there ya go. Also shown is the (unpatina-ed) clasp piece I couldn't include in my previous post. My only mistake with the clasp was making the loop a shade too small, so it's really difficult to get that hook through! DOH.

After every big trip, I lapse into a limbo state as I decompress and regain a quiet mind. But this isn't down time. It's perhaps the most important time in the studio in regards to the future. This is because the days following such an experience really are an intense period of cogitation as my subroutines mull over what I've learned and my conscious mind contemplates the new path I'll follow.

What's especially interesting to me about PMC is its jewelry emphasis, which means I have to learn a whole new design paradigm on top of learning how to use the material itself. As I mentioned in my previous post, I learned a lot from watching Ruth and the other students design their pieces. Most importantly, I learned just how confined my creativity had become. Coming from a "literal" background in realism, I found their "interpretive" aesthetic to be a fresh breeze. Indeed, many things they did with the exact same tools or patterns simply never occurred to me! I was amazed and fascinated by their work. I think I actually heard a door click open in my head.

So during this decompression, I've been surfing PMC artists online to study various works in order to identify what grabs me (and why) and even more importantly -- what doesn't (and why) -- in order to pin down my own jewelry aesthetic. And while I already know exactly how my voice is going to shape my jewelry, it always helps to study the work of others to gain clarity and to open the mind. So here are just some PMC artists I've studied so far who fall into the "grab me" category -- enjoy!

http://www.etsy.com/shop/penelopespassion
http://www.etsy.com/shop/chocolateandsteel
http://www.etsy.com/shop/SummerDaySilver
http://www.etsy.com/shop/heartofthefire
http://www.etsy.com/shop/lizardsjewelry
http://www.ivywoodrose.com/index.htm
http://www.sjlmetalart.com/sjl_metal_art/metalsmithing.html
http://www.cdpdesigns.com/
http://dailyartmuse.com/2009/05/21/gordon-uyehara-changing-direction/
http://www.terrykovalcik.com/metal_clay2_tk.html
http://www.silverclayart.com/gallery_pmc.htm

In this exercise, I've confirmed that my aesthetic prefers chunky, organic, relic-like, whimsical pieces that are unexpected and unusual in design. That it's more important to me that a piece be interesting, unique and arty rather than "mainstream."
In short: I like jewelry with an attitude and a point of view. In doing so, I've also confirmed I'm not drawn to "seen it," "sweet," "clutter," or "delicate." This clarity now allows me to forge ahead with my jewelry designs in greater confidence.

Aside from the aesthetic, though, it's also important to pinpoint exactly what it is I like about the medium. Luckily I already have a good parallel: I know what I love about clay -- it's ability to be spontaneous despite my best efforts otherwise. For example, during the process of making my tiles, serendipity infuses eccentricities
that make each one a true one of a kind, and so I literally never know what I'm going to get each time I open Big Al. While this maddened me in the past, I've since surrendered to The Will of Clay, and in doing so, found this aspect to be a rejuvenating aspect that balances out the hyper-control found in my realistic work.

So, what does this mean for PMC jewelry for me? It means that I interpret PMC as clay and not metal. My enjoyment is found when I allow it to be clay, and I enjoy the ironic juxtaposition between "metal" and "clay," things that are opposites in life. So I want to encourage that organic, chance-driven quality rather than pursue a machine-like precision. This has important repercussions.

Because just as importantly, I've been contemplating manageable production logistics. Time-consuming steps can become more of a burden than a boon, as well as drive up the price of the finished piece into prohibitive price-points. So after much thought, I think I have my logistics hammered out in my head that satisfy my artistic and production needs, and all I have to do is put them to the test.

"One thought fills immensity." ~ William Blake

Share/Bookmark

Monday, September 13, 2010

Playin' in PMC

An exquisite Washington rose, kissed by the morning drizzle.


There are few things in this world that capture my fascination more than possibility and inspiration. And if those things could be measured in chocolate, this trip would have been a shameless wallow in a churning sea of the velvety stuff. The primary reason for this trip was to attend
Certification 1 & 2 PMC classes, instructed by the gifted and gracious Ruth Greening and hosted by the PMC Guild, in Lacey, Washington. These two classes would span four days of intense instruction and hands-on learning.


A majestic mountain greets us as we enter Washington -- a wonderful taste of what was to come!


Metal clay isn't something you can just pick up and do. Beyond regular clay, it has additional quirks and technical specs because of the metal incorporated into it. In a nutshell: You really should take a class before diving in; otherwise you're going to end up with an expensive waste of time, or worse, really hurt yourself. But because I knew PMC would expand the possibilities in the studio immeasurably, I decided to attend -- and I'm sure glad I did! Everything that seemed an utter and intimidating mystery to me in my precious metal clay books, videos and mags now make perfect, clear sense. Hallelujah! There is no substitute for hands-on learning guided by an adept and experienced instructor! None.


The mind-boggling bead store, Shipwreck Beads, where the classes were held. Oh. My. Lord. If there ever was a mecca for a beader, this would be it. This place is so enormous, it has its own deli and coffee house!


The walkway is paved in beads!


A tiny glimpse of the inside. I'm not even sure if a wide-angle lens could capture the sheer size of this place in one frame. To my delight, they specialize in glass beads, and my goodness -- you cannot beat the prices here! Strings of exotic glass beads that would easily cost $25 each here in Boise were three strings for $8.50! And the selection of findings, storage cases, tools and hardware were overwhelming. Unbelievable.


In particular, what's really useful about the
PMC Guild hosted classes is that they are structured, standardized and lead by experienced instructors who are working artists themselves. As such, each class is progressive, designed to teach a total newb (like me) on how to use this magic stuff while also teaching the student necessary jewelry methods to expand the possibilities of design.

My instructor, Ruth, was marvelous -- patient, fun, clear and able to answer any question thrown at her (she also loves horses and rides a Harley!). She had plenty of supplies and "stuff" for us to experiment with, and plenty of examples and recommendations of other "stuff" that may interest us in the future. In short: She provided a de-mystified, expansive, and welcoming glance into the world of PMC. Moreover, and perhaps most important, she had that rare gift of being able to teach from the student's point of view, whether newb or veteran. A rare blessing!


Here Ruth demonstrates how to torch-fire a PMC piece, before we each had to torch our own pieces. It was scary at first, but not anymore! Ruth even had some basic supplies for sale, and so I was able to check off several items on my "need to get list" right there while also getting trained on them on-the-spot! One of these items being a torch. I think Hubby is a bit nervous about me using that puppy. I'm a danger to myself and others with a BBQ, let alone a butane torch...but that's another story.


What was great, too, was that the classes were small: Certification Level 1 had six students, and Certification Level 2 had only three! That meant Ruth could really give each of us some close attention, which means a lot when you're in the middle of some fiddly bit and just realized you don't know quite what you're doing yet!

But wait -- there's more! Each class came with supplies, a book and print-outs of necessary information and extra tips and supply sources. You also could purchase more PMC (or extra stones) from Ruth on-the-spot, if you wanted to add more, or used up too much. That was definitely handy.
And Ruth had lots of handy insights. For instance, descend on your local thrift store or dollar store for tools and mold forms because measuring spoons can make great dome molds, or old food dehydrators can make wonderful drying boxes -- and all for pennies. Or when coating a leaf, use only a fresh leaf, and paint "paste" on the back, where the features are more crisp. And one of her first humorous quips: "You'll become a connoisseur of straws" was priceless. I didn't know what she meant at first, of course, but realized as I made several bails, "Oh yes -- I'm going to need a special container for all the drinking straws I'll be hoarding!"


She also brought her "workhorse" Evenheat PMC kiln. What's neat about these kilns is that they can be plugged into any household socket (you don't need to get special wiring, like I did for Big Al), they come up to temperature (1650˚) inside of thirty minutes (!!!), they come pre-programmed with specialized ramped sequences for PMC, and they're small and portable. Reliable, easy, quick and efficient. Sold! Looks like Maury and Big Al will have a new little brother soon!


Pretty much anything you can do with clay, you can do with PMC. Even better -- many of the skill sets and tools for clay and sculpture crossover into PMC. For example, here I'm carving a hollow dome pendant into an impromptu Rune Horse with one of my most favorite ceramic tools, created by Bison Studios (thanks Joanie!). At the top of the photo is the burn-out piece we had to do, created by brushing on layers of PMC "paste" (otherwise known as "slip" to ceramists) onto a cork form, which is then burned out during the fire to leave a hollow PMC piece.


Here are my finished pieces (all of them have patina except for H & J). Now mind you, they are learning pieces, so they're kinda goofy. And we had to work quickly to get each project done on time, so there wasn't time to fiddle and tweak. But each one had a mission: Each was engineered by the PMC Guild to teach me specific things about PMC and specific skills and techniques in jewelry making. It'll take several months of practice to refine my hand, and especially my eye for jewelry design. I learned so much from watching the other students who were experienced jewelry makers. How they interpreted the same specifications and materials from a jewelry-maker's POV was very insightful -- I have a lot to learn in that department! Anyway: (A) The piece that taught us how to apply 24K gold to a PMC piece, (B) the piece that taught us how to use and gain control of the "syringe" form of PMC with the filigree technique, (C) the piece that taught us how to make a ring and set a stone onto the ring (I made the ring for Hubby, and now have a new-found respect for PMC ring makers! ARGH!), (D) the piece that taught us how to enamel PMC, (E) the piece that taught us how to roll slabs, inset stones using the "bird's nest" technique with the syringe PMC, use "wet assembly," inset cabs, attach layers of clay and how to make a basic bail (it was our first piece in Cert 1! I think mine looks like a cross between the Eye of Sauron and a UFO -- "There were three lights in the sky..."), (F) the simple charm piece that taught us how to torch fire, (G) the piece that taught us how to use "dry assembly," make a hollow dome piece, join seams, make cut-outs, how to carve the clay, learn to use of the sheet form of PMC, and make a split bail, (H) the piece that taught us how to do "burn-outs" (I added the polka dots with PMC sheet), (I) the piece that taught us how to make a bezel and attach it to the PMC and inset a non-fireable stone, (J) the piece that taught us how to achieve a mirror-finish and attach different pre-made patterned layers of clay in "dry assembly." The only piece not pictured is the piece that taught us how to make a clasp out of silver wire because it was still in the tumbler. DOH! But with these skills, I can now make pretty much anything I want. I'm going to take Certification Level 3 next year, to learn additional skills that will round-out my repertoire.

So as you can imagine, my mind is swimming with ideas now. I plan to put all my Rune Horses and stamp designs into PMC production, as well as make press molds for realistic equine pieces. But I also plan on incorporating other animals and nature designs a little bit further down the road, as well as make my own texture sheets. I also want to blend PMC with fired clay in some special items, like an annual Christmas ornament. I do know I like creating bezels rather than firing stones in the kiln because that gives me limitless possibilities (and I find bezel making a lot of fun), and I know with absolute certainty that enameling will be incorporated on some pieces. I cannot resist the look of translucent colored glass on the metal.

However, my goal isn't finished pieces of jewelry, but jewelry components that others can buy and make their own finished jewelry...rather like beads. To me it's more fun to see what other people do with this kind of work, and I just have so many design ideas that I have to prioritize my time. Even more important, a self-employed artist has to be honest about her strengths...and for me, coming out with new design components every year is a stronger skill.

So as you can well imagine, I'm going to be very busy in the upcoming years between my sculpture, tiles and now PMC. Bliss. There's nothing I like more than getting up in the morning with lots of exciting work to do, clear ideas and clear goals. Well...except for ooozing rattie goo. But just by a little!


The Washington capitol building in Olympia, seen from the port harbor. Downtown Olympia reminded me a lot of old downtown Santa Cruz (before the Loma Prieta quake) crossed with the Haight-Ashbury district of San Francisco. I liked it a lot.


Then turning around, you see the Port of Olympia, with the big shipping cranes on the left.


Another passion of mine: Tugboats. They drive me insane with delight.


The tourist harbor area had wonderful metal castings of shellfish embedded in the paving. A really nice detail.


Anyway, my classes ended on the 6th, and so I was off to the Washington coast on the 7th, making a bee line to the Olympic National Park. As I mentioned in an earlier blog post, we plan to return next year to the park so I can do some hardcore research for tiles and PMC design.

I have always been madly in love with lush forests. Green, full of life and that wonderful aroma. Shade, serenity and the sound of trees. And what's even more awesome about Northwest forests is that they're verdant, misty and warm, not sticky humid hot. Overall, NW weather is my favorite. The overcast cloud-cover makes my hyper-sensitive, fair, prone-to-lobsterize-at-the-hint-of-sun skin so so happy. My curls love the moisture in the air, too, and my lungs suck up the moist air with glee. I don't feel dessicated or cooked, but like I'm in a happy damp box as content greenware. Anyway, here are some shots from inside the visitor's center (it was so overcast that day, that it was smarter to forge ahead to the coast and return another day)...

No truer words have ever been spoken. I wouldn't want to live in a world without critters! Especially the beady-eyed kind.


A really beautiful ceramic heron, hanging in the visitor's center as an example of a native bird. I thought of my friend, Addi, and her fantastic heron sculptures.


To get to my destination on the coast, I had to go through Forks, WA, the setting of the popular series, Twilight. The entire town was awash in Twilight-arama.


A lovely view of one of the many WA lakes on the journey to the coast. They reminded me of the Misty Mountains from Tolkien lore.


A daredevil tree, set against the misty forest backdrop typical of coastal Washington.


The luxuriant pathway down to Ruby Beach. One day, the pathway to my studio will be like this. Somewhere. Some day.


A little ambassador welcomed me to the beach -- a banana slug! Also the mascot of my alma mater, UC Santa Cruz. And yes -- I wear my classic Zen Slug t-shirt with pride.


Ruby Beach, Olympic National Park, WA.


Another shot of Ruby Beach.


There were lots of totem-like rock piles everywhere.


Typical of NW beaches, driftwood is everywhere. I liked the rings on this guy.


After Ruby Beach, it was Kalaloch Lodge for the night. Love this place! Nice accommodations, friendly staff, a great beach (with tide pools!) and fantastic food. I had a scrumptious wild mushroom strudel (with mushrooms picked from within the park!) for dinner. Incredible!


A view of the lighthouse from the shore, on an island now designated as a wildlife preserve. As you may know, I have a deep affection for lighthouses.


Another great love: Crows and ravens. So here's a uniquely NW picture: A crow feasting on mussels during low tide. One of my big goals is to create a tile and PMC line featuring these birds.


A view on the beach -- another typical NW beach scene: Cloudy skies, mist and driftwood. Saaaweeeeet.


Along the beach around the lodge were these interesting totems created by beach campfire revelers. From this simple rock-stilt thing...


to this rather clever and elaborate "Northwest Woodhenge."


The view from my hotel room.

After a night on the beach, it was time to visit Little Bro and his wife, Megan, in Oregon. It was a great time, filled with laughter, Swamp People ("tree shaker!") Neil Diamond, and -- no big surprise -- great food. Dang...Megan can cook a mean meatloaf. Wow!

On my last day there, we went on a four mile hike around Jack Lake on the Canyon Creek Meadows trail. The first two miles were uphill. Uphill. So wanting to puke from exhaustion and panting like a sled dog, my head pounding like a church bell, I finally reached the top and downhill portion. Note to self: Get in shape --- NOW. Regardless, it was a breath-taking hike (har har).


A view of Three-fingered Jack from the trail. Look at all those dead trees from the fire!

There had been a fire through that area about seven years ago, leaving an interesting mingling of pristine and damaged or dead trees. To tell the truth, I loved the dead, fire-polished trees. I think of them as "ghost trees," and they had been polished by the elements into a smooth, silvery sheen. Like natural monoliths. Against the blue sky and sun, they glistened. So beautiful.


Walking in the company of Ghost Trees.


It was like hiking through an alien landscape, or a great tree graveyard.


Ghost Trees with fire-colored shrubs.


Among the beautiful bones of dead trees, life starts again.


Eating well always is a priority on vacation, and this one was no exception! As I mentioned before, fresh seafood and shellfish were always on my menu. But this local diner in Bend is a must-go-to destination for breakfast...


Jake's Diner in Bend, OR. This place has amazing food, a comfy atmosphere, a sense of humor, and super-friendly service...and very reasonable prices. A breakfast here won't sit hard on your ribs, but you'll be full and fueled until dinner. And no shi-shi, over-priced nonsense. Good hometown "blue collar" cookin'. No wonder this place has a loyal local following! Bascially, Jake's Diner understands good, honest food exceptionally well. And they are spot-on consisent with every meal. For example, Jake's has the best French Toast I ever had, and I'm painfully picky with French Toast. I don't want complications or wild re-interpretations -- I just want perfectly made, basic French Toast. Not too sweet, not too bready, not too eggy, and moist and creamy on the inside with a caramelized, crisp crust. And I got it there, in spades. Jake's also is home to the very best Egg's Benedict I ever had, as well. Nothing reinterpreted or goofy -- just perfectly made and robust. Even better, Jake's makes its Hollandaise sauce from scratch, and it's easily the best hollindaise sauce ever made. Anywhere. Seriously. Balanced and perfect. If you go through Bend without having breakfast here, you're denying yourself a real treat. Now I don't know about lunch or dinner -- since I only had breakfast there -- but if they're anything like what I had, I imagine you can't go wrong.


A fantastic bowl of cioppino I had while in Olympia. Yum! I feasted on local oysters, too. I also had the second best crab cakes I've ever had in that town, at Anthony's (the best were made by my late-Grandmother, "Babci," which means "Grandma" in Polish). I also enjoyed some amazing fresh, line-caught salmon there -- wow! Seafood and I have a long-time love affair.


It certainly all was a terrific vacation and learning experience. I'm bursting with inspiration and ideas, and refreshed by the coastal Northwest. But I'm very glad to be home. Now my real challenge is staying focused to realize my goals. I have important priorities I have to tackle in sequence like a diligent little pit pony if I'm going to survive this bottleneck of projects. For example, I have to get the Summer 2010 issue of The Boat out the door, then get my finished Melly Tiles out the door, then my own finished tiles up in my Etsy store. Amidst all that, I have to complete several bas-reliefs and sculptures for casting and get my PMC studio set up so I can start using what I've learned. I really need to start building the means, finesse and experience in that media so I can start offering PMC pieces in my store early next year.

Busy busy busy! Just the way I like it.

"If you want something really important to be done you must not merely satisfy the reason, you must move the heart also." ~ Mahatma Gandhi

Share/Bookmark
Related Posts with Thumbnails