Thursday, December 29, 2011

Carousin' with the Chemo Critters

Ten Little Critters, pink n' pretty...I'd rhyme more, but I'm not that witty.

Earlier this year my friend, Lynn, had to start the arduous process of combating cancer. Wanting to cheer her up, I got to work on a special project, one I'd never attempted before (and I sneaked a peek of one of pieces in this April blog post). 

When I heard the worrisome news, the idea for the project just popped into my headten little animal totems done in a caricatured, happy style. What kind of animals those ten would be also just popped into my head, those being a raven, a bear, a rattie, a frog, a tortoise, a bunny, a penguin, a bluebird, a ground squirrel, and a cat. Each one kinda symbolized a specific thing I wanted to say, becoming a fun clinky friend as well as a reassuring message. 

Creating these wee ones was a blast! Sculpting the different body forms and the happy expressions was addictive. I wistfully thought of what it would be like to work for Disney as I sculpted in those smiles. But I did set one steadfast rule for myself: none of the critters could take more than two hours to sculpt. I set a timer. 

The reason for this was twofold. For starters, I knew my penchant for fiddly realism would seep in if I gave it enough "fiddle time." Not that that's a bad thing, but for this project, I thought that level of fiddliness would distract from the whimsical quality of these critters. I also didn't want to overwork these pieces into oblivion, and the timer made sure I had to prioritize what my hands did.  

And second, I think sculpting totally outside a familiar zone is a healthy exercise, especially for someone so specialized in realism. I have great admiration for artists who can "cartoon" things because it's so difficult for me. My brain just works too literally. Now, however, I wanted to encourage it to work beyond its OCD habit and for that, a time limit forces it to capture the essence of shape and form rather than "literalness." And it seemed to have worked!

That said, there was a complication. Okey doke—for backstorywe try to avoid having thick, solid portions of clay to fire. Like, say, nothing thicker than a small carrot. If we do, we risk having a massive explosion in our kiln (and destroyed pieces) due to moisture that couldn't evaporate from the clay properly, or air bubbles that burst when heated to their explosive point.

But as I'm prone to do, I get carried away and forget about such critical technical imperatives. I just sculpt, happy in my muddy delirium, and don't really think through the process. So when I sat back and finished all of them—now back in realityimagine how my eyes went AAAAAWOOOOGAAAAH when I realized just how big and thick they were! GadZOOKS! There sat ten little critters just asking for explosive trouble in Big Al. 

But no problem I thought, shirking off the initial panic. I could let them dry a teensy bit, cut them in half and hollow them out, like I did with Mr. Pony. The only thing is...I got distracted. Big time. Certain family matters and projects with pressing deadlines caused me to completely forget about this critical step, and I missed the window. Once clay gets too dry, you can't really piece it back together well, and it tends to shatter apart or crack when fired. So I was now committed to firing them solid and thick. Great.

That meant they had to dry. Dry dry dry DRY. So dry, they'd put the Sahara desert to shame. So they sat for two and a half months. Remember, though—moisture was only half the problem. There was still the threat of air bubbles, but that was something I had no way of managing. If an air bubble was in any of them, there was no way of knowing. It was a gamble, and I just had to forge ahead on faith and hope. 

The one thing that was working in my favor, however, was that these critters were sculpted in lowfire earthenware, a clay that's much more porous and forgiving in the air bubble department. Had they been sculpted in stoneware or porcelain, the outcome was potentially far more grim. Probably too grim to continue.

So came the big day, the bisque fire, in which the raw greenware clay is fired to make it hard. Being earthenware, this meant that the bisque fire would be the mature fire, the highest temperature, with the second fire for the glaze being the lowest temperature. So if these critters made it through this first bisque fire, they'd probably make it through the glaze fire, too. This was the moment of truth.

Taking precautions when I loaded them, I stacked kiln posts to form a kind of bomb shelter around each one. I thought if one exploded, at least the posts might contain the blast to help protect its neighbors and the inside of Big Al. Because, honestly, I fully expected to lose mostif not allof them. But the only way around it is through it and so in they went, and "on" Big Al clicked. I fretted for twelve hours.

The next day, I trepidatiously opened Big Al's gaping maw, already accepting the worst, when what did I see? ALL of them...intact? In perfect white bisque? WHAT?! GLORY BE! It's a chemo critter miracle! I quite literally couldn't believe my eyes and even started shaking with pure excitement. What an awesome omen! Heck, what a relief! To celebrate, I promptly chomped down a big chunk of chocolate. NOM NOM NOM.

So the next step was glazing. Again, because I don't think things through most times, how these puppies would be glazed really didn't get hammered out entirely. Or rather...not at all. I did know that realistic glazing was out because I thought that would be too distracting from the actual sculpture. But beyond that, I was at a loss. 

In hindsight, I'm rather irritated at myself for not having put more thought into the glazing aspect to be honest. Though I didn't know it at the time, deciding how to glaze these suckers delayed the entire project far longer than I intended. Hemming and hawing back and forth...art glaze? Solid? Directional? Splatter? Sponge? Airbrush? Different colors? What colors? Covercoat or tints? Overglaze? BAH! So many options! 

I finally made a command decision and chose directional underglaze in three harmonious colors: blue, green and magenta. I figured that would accentuate the sculpture, be colorful and look cool together.

Here are some of them, getting their clear gloss glaze after being directionally sprayed with colored underglaze. The clear glaze is tinted pink so you can see how you apply it, but the pink disappears in the fire.

After all was said and done, they all survived the glaze fire just fine and came out cooler than I expected! I was tickled beyond pink and into blue, green and magenta! So without further ado, here are the chemo critters...

 Here's the bear, scratching his paw. He's about 3.5" tall if I remember right. A solid chunk of 3.5" tall. Oy.

 And the bunneh, about 2.5" tall. Those ears were a riot to tack onto that noggin! And who can resist a bunny tail? No one, that's who!

The cat. I'm particularly pleased with this guy. He was one of the hardest to sculpt, that feline body having so many unfamiliar curvy nuances...and the skull was tricky. Wow, cat skulls are complex! But he was a lot of fun and a great challenge, so I'd like to sculpt more stylized cats for those reasons.

The bluebird, who also happens to be the state bird of Idaho. I'd never sculpted a bird before, and I pondered over those feathers, let alone the birdy shape. Because of all that, this little guy was the most difficult piece to sculpthe was just so waaaay outside my familiar zone! Boy, was I pleased to find that he turned out so cute! Lots of lessons learned from him (which I'll take back to my equine work). The biggest one? Just how effective a mere suggestion of something really is, such as "feather."

The perky purple penguin. I decided not to make his "arms" touch like some of the others since I liked the idea more of him softly popping his wings against his body. I envisioned him with that grin and doing that while rocking side to side with giddiness (and you can see that suggested by his tilted head position). That roll of goo was especially fun to sculpt!

 
And now for the froggie. Here's another one way outside my comfort zone. Wow! Frogs are wild to sculpt! I'm delighted with how he turned out, though, since I really wasn't so sure about it all. You know when you sculpt something so totally different, you kinda have no basis on which to base your confidence? Yeah, that.
 
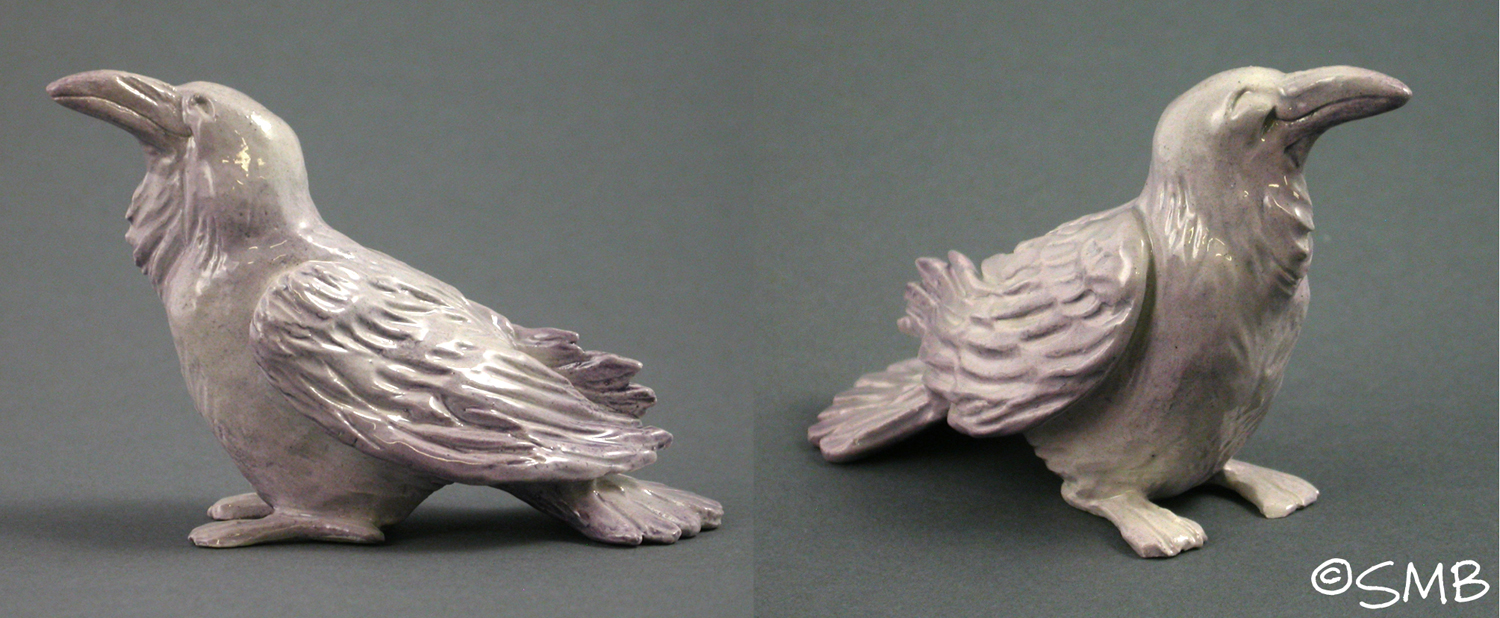
The raven, who was about 4" beak to tail. If I remember right, he was the biggest piece. I really love ravens, and I knew Lynn liked them, too, so he was extra fun to bring to life. But I gotta tell ya...sculpting a smile into a beak is an interesting experience!

A happy tortoise. I adore tortoises! That shell was a thrilling challenge, but I especially loved sculpting his neck goo and his little face. Tortoises have such cute faces!

A squiggly ground squirrel. It's no surprise that two rodents infiltrated this crew. I mean, aside from the obvious association between me and rodentia, that body type lends itself so well to caricature. I really like how this little guy turned out, too, especially through his scrunched up shoulders and neck goo.

And, of course, a rat! What actually surprised me about this piece was that I sculpted him from memory. I really didn't think my brain was processing rattie form all these years, but apparently it was!

After all this, I offhand discovered something rather interesting, shown in these next three images. Now obviously there was a learning curve since all this was new to me. But to tell the truth, I really didn't know what to expect of myself. 

Despite all that, though, I anticipated a smooth and gradual learning curve, progressively demonstrating increased skill in each successive animal. Did I get a big surprise! How this project kicked off proved that a learning curve can be abrupt and nearly instant.

To back track for a moment, the first piece I started was the rat, since he was the most familiar, or rather, the least intimidating. Then I sculpted the bear and then the bluebird. But after I stepped back from these first attempts, I decided I didn't like them. They just didn't have the qualities I was going for and they were too crude. 

So I immediately started each one again from scratch that very same day. Here's where things get curious (the first attempts are in the top row, with the second attempts right below)...

 
Clearly, there's a big jump in evolution from the first try to the second try, as shown by the ratties. This caught me by total surprise, and what's more, I only realized this after I compared the two later. In other words, I wasn't cognitively aware that my brain had made this leap while I was sculpting the second attempt. It just happened.
 
Here we see the same effect in the bear. Night and day.
 
And the bluebird. That's a dramatic difference! Like two completely different people sculpted them! And in a sense, that's true.

Now this isn't to brag. It's to illustrate something important about creative development, which is: try again. That may sound simplistic, but it really digs into some useful ideas. For instance:
  • The way we look at things is subject to as much creative evolution as our practical skills. Moreover, this applies not only to how we perceive our subject, but how we perceive our sculptures, too. 
  • New abilities develop unpredictably. There isn't a "right way" of learning, so we shouldn't be surprised if some things come faster than others. Learning can happen sideways, too, when we aren't even realizing it's happening.
  • The only way to advance is to do and redo. Again and again. The more times we redo, the more opportunities we give our brains to refine and rethink what we're doing. Which brings us to...
  • We must finish what we start. If we rarely complete our projects, we don't give our brain the opportunity to complete its learning. Doing and learning are the same thing!
  • Though we may not like our first attempts, we shouldn't get discouraged because they don't indicate what we're really capable of! We can always try again. Learning is a process, and we need to give our brain the opportunity to put new lessons to work.
  • Even failures are worthwhile endeavors. We all have to start somewhere and we all need a baseline from which to grow! We shouldn't be afraid to dive in, or follow the wisdom of our hands.
  • Try something new from time to time. Keep your brain flexible and able to see the subject in different ways. It's fun, too!
  • And lastly, even experienced sculptors struggle and surprise themselves. Please don't feel inadequate if you're struggling because that's just part of the journey! Struggling means we're learning, so embrace it!
All these pieces are oneofakinds (AAOK), so there are no molds to create duplicate castings. Do I plan to revisit this idea, to make more critters? Perhaps. It would be creatively healthy for me to veer off into caricature-land from time to time, plus sculpting other animal forms is an enticing prospect. So I can't rule it out. If you see similar little denizens pop up from time to time then in my Etsy shop, you know what inspired them!

All in all, I'm happy to report that just as this project had a happy ending, so has Lynn's yearlong ordeal! We have so much to be grateful for, and so much to look forward to in 2012! Just keep forging ahead and shore each other up. And don't be afraid to be silly and have a bit of fun, even when things seem bleak. Above alllove love love. These critters were made with love for a lovely lady, and I hope they bring her many years of smiles and warm fuzzies!

"Most of us would be upset if we were accused of being 'silly.' But the word 'silly' comes from the old English word 'selig,' and its literal definition is 'to be blessed, happy, healthy and prosperous.'" ~ Zig Ziglar

Share/Bookmark

Friday, December 2, 2011

Dirt, Sand and Metal


 Detail of Petals and Ponies, one of the festooned Dancing HorseTM tiles still available in my Etsy store.

I believe all art is about the elementsthe elemental state of nature, the elemental sentience of existence, the elemental essence residing in all life, and the elemental ties that bind us together. The inner core. The base ingredients. Art is about life itself.

This is one of the reasons why working in ceramics is so appealing. What can be more elemental than dirt, water and fire? Mix it with imagination, dedication and passion and we rouse what is elemental within us. Art is forged in the gut. It's good for the soul.

Along with its elemental simplicity, clay also represents an ever fascinating, dichotomous blend of lowtech and hitech, serendipity and mastery, partnership and submission, function and art, timelessness and regeneration, of old and new. Ceramics evolve, yet remain true to its base elements.  

I believe the the same can be said for the work of any dedicated artist, no matter what type of art they create. Indeed, it's a philosophy I apply to all my work, and just as much to my giftware.

This fourpiece Prancing PoniesTM set, River n' Rock, was one of the many popular magnet sets offered. Each one is about 2x2" and based on a shape of either a circle or square. New upcoming designs will incorporate the triangle and oval to make the whole collection synch with the Dancing HorsesTM. Next time I may festoon these little guys, too. Tiny tiles + tiny beads = big fun!

Speaking of which, it was a madhouse here these past two weeks with beading, packaging, photographing and uploading. Why? Well, for Fuchsia Freakday, of course! Last Friday I opened my Etsy store for a big ceramic giftware sale, featuring my Dancing HorseTM tiles and Prancing PoniesTM magnets.

Offered was the usual undressed Dancing HorseTM tile, this one being AC-1 ("AC" meaning "Artist Choice"). This was my favorite tile from the entire fire, using an oxide that was rubbed off to reveal the design. I was very tempted to keep it.

In particular, there were some unique features about this sale that one could regard as landmark. For starters, this was the first time I offered my Dancing HorsesTM festooned with beadery. Mud and glass together at last! I've been a lifelong worshipper of glass beads. Hey, they're wearable bits of art glass! I've collected quite a gleaming mass over the years, like some sort of devout Bowerbird, especially during my PMC workshop last year at Shipwreck Beads

So it was a thrill to finally combine two loves into one shiny pile of giddiness. Learning how to make my own glass beads is actually on my fiveyear "to do" list so I can incorporate them into my giftware and (future) jewelry. My friends Jonathan and Joy sell their gorgeous handcrafted beads and beaded creations on Etsyhow cool is that?! With inspiration like that, who can resist?

Also new to this sale was the offering of undressed tiles with different hole configurations, this one having three holes. Collectors are encouraged to festoon their undressed tiles in their own special way and different configurations provide more options for their creativity.

Another landmark feature was a predetermined store "opening," a specific date and time when it would be instantaneously stocked and opened for shopping. Based on the rather stressful situation with my previous porcelain sale, this time around I wanted to hide my items until they were all uploaded, then "unhide" them at the appointed time to open the store. Many thanks go to Amanda for her astute instruction on how to do that, and it worked like a charm! It was a far more pleasant experience for both shoppers and myself. Thanks tons Amanda!

Still, I'm not exactly a deadline kinda artist. I'm much more free and fluid and free-flowing and...and...oh heck...OK, I'm prone to distraction. From too many ideas and too many ongoing projects. I've become a reallife Jeremy Hilary Boob

But I can say this: having an opening deadline wasn't only really exciting, it was a healthy exercise in time management. Or to put it more accurately: it was a mad rush! Midnight oil was burned by the barrel and early morning coffee was chugged by the potful. Sometimes ya gotta bust yer artistic gut to clean out the creative gears!

Another landmark aspect of Fuchsia Freakday was the debut of the Prancing PoniesTM magnets. I really love a cool, unusual, handcrafted magnet as my decorator crab-like fridge, metal shelves, and file cabinets testify. They're a delirious blend of function and art in a tiny package, and they're a super means to test new glazes to boot. So I was tickled to see the huge response to themthey were snapped up like acorns by a rampaging squirrel army! The sets were particularly popular, so that tells me I'm on the right track.

After all the hard work and preparation then, I'm delighted to report that the sale was a wild success! Thank you! It was so successful, in fact, that I plan to make Fuchsia Freakday an annual event to coincide with Black Friday. Next year, I'm even going to incorporate an exclusive, dayspecific item! Spice it up a little. There are still some items available, and being handcrafted, unique pieces of art, they make novel gifts and stocking-stuffers for the discriminating horse lover.

 
Here's one of the two-hole festooned pieces, Whirligig. Not only is it fun to come up with beading patterns, but titles, too! And this glaze is one of my very favorites - consistent, easy to apply, pools well and has a rich, smokey lavender color. If you look closely, it also creates a 3D effect with the swirls. So cool!

I'll be actively expanding my giftware items in 2012, introducing new designs, new lines and new items (including jewelry and mosaics). So amid the ongoing chaos from porcelain ornament production, I'm also finalizing loads more stamp and tilepressing designs, along with creating more basreliefs. Like I saidJeremy Hilary Boob.

A Cool Cocktail, one of the three-hole festooned pieces off to a new home.

The thing is, though, many of these new tile designs were actually done last year. Well, at least the equine figures were. That's the easy part. It's the logistical production part that's hard. For instance, what will be the flourish or theme? How will the designs work together but stand alone, too? Will I use a stamp or tile press? That's a pivotal decision because it predetermines the design, production and nature of the final piece. Then what size? What shape? What clay? What will be the target price point and how will production be designed to meet that? Lastly, and perhaps most importantly, how will all this limit or expand various other applications of the design? It may not seem like it, but this process is actually tremendously difficult.

 
Here's one of the four-hole festooned pieces, Dancing in my Dreams. This piece is still available!

Interestingly enough, though, creating the pieces for Fuchsia Freakday clarified design issues and resolved production problems in roundabout ways, so all those previously stalled designs are now flowing smoothly. At last! Blarg! I can't tell you how good it feels to finally have forward motion on them!

All that Glitters demonstrates that the fun can be doubled when tiles are festooned together!

There's also nothing like a firsttime sale of new pieces to teach you humility. Leading up to the big day, I had all my ducks in a row...or so I thought. All the boxes, promo flyers, listing methods and verbiage, packaging...yada yada yada. All was at the ready! Go me!

I soon discovered that no amount of prep can prepare for the actual play of events. In the scramble to jump through my own selfmade loopholes, for example, I was forced to make many a return trip to my local box supplier, each time thinking, "OK, I have everything I need nowI'm all set!" Aaaaaand each time returning for something I never imagined I would need, with Mike (the owner) quipping, "You forgot something again didn't you!"

It doesn't stop there! We can add more! Here's Bouquet.
   
Now some of you have asked how I come up with my ideas and, well, going back to the elementals, they're born from an alchemy of imagination and spirit, with a bit of whimsy and style thrown in for good measure. But, essentially, the bottom line is this: What kind of horsey gift would I want to give or receive? From that perspective, coming up with ideas is really quite easy. When we create from the heart, isn't anything?

 
Finding a rich, pretty golden yellow Cone 5 glaze that also pools well has been quite a quest, but I finally found one! Here's The Bright Side, one of the four-hole festooned pieces that sold on Fuchsia Freakday.

But giftware designs are also guided by specific goals necessary to create a coherent line. I put quite a bit of thought into each one to build something cohesive, continuous and versatile; to be able to evolve, yet stay true to its core. For that reason, these ten goals guide each new design:


These "Ten Commandments" make giftware a load of challenging fun to concoct, on every creative front. I mean, not only is the process a logistical puzzle, but designing these pieces asks me to see the subject with totally new eyes.

Giftware thus opens the door for expressing the subject in so many different ways, and that keeps my body of work fresher while becoming an addiction of perpetual inspiration that pulls from multiple outlets, not just realism. All this congeals into a positive feedback loop that informs the rest of my work in ways not possible by other means.

I'm Finally Warm, in response not only to the color of this piece, but to the space heater now residing in my office. It's still available in my store!

Just as importantly, giftware spreads the accessibility of my art while also revealing a side of me otherwise not so obvious. So while my sculpture work is a dialogue between me and the subject, my giftware is a dialogue that includes the collector, tooand that's a really cool conversation!

Here's the grand-daddy of them all - a "four up," Rosemary & Thyme, inspired by the wonderful British series I was watching at the time. 

I can also say that Fuchsia Freakday is my rebuttal to Black Friday. I mean, geez, "Black Friday?" I get the point, but it sounds so dreary! I have such a blast creating these pieces that I figure my version needed a bit more pep. I also choose to offer handcrafted, one–of–a–kind pieces made right here in the good ol' U.S. of A. with heirloom methods, in contrast to the typical items shoveled out by the crateful on Black Friday. And you don't even have to park your car!

The Dance, my favorite of the festooned pieces, and one of my most favorite things I've ever created. I held it back from the sale, at first tempted to keep it, but then realized it needed to live with a certain someone special I had in mind.

So all in all, this sale has been a joy, a reaffirmation, and a learning experience. Speaking through an elemental language is gratifying in more ways than one. It's a blessing that teaches new lessons and inspires new ideas, permeating the studio with the wisdom of core ideals to invigorate and reawaken. Yeah, I'll be busy next year. Just the way I like it.

"Ad hoc, ad loc and quid pro quo. So little time—so much to know!" ~ Jeremy Hilary Boob

Share/Bookmark

Saturday, November 12, 2011

The Creative Stewpot


It's funny how some things are just meant to be, and in their own time. Life's a mystery, a wonderful thing to be sure. Indeed, a couple of weeks ago I discovered just such a mystery languishing right under my nose for...oh...about seven years.

Back story. Okey dokey - I had a 1:9 scale Morgan family in the works some time ago. I started with the mare, but from Day 1 she was a battle. Nothing worked. And I mean nothing. It was one big sculptural Bataan Death March. So I stopped. I've learned it's just better to stop and switch gears rather than force things. Either I'm not ready yet, the planets aren't aligned, or the conflict originates in my inability to listen at the time.

On top of that, I later decided they needed to be in ceramic as well, and so they needed scaling down because at the time ceramic production was infeasible with pieces larger than 1:12 scale (albeit not anymore). Really, the mare's torso alone was a good 9" long, not to mention the neck, head or tail! Back then - before large pieces were slip cast in pieces - that meant the wet, loaded mold would have weighed enough to snap one's spine in half like fresh celery.  

So I made new scaled-down armatures and shelved the original versions in the dark recesses of my studio closet.

 Here's the second generation scaled-down Morgan mare armature. Her torso is only about 6" across. I enjoy creating family sets because I can play with one theme in different ways while also infusing interaction between the pieces.

However, stewing long before all this was the compulsion to sculpt a Lipizzan stallion. I keenly remember the Royal Lipizzan Stallion show Mom took me to eons ago when I was a wee tot, I think when I was in elementary school. Let's just say it made quite an impression.

However, what stopped me in the ensuing decades were the lingering doubts about my ability to truly capture the cavorting white steeds romping around in my imagination. For one, Lippies have a very distinctive look and presence while also imbued with the feel of a living relic, a horse from another age. The breed has a high degree of type variation, too, but despite this, it's surprisingly easy to sculpt them as too-Andalusiany, -Furiosoy, -Morgany, -Arabiany, -Kladrubery, or -Cobby and I risk missing the mark entirely. There's a delicate balance of key features needed to create a piece that immediately and unequivocally reads "Lipizzan." Complicating matters, these horses also incorporate nuanced ideas about anatomy, biomechanics and horsemanship due to their "old world" build and schooling.

Altogether then, one could say that the Lipizzan extravaganza Mom took me to all those years ago was a primary impetus for the development of my art career. Why? Welp, in the truest sense, portraying this breed incorporates everything one needs to know about realistic equine sculpting. But that meant the Lippies who paraded before my tiny, awe-filled eyes had to wait patiently in my head for 30-odd years before I'd come to understand how to do them justice. Some projects really just need to bubble and burble in a creative pot for a very long time. 

Here she is, just as I recently pulled her out of the closet. A GapoxioTM wad of frustration and self-doubt.

As these things tend to do spontaneously, all this smashed together in one of those Big Bang moments of seeming destiny. I was digging through my closet on a totally different hunt (of course) when I came across that old, dust-covered mare. In an instant epiphany, I saw her reborn as a Lippie stallion. It was a literal flash. Quite a powerful moment, actually. Then like my life flashing before my eyes, I realized that's what was fighting me all those years ago! I was forcing this piece to be something it didn't want to be - something it wasn't supposed to be! And too soon.

Here he is, cut apart to be re-pieced back together. Unlike many of my colleagues, I create my full-body sculptures from a self-hardening epoxy clay rather than soft oil clay, or waxes. This means changes can be a real PITA, but it does provide a permanent archival sculpture. This epoxy also has superior characteristics for capturing detail and fleshy effects with ease, at least for me.

So here he is, pinned back together and quickly rough-sketched in Photoshop to distill the idea. Still debating the head and left foreleg position - perhaps the tail, too - but I'll let him guide me this time 'round. While I'd like to eventually sculpt Lippies in the haute ecole and "airs above the ground" movements, right now the "cavorters" have to get out of my head after all these years.

(Above segment) The original version, and (lower segment) the new version. He's going to entail quite a bit of work with tweaking, correcting, re-proportioning and getting things in synch. For example, I see already that his gaskins and hind cannons are too long. However, I work from the withers "outward" so I'll make all the necessary corrections as I go, essentially "cascading" the errors out of his nose n' toes.

Representing a culmination of my entire art career then, this piece will be a true test of how well I've mastered the art form. A heckuva challenge, but I cannot wait to get started! I figure I can work on him alongside my sproinging Arab mare to usher in 2012 with a bang. 

But oy...he's gonna be big. My largest original to date! Heck, he's already the size of my HR Metalchex! This makes him a sharp departure from the smaller scales I've been creating lately, but it's fun to spice things up every so often. And while I don't know how his size will translate into resin or ceramic, I do think bronze is a definite must.

I'm so grateful that Mom encouraged my passion for horses at such an early age - look at the journey it started! A blessed path. What a wonderful thing to look back upon and reflect, and then be able to infuse into this grandiose and thrilling piece! The past and the future, stewing together within the joyous moment! Thanks Mom!

"It has happened more than once that a composition has come to me, ready-made as it were, between the demands of other work." ~ Amy Beach

Share/Bookmark

Monday, November 7, 2011

Variations on a Theme


If you follow this blog, you've probably picked up on a theme by now: my infatuation with serendipity. That is to say a fondness for variety, diversity, change, moment, uniqueness. The things that make each of us individuals and each second a complete universe. 

Creatively speaking, this translates into a gaggle of things to create paired with various ways to create them. Said another way, I not only have affection for variety in media, method and composition, but also for the various expressions of the equine form. Not talking about breed, gender or age differences here. Those are obvious enough. I'm talking about the more subtle differences in how anatomy manifests between individuals that make them individuals and how anatomy changes between moments that make them individual, too. Pour in expression and soul, and that's the fun stuff for me. The rules are just a means to the end.

Now granted, the rules are important. We strive hard to learn equine anatomy (to include biomechanics) as beginners and continue to refine our understanding throughout our career. Deeper than that, however, is the individuality of anatomy. No two individuals are alike and no two moments are alike. So applying the same habitual anatomical interpretation to another sculpture isn't the best plan if we seek to convey this animal's experience with authenticity. (I hinted at this effect a bit more in Parts I and II of my anatomical chart discussion if you're interested in more discussion on the subject.)

Also, when I see a horse, I don't see "a horse," or even a [insert breed]. I also don't make value judgments of "good" or "inferior," "beautiful" or "ugly." What I see instead is a unique individual, much like how I'd identify friends and family. Having evolved away from objectification in my art and towards exploration, I'm far more interested in those qualities that go deeper. How does the saying go? "We like people for their qualities, but we love them for their flaws." Well, I believe the same applies to equines.

Because of this, sculpting "perfect" specimens isn't very interesting to me. I mean, you're not lovely and worthwhile because you don't look like a movie star, centerfold or model? Nah. I don't find your value in how beautiful you are on the outside. And it's so subjective! Indeed, it's those things that make you different that allow me identify you as you! Isn't that much more fun? 

In a similar way then, repeatedly sculpting the same anatomical formula doesn't light my fire either. Sure, it's comfortable and safe, like all habits are, but the serendipity found in living anatomy entices me far more. The irony is that I've been telling folks all this time that I don't sculpt portraiture, but only now do I realize that's exactly what I've been doing. Only I just create portraiture of my own making.

Anyway, this direction came into sharp focus these past two weeks in the ceramic studio. As I mentioned in the previous post, I got a wild hair - as I'm prone to do (perhaps too often) - and cast some Reflective plaques in porcelain slip. I actually bought the jar of this magical stuff some years ago and it sat lonely on the shelf until I was confident enough to swim in its silky goodness. The Joy ornament from last year eroded any trepidation I had, so I figured it was time to swan dive.

Anyhoo, the mold cast easily and the two initial castings were a dream to clean. Greenware porcelain is interesting. You don't really clean it like you would earthenware, terracotta, or stoneware. You really just touch it with water and it "self heals." (In this case, a soft artificial paintbrush dipped in water.) It melts into exactly what you want. It also carves beautifully and holds detail like nobody's business. Imagine mixing talcum powder with butter - that's how it feels.

Elsie supervised the entire endeavor, taking period drinks from my water cup. Yes, I love tapioca pudding, so I have lots of those cups.

Which got me to thinking. Reflective in porcelain was exciting enough - yeah, great. But why stop there? Claybody them! Never mind that I've never worked with porcelain slip before. And let's just ignore the fact that I've never claybodied the stuff either. Don't even mention that I've also done zero research on the process and had absolutely no idea what I would be doing. Perfect! Let's go! Hey, the only way to learn is to stare looming failure in the face and cackle madly. 1.21 GIGAWATTS?!!

But there was a monkey wrench. Unbeknownst to me at the time, porcelain slip dries fast. Really fast. Way before I expected it - even in a cool, damp garage - these two castings were too dry to claybody. Once clay is past a certain drying point, the likelihood of added changes taking well plummet dramatically. In this case, they'd probably just pop off in the fire or create cracks*. So I opted instead to carve them rather than add alterations; to subtract rather than add. Thankfully, it was far easier than expected and terrific fun to boot!

[*In hindsight, little did I know about porcelain's vitrifying properties and how they can be manipulated, but they may have lent themselves to claybodying even these too-dry pieces. But I'll leave that for the next post.] 

So here are the results from the subtractive claybodying, pieces #1 and #2. With them, I simply carved away what I wanted to change rather than adding anything. On the top one, I detailed out those braids and on the bottom one, I made them smaller and more "cigarette-like," as well as removing them from the tail in dressage fashion. On both, I changed the facial features, especially in the muzzle area.

So having had such a great time with those two, I decided to go one step further: Cast three more for additive claybodying. To do that, I popped each fresh casting into a gallon-sized ZiplocTM baggie with a damp wadded paper towel in the corner, carefully squeezing out most of the air before zipping it closed. This keeps the casting wet, something necessary for additive changes.

Here's #3 - in the middle of the claybodying process - in the "wet bag" to keep it damp. You can put your in-process piece back in the bag to come back to it later. It can "keep" in there for a couple of days, but not indefinitely. A spray bottle filled with water and set to a fine mist is also a useful companion to keep the piece evenly damp during the process.

For additive claybodying, I need "slab" and "paste" porcelain rather than runny slip. To do that quickly, I simply pour some slip onto a plaster mold and let it dry enough to still be damp and flexible, but no longer runny. I can keep it as a slab for manes, tails, or bridging expanses, or I can turn it into paste by smooshing it in my palm with some water, as follows...

I make fresh paste each time - it just works better that way.

You can keep slabs fresh in the wet bag, too, or you can prepare them for paste in the "mushpool," or damp cup. Anything left over after you're done gets put back into the dump bucket to be used again for future castings.

Here's #4 in the works. To add on pieces, like manes and tails, both surfaces need to be well "scored" with a sharp tool, then both surfaces are slathered in slip (the same slip used for pouring the piece in the first place). Only then can they be stuck together, squishing firmly to really marry them together and to remove any air pockets (which would cause the piece to explode in spectacular fashion during the fire).
 
 Oh nose! You can also cut apart the piece and reglue it back together in the same fashion. Here you can see #5 getting a reset nostril after scoring and slipping. I cut it away and reset it lower, so I could carve the skull downward for a more Iberian build.

 Using both these techniques, here you can see #4 with his roughed-out mane and tail glued on, along with his reset ear and resculpted jowl and nasal bone. All other changes were done by subtractive sculpting.

 Likewise, here's #5 during the "ugly stage," using these techniques.

 And here's #3 during the ugly stage. You have to keep your eyes on the prize at this point because it's so easy to get intimidated!
 
As if all this wasn't enough - guess what. I got another wild hair. Yeah, I told you. I get them a lot. I've been intrigued by the various ways other sculptors rendered the eyes on their sculptures, actually carving in pupils and even the "eye dots" (or omlats), to denote light reflection rather than just a blank orb. I've always wanted to try it and figured - why not now?  
 
Here you can see what I mean by "sculpting eyes" rather than blank orbs. Initially it took creative acclimatizing - it's definitely a very different way of interpreting de peepers. But I really like how they turned out! "Sculpting with light" this way was a thrill, and I'll definitely consider it again where appropriate. And truth be told, I also wanted to discourage the painting of these pieces down the line by others, to instead be appreciated purely as a sculpture.

 Here's the fired result on #3 - fun, huh?

The beautiful thing about slipcasting porcelain is that it allows me to present my work as pure sculpture. I've always been more of a sculptor than a painter, so this is both pivotal and inevitable for me, having developed towards it over the years. I've lost the compulsion to "color" my sculptures, realistically or otherwise, and even clear glaze interferes with light reflection on a bisque piece, especially with finer details. Yet earthenware is too porous and stoneware a snidge too grainy for some of the projects I intend to tackle. For this goal then, bisque porcelain is perfect - it's vitrious and captures light brilliantly. It's also universally accepted in the "hierarchy of media," making it ideal for submitting work into art shows, and one I can produce in my own garage no less.

So as a bit of foreshadowing, this project (and those like it) has an agenda: to train me for one-of-a-kind pieces in porcelain, in bas-relief, bust and full body. I've long wanted to see if I could do this, and these baby steps are a good beginning. Lots to learn, lots of mistakes and lots of surprises, but what would art be without adventure? 

Similarly, this minimization of "coloring" is how I intend to approach my bronzes and OOAK hand-built ceramic pieces, too. So extreme, in fact, that I'm also toying with the idea of sculpting in pinto and appaloosa patterns, and perhaps even markings. The eye treatment I gave to these claybodies opens up the door to that. 

So here's the whole group in greenware. In the top left is the original version, right outta the mold. Again, forget about the different manes and tails, ears and breed types - those are just superficial differences. Instead study the different fleshy bits, such as around the muzzle and eyes. No two horses manifest flesh in the same way, so no two sculptures should manifest flesh in the same way either. I'm looking forward to tinkering with the eye and ear anatomy more in the next batch.

Here are some muzzle and cheek close-ups of #2, #3, #4 and #5 to clarify the point (after firing). The musculature and features in these areas are different on each piece because they're different on each individual in life. Can't wait to expand on this theme to cram my mental library with even more tidbits!

Anatomy may be the rules, yes, but nature bends them with each of us. If it didn't, every horse would look exactly the same, as each of us would, too. So because every equine is a fresh take on a theme, it's a joy to apply a fresh eye to each sculpture as well.


 During the point of vitrification, porcelain becomes gooey and flexible, and so thin, suspended bits tend to sag. To prevent this, I could either stilt the area (something a bit beyond my skill level just yet - but stay tuned!), or a substance called "porcelain prop" is commonly used. It's a cotton-ball like substance made from inflammable glass-like materials which can be shaped to support those prone-to-sag-bits without becoming fused to the piece (in this case that sticky-outy ear). It's also reusable. Just be super careful with it, as it does have asbestos-like qualities. I also learned to use only the tiniest point of contact with the piece, and put it just below the contact point in order to "catch" the area at the point of sagging. Heat builds up between the two surfaces, which can cause a regional point of over-fire. Lesson learned!

 Cone 6: 2232˚! Big Al's hottest yet! He seemed quite pleased with himself. I could hear him bruxing. I think I even caught him boggling those peephole plugs, too. Happy kiln, happy heart.

So here they are after the mature fire of Cone 6:


#1

#2

  #3

 #4

 #5

To see them in their creamy porcelain goodness is such a treat! It's also interesting to see how the clay softened and where during the fire, and where it kept its crispness. Mental notes for next time. The shrink rate was impressive - I wish I took a measurement photo of them in greenware so I'd have something to compare them to after firing. Next time!

Anyway, #2-#4 will be available for sale today in my Etsy store. #1 and #5 will be available a bit later - I have a couple of hiccups to fix first. Yes - you can fix low-fire porcelain after the fire! I learned this by serendipitous accident (literally) and I'll walk you through it in the next blog post. 

The many incarnations of Reflective: (left) bare white resin (middle) earthenware [in process] and (right) claybody custom bisque porcelain. Can't wait to apply this to future pieces!

Nonetheless, claybodying isn't just for fun. When approached from this deeper angle, it's an extremely useful artistic exercise that stretches the Eye. Applying different anatomical interpretations to the same piece encourages us to search for the mercurial and serendipitous in life. We're compelled to pitch formula and adopt variability. This not only turns the depiction of this animal into a far more fascinating endeavor, but it adds individuality and "living moment" to our work, letting it spring to life in ways no other approach can.

So you can bet that more claybody customs (often shorted by the acronym "CBCM") on my bas-relief works will be forthcoming, and I'm so jazzed now to create more expressly for this purpose! The Fates were shining down on me the day Joanie introduced me to clay - Joanie, you rule! Go raibh maith agat a milliún! ("Thanks a million" in Irish.)

"In ordinary life we hardly realize that we receive a great deal more than we give, and that it is only with gratitude that life becomes rich." ~ Dietrich Bonhoeffer

Share/Bookmark
Related Posts with Thumbnails