Introduction
There’s a lot going on in Nature’s Moment, isn’t there? Inertia, physics, textures, action and reaction, happenstance…it’s a lot of chaos. Glorious chaos! But how do we make sense of it all as artists? As realistic artists to boot? As artists we have to decipher, organize, and translate things in a way that allows us to compose a design, and one that’ll work logistically with our media and purposes. But as realistic artists, we have to do so in a way that makes technical, believable sense but still works as an artistic composition.
Complicating matters, Nature isn’t always as expected! The body can achieve any number of odd, even goofy poses within its limitations and not all of them may be particularly workable with our design goals. Heck — some can even just look downright wrong, like if we actually rendered it as it was, someone would insist that we made a big mistake. Really, sometimes we would need that reference photo to defend our creative choice. But isn’t that amazing?! So many options, so many unexpected choices! Such is the nature of life with all the biology, physics, chance, and emotion encapsulated in any given discreet Moment so take the good with the goofy — because goofy can be good! Sometimes that little bit of awkwardness is just the complement needed to take the piece over the top with realism. Moment just happens and learning to identify, strategize, and infuse it into our art is an art unto itself, but a skill we can learn all the same. But how do we do that?
Well, first of all, what the heck is a “Moment” anyway? Simply put, it’s merely a split second of frozen time, a snapshot of life. That’s all, just a “freeze!” But make no mistake, a lot happens in a Moment! Movement, posture, expression, texture, goo, physics, action and reaction, cause and effect, tensions and relaxations, chance, balancing and counterbalancing, environmental effects…a host of observable things is crammed in there which when included, can take the realism of any piece to a whole new level. Indeed, every Moment is defined by all those little details of life that add so much energy and distinctiveness in the best ways. The pooching of a capillary, a flick of a mane tuft, a twitch of the muzzle, the brightening of an eye, the wrinkling of skin, a distortion of a muscle, a stretching of fascia, the balance shift from one leg to another, a rotation of the spine, flying dirt clumps, a flicker of eyewhites, a swish of the tail…things like this are happening all the time to change our subject and, absolutely, every little bit counts. Going further, there’s also the idea of the “Living Moment" as a reminder that not only is this snapshot energized by life itself, but it exists in a continuum of Moments strung together implying the existence of a pre- and post-history of our piece’s depicted Moment. Based on this then is the narrative, or the overarching storyline, the supportive backstory of our piece that can guide our creative decisions and fuel our inspiration. So it’s between the Moment and the narrative that our piece gains context, something that often lends more depth and emotional weight which can impact the viewer more deeply.
But — yes — all that stuff going on is a lot to take in and decipher. So again, how do we do that? Well, there are some artistic ideas we can apply here to help organize and showcase that busy Moment to make designing our work easier and more effective. Why is that important? Well, by lending structure to our process, we gain the clarity and incremental control needed to account for all that’s in our chosen Moment, and in a way that won’t overwhelm us or cause us to miss anything, either. Plus, when we have structure, we’re asked to pay a bit more attention and so can often pick out more things from our references or life study to infuse into our clay or pigment. When we get good at this, we learn to pick up on a Moment’s goings on automatically — we learn to See better. All those observable little touches will simply jump out at us more, and often as exciting new novelties we can explore in sculpture or paintwork. When we get really good, we can create beyond our reference photo with a more developed mental library, knowledge base, and the confidence to take our design any direction we want. And when we get really super good, we can use artistic tricks to even manipulate and magnify that inspiring Moment to really get the point across in our piece. All of that is the goal. So what are some of these ideas? Well, there’s a few of them and they’re very easy to apply so let’s dive in!
Establish a Baseline
Okay — so we’re looking at a horse and trying to decipher the Moment, but how do we pick all the good stuff out when there’s so much going on? Where do we start? Well, think of a horse in a neutral position: Posture relaxed and standing square, head in a straight, relaxed position, ears forward, and mane the tail down and straight, skin relaxed and goo more or less inactivated, muscles and tendons relaxed, and the expression is calm. That’s our template, our starting point so now anything that changes this neutral pose, tension, balance, texture, expression, and whatnot will be features of that Moment. (Now — yes — the neutral pose itself is a Moment, too! But we have to start somewhere, right?) Make this a habit in our study and the features of any given Moment will begin to really pop out, making our job all the easier and our explorations more curious, fruitful, and fun. In fact, it's not a bad idea to start making a list of all we See as a training exercise, detailing every aspect we can pick out. At first it may be general and span several Moments (like for life study), but do this enough and we can begin to pick out more things within a single Moment and then we're well on our way.
The Camera
Yep, the good ‘ol photograph is a tremendous tool for capturing Moments, by definition. So get a good camera, learn to use it, get out there and snap away, and most of all, really study the photos. Get down into every inch and study, asking questions like “Why is this bit doing this?”, and “How does this bit affect this bit and why?”, “Can I decipher what’s anatomically happening by taking clues from the Moment?”, and “Is this bit relevant to my piece?” With the body, look for cause and effect, passive physics (like with the hair), oddities and deviations from the expected, similarities and patterns between Moments, unique aspects or elements specific to that Moment, and other such details. What’s the expression? The gestures conveying that expression? (Look throughout the body as horses express with their entire selves.) The posture? Even a standing horse is moving and even a calm horse is expressing — every Moment is loaded with fascinating information so pay close attention to what’s captured in that photo. Study the ground, too. What's the footing? And what is it doing in response to the movement? Look, See, all of it. Then try to imagine all that in your media, imagine sculpting or painting it. How would we do that? What techniques are usable here? What tools and methods would we use? Do we need to create new ones to capture a particular element? Do these fun bits here — will they work with our concept? Then study other Moments, i.e. photos — loads of them — to compare and contrast to tease out both the commonalities and the unique features that can add such a fun touch to our piece. And photos can come from anywhere like ads, social media, magazines, stud books, books, calendars — any photograph — so we should absorb as much as we can. In fact, the apt student will study every photo encountered automatically, mining it for information and popping that into a mental library. Indeed, horse pictures truly stop being just pretty horse pictures and horse picture books become treasure troves of data!
When confident with photos then, take it to life study — get out there and soak up the Living Moment as much as possible with the real deal. Really See the subject, every square inch and study how everything works together, affected by and affecting everything else in a don’t-blink cause-and-effect continuum. There is no better teacher than the horse. And if we can, get up close and personal, really get in there to study — get close. And touch if we can to program it all in by running our hands over areas and feeling textures. In fact, grooming is a tremendously helpful way to program stuff into our noggins! Never pass up an opportunity to groom a horse!
Make all this a regular habit and our mental library and knowledge base will burgeon with options and possibilities but even more importantly, we’ll develop a more open mind about what Nature is truly capable of doing and so our previous “safer,” more conventional expectations won’t corral us so much anymore. And though we’ll become more prone to express our new discoveries, we’ll have those facts to back us up if needed. And all this open-minded discovery feeds our curiosity which further fuels more proactive study, and so it goes. Pretty soon, we’re humming along, able to decipher Moments as second nature as our confidence bumps up a notch and our work levels up! A photo can truly say a thousand words and learning to speak more of them will only make our sentences all the richer and our stories all the more interesting.
Consider the Narrative
We’re inspired to create our pieces for a reason…something within that Moment moves us, energizes us, interests us and so we’re driven to capture that. If we can pinpoint what that is from the get-go, we can actually design our entire piece to not only capture that Moment faithfully, but amplify it even more. Like let’s think on the concept that captured our attention — was it a mood, posture, structure, gesture, movement, idea, event or even something like music, film, or a theater performance? Hey, inspiration can come from anywhere! Or was it an emotion that was strongly attached to our inspiring Moment? Like was it a sense of drama? Spontaneity? Serenity? Romance? Quirkiness? Expression? Power? Aggression? Nobility? Dreaminess? Strength? Speed? It doesn’t have to be just one, either. Maybe there are a few themes at play, no problem! Or perhaps the intricacy or oddness of a pattern or curious tone of a coat or interesting ripple of a muscle is what captured our imagination — that counts, too. Or perhaps there’s an inspired storyline, a backstory, an imagined motivation that’s guiding the construction of our piece’s Moment? It could also be a special personality, a unique character we've met who has enticed our creativity? Few things are more inspirational than a special equine someone we've met.
Whatever the Moment’s inspiration is, lock onto it and create everything from that point and you’ll find that your Vision won’t only remain intact but will now have an intensified power that will really tell a stronger story. In other words, think of the narrative as the starting point to map out the rest of our design choices. In turn, our Moment for our narrative tells the story itself through its components so we're now asked to identify more of those to tell a more complete and compelling narrative, and so it goes.
“Traveling Eye”
The Moment is a complicated place with a lot going on, but not all of it will serve our piece exactly as we might need. To remedy this, there’s the concept of “flow,” of how the eye “travels” over the sculpture as a function of its design. That’s to say, it’s how the eye is drawn from interest point to interest point and where it travels inbetween to get there. Do that cleverly and it’ll all marry together to create a cohesive, “flowing” piece that keeps the eye from “stopping” or “shooting out” while preserving the Moment all the same. Indeed, we want to keep the eye moving around “inside” the confines of the piece as much as possible so the idea here is the continuance of line, form, effect, detail, color, and negative space that pulls it around. As such, we’ll usually end up with something that most people find very attractive, only they can’t quite put their finger on why, it just seems especially engaging all by itself.
We can also use flow to showcase those portions of the work we really want to highlight, bringing us back to our inspiring Moment. What aspects of our chosen Moment do we want to bring to the fore? Like maybe we really like that expression, so how can we make that centerstage? Or maybe we love the twist of the body and want to bring that to attention. Our imagined backstory needs to be front and center, so how can we develop that with the Moment we're presented? Plus, which aspects can be distilled down to traveling eye concepts? Is there a flick of the mane that’ll turn the eye back to the face? Is the angle of that articulated hindleg a nice foil to the tuck of the head? And hey, look — can we use that flip of the tail to pull the eye back to the body and ultimately back to the face? Take an inventory of all the the features of our references that’ll draw attention where we want it and use those…and those aspects that distract, consider ways to amend them. And that’s the trick here because when it comes to realism, sometimes we simply can’t erase bits of reality since those components need to be there in that certain way due to the nature of the Moment. So then, how do we work around them? Well, we turn them into focal points! Instead of denying ‘em, own ‘em! And then also look for passive things we can tweak (like hair) to manipulate the eye over these areas. Plus, this is where paintwork can come in especially handy because we can use pigment to draw the eye around those portions as well.
Because — yes — the traveling eye concept works beautifully for painting, too! Indeed, one of the things that many painters will do is doctor color and pattern a little bit to best flatter the piece. For instance, maybe adding that kissy spot is just the ticket to pull attention down to the nicely sculpted muzzle, or maybe an ermine spot will do nicely to pull the eye back to the detailed hind foot. Or perhaps we need to change the border of this tobiano spot just a bit to better balance out with the outstretched foreleg, or maybe those intense pangare effects could use some complementary balancing with some complex mane and tail shadings. Or it could be that the strong dark sooty shoulder we just painted could use a small hind half-sock for visual balance, pulling the eye back and forth; otherwise it’s just going to get stuck on that sooty area. Things like that are just some of the many considerations involved with designing an effective paint job. Now clearly, painters who do this know what they’re doing — they understand color, effect, and pattern enough to tinker with the rules — because while this approach can be an incredibly helpful method, if we don't know the rules, we're going to get into trouble. Really, it's one of the many reasons why a basic understanding of equine color genetics can be so helpful.
But it doesn’t end there — here’s a fun kicker for the mix: If we infuse a unique oddity into the flow, some bit that just seems novel, we can actually make the piece more memorable by intensifying the narrative of the Moment. Opposites can indeed magnify each other. We can think of these little events as “organic chaos,” that life chaos intrinsic to all Moments that once you start looking, you See it everywhere! So fun! But what in the world is “organic chaos”? Well, it’s everything that life tweaks as a function of every fleeting Moment, the actual components of the Living Moment itself, and it’s sometimes things we don’t conventionally expect. Like it could be the unexpected ripple of flesh, a random flick of a tuft of hair, a curious articulation of a leg, a momentary tweak in expression that adds a nuance, a squishing of wrinkles that seem to have popped up out of nowhere, a crinkling of fascia that creates a momentary texture, a morphing of muscle from motion, and so many others. This is where texture, fleshy morphing, expression, posture, gesture, and hair can really shine, too, along with extra touches in paintwork that add Momentary details. For instance, a flicked ear or swishy tail can go far to complement a standing piece, a cheeky expression using eye whites can help balance out a loud paint job, a novel flick of the mane can add a point of interest that makes the head and neck position so much more accentuated, some loud cat-tracking on the shoulder will pull the eye in a desired direction, or some subtle highlight and shading will place the eye on the nice muscling on the hindquarter. Considerations like that can be stacked and all add up. But organic chaos is also the genetic luck of the dice, the look of genetic randomness in a coat or structure. For example, how the ticking or lacy effects on a pattern look so randomized rather than regimented and orderly, or how an individual may have a particularly eccentric profile or tail carriage. In a very real sense, capturing organic chaos is perhaps the most difficult aspect of realism in either sculpture or paintwork only because the human brain is designed specifically to identify and recreate patterns, the exact opposite job! So be extra mindful of such features in a Moment because they're going to need special attention to get just right.
What’s more, flow can be used to amplify the visual of physics like making sculptures of running horses look like they’re going faster or bucking horses really look like they’re putting in extra effort. Like if we make the mane especially chaotic on a cavorting horse, not only do we add a lot of drama, but we make it look like that horse is really moving spontaneously and energetically. Now imagine that same piece with a more relaxed, subdued mane — quite a different effect, isn’t it? And sometimes we might want that more subdued effect! There is no real right and wrong answer with these things given they remain faithful to structure, physics, and our narrative. The point is then to identify and develop strategic focal points so we can best serve the Moment contained within our narrative, our concept.
Speaking of which, we can also use flow to “contain the energy” so it feeds back on itself, ramping up the viewer’s engagement even more. For example, we can use tendrils of mane flipping back to direct the eye back to the face, or the tendrils of the tail to shoot the eye back onto the body, strategic patches of color, pattern, or effect that keep the eye shifting between the neck, barrel, and hindquarter, or a leg marking that pulls the eye away from a complicated face to bounce back and forth. The more points that ping pong between each other, the better, because the last thing we want is for the eye to immediately shoot out of the piece altogether or get stuck in one place — surefire ways to lose the viewer’s interest.
Wrap it all up then and the traveling eye or flow is a unifier, amplifier, magnifier, and organizer of the Moment in your piece. It’s not surprising then that a lack of “flow” can result in a disjointed, awkward effect that visually interferes rather than forwards. It can even turn the viewer off entirely. Haven’t we all seen a piece and thought, “Gosh that bit is really distracting.” That’s when flow has been disrupted and it can really make or break an otherwise great piece.
Negative Space
Our piece isn’t just the sum of its parts…it’s the sum of its non-parts, too! In other words, the empty spaces, the holes between the positive spaces, the actual sculpture, count too. Indeed, there exists in negative space a whole ‘nuther sculpture around our piece which can be cajoled into visual partnership, too. So quite literally, all those empty spaces between the hair tendrils, between the legs, between the neck and the body and all those others are just as important as they relate to the whole picture and each other.
Here's an example of some general negative spaces and notice how they balance with the mare. For example, note how the head and neck position is mirrored by the negative space between the hind legs or how the big space under the belly helps to counterbalance the flippy tail.
As such, mapping out negative space can be a useful tool for deciphering positive space by problem solving “backwards” and providing a kind of second check system. So study the negative spaces in references and ask, “How does this relate to the horse’s structure or movement or posture?”, and “How does this negative space relate to other negative spaces?”, and “How does this negative space serve the flow of my piece?”, and “How does the shape of this negative space shape my sculpture?” For instance, a big billowing mane is nicely balanced with an active tail not just with the tail shape, but also by the big space left open between it and the body. Or the negative space between the hindlegs serves to balance that wild expression we’ve infused into the eye. Or the negative spaces between mane tendrils can counterbalance active forelegs. See how that works? You can build on each element with negative space to add more interest yet the effects of it are so subtle, the piece never feels forced or contrived. So learn to manipulate negative space well enough and we gain an under-the-radar tool with a big pay off.
Shaping Up
Know it or not, shapes can induce an emotional reaction. It may be unconscious, but we just tend to react differently to a circle, square, triangle, or trapezoid. Knowing how to engineer things using shapes then can really intensify our narrative’s Moment. Wait…what?…how?!
Well, for example, a triangle is a very dramatic shape, isn’t it? This is why it works so well to increase the sense of chaos or drama in the composition. Indeed, base any sculpture on a triangle and — bam — instant flair. On the other hand, a circle tends to instill a more coiled, controlled, intimate, dreamy, introspective feel. It’s also a very classic composition which is why those based on circles tend to have a rather stately, “classic,” even “traditional” feel to them. Likewise, a square tends to heighten steadfast stability, pride, and strength with its straight lines and measured negative spaces. On the other hand, a trapezoid introduces a bit of chaos and drama into the mix, like the triangle, but with a touch of stability, like a square. And we can layer them, too, since the regions of the body can be broken down into shapes as well. Like the circle composition of the tucked head and neck adds sweetness and dreaminess to the solid, stately stance of a standing pose. Then add in a bit of oddity — like twist the head a little bit and laterally bend the neck a snidge around — and BAM, we have instant charm.
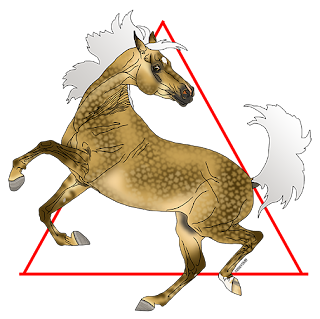


Here are some basic illustrations about how shape can influence the impact and help to guide our creative choices. Notice how each one has a different "feel" to it?
For more, designing the piece based on a shape is also a useful method for establishing a “containment field” for the eye that helps to guide all following creative choices. Like if we know our sculpture is based on a circle from the get-go, we can construct traveling eye pathways that work on that circle to intensify that impression. Think about it, a circle, square, triangle, or trapezoid all have different types of containment fields, all which have the potential to serve our Moment in different ways. For instance, maybe tucking the head just a little bit more and adding a curve to a tail tendril can pull the eye in a circle better to reinforce a romantic, dreamy feeling or maybe a flick of an ear and a swish of the mane can add a triangular aspect to lend drama and energy. When we have an overall guiding shape, how we strategize our choices takes on a more organized focus which can really forward our Moment’s narrative.
What’s the point? Shapes help us organize and prioritize our intentions and are so easily buildable and adaptable, they help us to take our concept where it wants to go. In other words, it’s fun and useful to think beyond simply just what pose we want or just what’s depicted in our reference photo, but how we can forward our chosen Moment through more deliberate choices, and using shapes can be a baseline for this. Definitely, a shape can also be that enigmatic extra “something” that just rings true in ways that lie just outside the viewer’s awareness. The piece just seems so intrinsically “romantic,” or “stately,” or “wild” or whatever, but the viewer cannot pinpoint exactly why — well, it’s probably a shape at work.
Line ‘em Up
Similar to shape, the use of line can activate the eye and instill more “feel” into the composition, too. For example, straight vertical or horizontal lines emphasize stability, control, and rigidity, while in contrast, diagonals amplify drama, tension, and energy. Also, the use of line can be done with both the sculptural aspects and the paintwork elements, so have some fun with both facets of design. For example, placing a rather up and down lighting strike tobiano markings on a moving piece can “root” it somehow to accentuate mass, control, and steadiness while, conversely, slapping a curvaceous pinto pattern onto that same piece can change it completely by creating a chaotic, energetic, dynamic feeling. We can even move the eye around. Let’s take diagonals, for example, which are really useful for this. Take that very same piece and paint it rich, dark chestnut then place a pale flaxen mane on it, a lovely red tail and pair them with a hind leg sock. The eye is pulled back and forth over the dark body diagonally between the lightness of the mane and the tail and the sock, creating a very active eye that’s constantly moving over the piece. Or take a concept that’s standing square and simply shift a leg diagonally — the front leg back or the hind leg forwards, for example — and we have more energy (through the diagonal line plus a new triangle in negative space) plus a new focal point to build on. So the more things we can line up and get our eye to travel to, the better. The name of the game is visual ping pong in all the piece’s interest points within the containment field of the shape, and deliberately “lining up shots” is a highly effective way to inject more energy into our piece.
This guy helps to illustrate many of the ideas here. For starters, notice how the tail echoes the arch of the neck? The bend of the foreleg, too? How the dapples pull the eye away from the face and towards the tail, to bounce back again? How the ermine spot on the right hind leg, the one under the belly, seems to "root" him somehow, making that foot seem like it's really carrying weight? How the diagonal set of the head position, right fore leg, and right hind leg lend energy and a bit of drama as opposed to being straight up and down? See how the turned ear creates a subtle curve with the right fore leg that sisters the curve created by the hindquarter and right hind leg? What else can you see?
Volley Back
On that note, we can use posture or the passive physics of the mane, tail, and feathers to bounce the eye back into the piece for another round of activation. Like if our eye tends to shoot out of the piece in one area — sometimes it can’t be helped because of realism’s believability confines — we can use the position of the head and neck or leg, or the curvature of a hair tendril to loop the eye back into the piece. Really, sometimes just a flicked tendril of mane will do it which is why, in particular, the hair is such a powerful tool for traveling eye manipulation. Put it to work — it’s fun and fascinating! Point being, pay attention to any areas where the eye tends to shoot out of the piece and try to counteract that with other design choices. We usually want to contain the energy of the depicted Moment and we help to do that by volleying any loose energy back into the piece with pinpointed, strategic tweaking.
Patchwork Strategy
Using areas of detail or color can also work to pull the eye around the piece to lend both cohesion and contrast for some drama that just seems so natural, it seems invisibly executed. Really, a splash of color here or a dollop of detail there can really work wonders to tease the eye around the piece without it ever knowing it’s being played. Because as we designed certain areas to be highly detailed like the face, the shoes, the hair, the ticking, we also designed areas that attract the eye, so put these areas to work! Use them to pull that eye around. Like a common mistake is to make a highly detailed head but relatively little attention paid to the rest of the body. The thing is, body regions should have a comparative amount of detail to both make for a cohesive piece and to keep the eye from inevitably stopping at the most detailed area. In particular, we have our work cut out for us with the face which is naturally highly detailed, and so we’re naturally, even automatically drawn there as a visual species. So as a sculptor or painter, we should be strategizing ways to pull the eye away from the face and back over the piece because this will inevitably create an active system since we’re typically always drawn back to the face. For this with paintwork, for example, dapples, effects, markings, and patterns can be used effectively to move the eye around. Just as effective though is the use of strategic color blocking or intensity of color on targeted areas of the body to activate the eye and counterbalance other focal points. Take a dark sooty bay, for example, those patches of brighter reds on that dark body act as magnets that pull the eye over the piece so don’t discount the power of your palette! Or perhaps a star and hind sock will pull the eye diagonally across the piece but then add a tuft of uplifted mane, and the eye is now traveling in a loop, point to point to point, between those three markers. There are also tricks we can use like placing a sock on a foot that’s placed farthest out from the body to really draw the eye back there for more drama whereas placing that sock on a leg that’s more under the body will place the eye in a more centered spot and so lend a greater sense of stability and weight. Or with sculpture, for instance, that patch of wrinkles will be an instant focal point so think about a strategic touch to another part of the piece, or even something in the paintwork that will create a volley-back dynamic. Or that strong expression we sculpted will do even better with a complementary counterbalance such as a flicked tail or active hind leg. It all depends on our goals for the piece so play with things to see how they all work to shift the energy of the Moment in the composition.

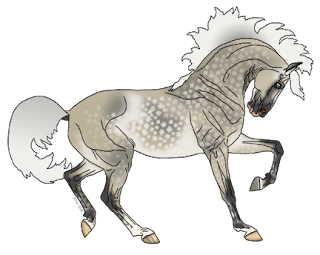
This flashy fellow also illustrates a lot of the principles discussed here. Note how the dappled sooty shoulder and neck on the front half counterbalance the loud pattern on the back half? How the flamboyant flip of the tail balances with the arch of the head carriage and flippy mane and the fore legs? How the shape angulation of the right hind leg mirrors that of the left fore leg? How the bay patch on the flank balances with the white patch on the triceps? How the big blaze on the face draws the eye which is then bounces to the big patches of coat color on the hindquarter and back again across the body? How the flow of the spots from the flank goes up to the crest to take us back to the head to then be draw to the left fore leg and back to the flank? What else can you find?
Now granted, sometimes we can’t design every little thing about a piece because realism dictates certain things have to be a certain way. Like we can’t design like Dali or Picasso and put body parts in fantastical positions that serve an abstracted composition. We have rules. But this is precisely where knowing what to strategically tweak and how we can tweak it can be so helpful. Really, the rules are there as definite guides, but don’t forget just as Nature plays with them, so can we!
Tracking
But don’t stop there! We can layer all these components together to create complex “eye-tracking” pathways over each other, increasing the complexity, intensity, impact, and sophistication of our depicted Moment. Hey, draw in these lines on a photo of our piece and it might look like a ball of yarn! That’s good! Absolutely, the more the eye is drawn from point to point, detail to detail, space to space, the more the eye participates with the piece and so the more engaging our composition. Really, sometimes folks don’t know quite what appeals to them about a sculpture, but chances are it’s the subtle engineering that went into every aspect of the piece that helps to draw them in and hold their attention.
Everything Counts
Sometimes it doesn’t take much to make or break a piece. A simple angulation, little detail, or perhaps a use of color can either add the final perfect touch or the touch that distracts. Let’s say you’ve created a lovely sculpture of a galloping mare in the extended phase of the gallop, designing her to accentuate a sense of speed and energy, and have painted her a lovely deep-shaded bay. Yet you’ve neglected to tone down that orange undercolor on the hip area there and it has no counterbalance and so the eye is continually drawn to it, away the rest of her wonderful aspects. Because the eye can’t ignore it and gets stuck there, it becomes a distraction, a visual nuisance. So what could we have done in the sculpture or paintwork to add counterbalance? Everything builds on everything else. Or for another example, you’ve created a beautiful piece based on a circle, designed to exude drama and romance. However, that hindleg is placed a bit too outside the line of the circle which is stopping the eye and compromising its flow. But just pull that hindleg a bit more forwards and the problem is fixed and we have a more flowing, engaging piece all of a sudden. Every aspect counts.
When it comes to the details contained in our Moment, it can be handy to have some of those elements work together fluidly to create a more flowing, cohesive piece even if we have to tweak a thing or two. We are talking about art, after all. Indeed, if we can tweak an element or two to forward the overall impression of the sculpture in some way, we can engage the viewer more all while reinforcing a more compelling story.
Another Point of View
Similarly, sometimes we need to See things from another perspective to tease out what’s actually going on in a Moment and we can do this with some simple artistic exercises that give us a brand new viewpoint or "fresh eye."
For one, we can create a situation that entirely removes distraction so we can really focus on what we’re looking at. We do this by creating an actual kind of picture frame that filters everything else out when studying references, and we simply use a plain sheet of printing paper. For this, take a sheet and cut out a 1” square window in the middle. Doesn’t have to be perfect, we just want a window of about 1x1” big. (The smaller the reference photo, the smaller the window.) Then lay that sheet on top of your reference photo and study only those things inside the window, slowly going over the entire image. What can we see? Texture. Delineations of muscles, tendons, and ligaments? Color, pattern, detail and effect? Shapes and curves? Concavities and protrusions? Details like wrinkles, veins, capillaries, nerves? Little fleshy smooshy fun? The more we can pick out, the better because, in fact, there are loads of things packed into every inch, isn’t there? Things we maybe didn’t see before because we were distracted by the whole? But make this an artistic exercise with every reference photo and we train our Eye to really start picking out things all by itself as we learn to See with more acuity.
For another exercise, invert the image in a photo editing program so the light areas become dark and the dark areas become light. This is especially useful for pattern interpretation, and especially with dappling or appaloosa spots because this technique really makes them stand out in a fresh new way. But it works well for deciphering muscles, legs, and facial structure, too. Basically, by seeing a feature with a fresh eye like this, that shock to the system reorients our objectivity and so we’re often able to pick out additional information we couldn’t See before.
For another, we can reverse our references and an image of our piece to See things backwards, which is another handy way to regain an instant fresh eye. Our eye can become accustomed to what it's seeing and so will miss things it otherwise might have caught, so switching things up like this can go far to recalibrate its ability to pick things out again. Honestly, it's pretty uncanny how different something can look backwards!
Similarly, another useful trick is to regularly look at our piece “reversed” in a hand mirror to give us an instant fresh perspective. Just periodically stopping and checking our work this way can help us problem solve on the fly with an instant fresh eye. As mentioned, our Eye can become habituated to a certain viewpoint, a certain way of Seeing our piece, and so many issues can become invisible to it over time. No worries — it’s normal, a part of the process, so we just work around it and using a handmirror like this is a particularly effective trick. Boom — things invisible to us before can become really obvious and we’re left wondering, “How did I not see that?!” Try this with references, too! It can really help us See things in a new way and even pick out features of a Moment we might have missed otherwise.
Another trick is to shrink down or enlarge our reference photo to the size of the sculpture we’re working on to get a better sense of scale, something particularly helpful with painting patterns, dapples, and effects as well as for facial, wrinkle, or detail sculpting where scale can be a big concern. Scale is everything when it comes to realistic equine art — in fact, we can argue that achieving perfect scale is all that we’re really striving for. That our job is simply a study of accurate scale, of proportion. Think about it, get everything put together in perfect scale and we automatically have ourselves a finished, nicely done piece, right? This is why if one aspect is out of scale, it becomes a distraction, doesn’t it? It’s a sink that traps the eye there, making it a quick way to prevent the brain from suspending reality, too. So if we want to forward our Moment best, keep things in as perfect scale as possible, even if that means mimicking features or effects rather than literally translating them (like on the smaller scales). For instance, the hair by hair technique sure is pretty and can be immensely convincing for certain effects, but it can easily go out of scale if we aren’t ever-vigilant. Or focusing too intently on sculpting the eye or a nostril often causes it to become too big, or the same thing can happen to the entire head. Or not being careful with the nail heads we apply to the hooves can cause them to grow too large and blobby rather than staying tiny and rectangular. Or perhaps we lose sight of the big picture and so our muscles become too enlarged or bulky, well beyond what our references show. The point is that what we intently focus on has a tendency to grow in scale, so paying attention to scale at every step is a highly effective way to ensure the realism of our Moment.
Sculpt or paint upside down, again trying to shock the system with a new perspective. This technique is particularly helpful because it abstracts everything and forces our brain to stop anticipating things and to just render what’s there. This can be important at times because the brain is absolutely fixated on its preferred formulas, regimentation, and habits and will always unconsciously default to them if we aren’t careful. Now all this is just fine because these things are sometimes necessary for realism, right? We have biological patterns we’re tasked with duplicating on every piece, yes? And our habits feed our artistic style, that special “look” to our portfolio that makes our work so distinctive and lends such diversity to this art form. And sometimes regimentation is necessary for certain aspects of structure or coat effects. But at the same time, we do need to break beyond them at key times to really capture the organic chaos of our Moment more accurately. So definitely, we can’t be too married to our formulas, regimentation, and habits; otherwise we’re going to miss all that. On the other hand though, if we get confused in an area, just turning everything upside down usually makes deciphering things easier and more effective because our expectations are taken out of the equation. "If in doubt, turn it about!" So if we’re tackling a particularly complex area, think about rendering it upside down first for an immediate refreshed point of view. We can always turn it right side any time, but starting out upside down can be a handy trick for tricky areas. Indeed, our expectations can really hose up our efforts and can even hold us back which is why maintaining an open mind with as little expectation as possible is so key for rendering realism. Nature just throws too many curveballs! It’s so organic, adaptive, and loosey-goosey with some of its rules that if we aren’t open to all that, we can miss all that great stuff!
Conclusion
Nature always provides a multitude of little gifts for our work if we learn to See them, and it’s the Moment that encapsulates all those fleeting little treasures into a tidy “present” that can be so fascinating and inspiring, laden with new options and possibilities. Nevertheless, both the sculpturework and the paintwork should stand alone as well as work together in all this. In other words, the “naked” sculpture should be so well designed, it doesn’t need paintwork, that it could simply be left unpainted and still work beautifully. Likewise, the paintwork should stand alone on its own merits, too, and work to enhance rather than distract or compromise the overall impression. These two need to be worlds unto themselves before they work together, but — yes — work together they can, and beautifully! So feel free to layer all these ideas together between the sculpture and paintwork which can be designed as simple or as complex as we want them to be, so have at it! Really, no matter how we put it all together, providing some continuity for the eye will ramp up the appeal of any piece.
Because, wow — yes — there’s a lot going on in any given Moment. It’s a lot to take in, process, and incorporate so we have to be meticulous, observant, and above all, curious. Truly, a healthy dose of curiosity in everything we do instantly injects our efforts with more potency and intent so slather that stuff around! When we always make one of our goals that of exploration and discovery, we aren’t only going to pick out more Moment fodder, but progress a lot faster doing it. So make it a kind of treasure hunt to pick out a Moment’s features to then strategize them. It’s amazing what we’ll find once we start looking and fascinating to see just how much it can improve our work.
Because it’s our eye that first draws us into a piece and once attracted, it likes to participate. Adding in features of the Moment does a lot for this as well as jacking up the believability of our piece. Yet if we go further and use them strategically, we can really imbue our piece with a lot more impact to engage the viewer more deliberately and dynamically. The point is, with a little bit of forethought, we can design many elements of our piece to capture not only more of the Moment's reality but also in a way that grabs the viewer and holds on. Sure, working on a whim is super fun — never stop doing that — but injecting a bit of strategy here and there can be even better for adding interest factors with purpose.
Wrap it all up then and the trick the Moment actually gifts us with is the power to make informed, credible decisions from a bigger menu of viable possibilities. And that’s the name of the game in realism: Ferreting out options. Why? Well, it helps us avoid stylistic habits or formulaic interpretations that can cause our portfolio to plateau or homogenize. If the Moment is different every second, so must be our work, right? If Nature deviates from the expected formula at times, so must we, yes? The Moment also encourages us to remain students with open minds and risk-taking hearts, resistant to conventional or “safe” expectations, including our own. It frees us from the confines of anatomy charts and diagrams and especially from other peoples’ rigid idea of what’s “right,” allowing our inspiration to go where life itself leads. We also gain the ability to mine more information from our references and life study, always a welcome outcome by making our work more realistic and accelerating our progress. Absolutely, the more we See, the more lifelike and immediate our work. We also gain confidence and invigorated curiosity because we’re able to make more expansive and conscious creative choices rather than simply parroting what we half-see. This, in turn, gifts us with the freedom to take our piece in any direction we want but with the authority to back it up, and that’s an incredibly freeing place to create. But perhaps most of all, sculpting or painting becomes an exploration, a new opportunity for discovery of all the secrets a Moment holds for us, compelling us to dig deeper into it, our knowledge base, our skillset, and ourselves. Make that a mantra and every Moment will become a gifted meditation, one that will steadily and surely inspire our skills forward. There is always more to See in a Moment and so always more to infuse into our work — what a wonderful proposition!
Moment by Moment, we develop a body of work because that’s all we ever sculpt or paint, right? The Living Moment. That’s it. But look what power it has! Look at all the possibilities already created and countless more still to come! It’s nuts and nuts awesome! Truly, we can focus on a single subject our entire life and never even touch the tip of the iceberg! How fabulous is that?! Every Moment is a singular dollop of time, laden with its own unique beauty, profundity, magic, and possibility worthy of our attention. So slow down, stop, pay attention — it’s good for you and your art. Take the time to notice all the gems nestled in every Moment and our storytelling will be all the richer for it. When we start to consider what a Moment is truly offering then, we not only gain more subject fodder, but even better, a deeper appreciation of the present and through this, perhaps a deeper connection to our subject. Because that’s what being an equine artist is really about — telling an equine story, and the Moment shows us so clearly how beautiful, intriguing, and complex a story that can truly be.
“Always hold fast to the present. Every situation, indeed every moment, is of infinite value, for it is the representative of a whole eternity.”
— Johann Wolfgang von Goethe


